Peach Melba & Vanilla-Cardamom Ice Cream

peach-melba-vanilla-cardamom-ice cream Just give me a cup of soothing vanilla ice cream topped with fresh fruits and raspberry sauce once a day in summer and I promise to become your slave for the season! Or perhaps you'd like to share some of my delicious Peach Melba, a classic summer dessert that's easy to assemble and worthy to be served at a royal wedding. I have always been a fan of ice creams, and though I love tropical flavors more, there's a charm about vanilla ice cream that is hard to replicate, especially if you decide to serve it with some fruits or toppings. Peach Melba is one such brilliant French dessert that combines 2 best fruits of the summer season, peaches and raspberries, alongwith my vanilla cardamom ice-cream; it looks beautiful, tastes fantastic, and will totally earn you brownie-points at a summer party! Luscious, decadent, yet healthy, easy and flavorful at the same time, you can't ever refuse this classic summer dessert!

Though summer is dominated by berries, peaches and plums come pretty close at the second spot! Luckily for me, I love them both, so when my cousin gave me a batch of peaches and plums, picked fresh from her garden, I was thrilled, as it meant more desserts and tasty treats. I prefer nectarines for their juicy texture, but peaches work great when they are poached or grilled. So while I still have a few saved up for our 4th July bbq event, using them to make this Peach Melba was indeed a wonderful decision! Off this goes to Mike who's collecting Frozen Treats! And it also goes to Andrea's Grow your Own event, to celebrate the home-grown peaches!

Ingredients

Cardamom Ice Cream
2 cups milk
1 cup sugar
2 cups cool-whip (or heavy whipping cream)
2 tsp vanilla essence
2 tsp cardamom powder

For the Peaches
1 cup water
1 cup sugar
1 tbsp lemon juice
3 peaches
1/2 tsp vanilla essence

Raspberry Sauce
2 cups raspberries
1/4 cup confectioners' sugar
1 rbsp lemon juice
toasted almonds or fresh raspberries - for garnish

Method

Vanilla-Cardamom Ice Cream
Combine all the ingredients and stir briskly for about two minutes until sugar is dissolved. Then pour into a 1-gallon ice cream freezer can and freeze according to manufacturer's directions. If you don't have an ice-cream-maker, cover the mixture and freeze it for 4 hours; then remove and churn again on "whip" setting in a blender to make it smooth and creamy. Again freeze it for 4 more hours, then repeat the churning process. Finally, set it in the freezer for 8-10 hours till it is entirely set and frozen. This is a time-consuming procedure, but works well to get the machine-like smooth & creamy texture!

Poaching the Peaches
Cut the peaches into 4 quarters per peach. Put the water, sugar, lemon juice, and vanilla essence into a wide saucepan and heat gently to dissolve the sugar. Bring the pan to the boil and let it bubble away for about 5 minutes, then turn the heat down to a fast simmer.

Cut the peaches in half, and if the stones come out easily then remove them, if not then you can get them out later. Poach the peach halves in the sugar syrup for about 2 to 3 minutes on each side depending till they become soft, but not mushy. They should still hold their shape and weight. Remove them and keep for later. When sufficiently cool, peel off the skin.

Raspberry Sauce/Coulis
To make the raspberry sauce, blend the raspberries, confectioners' sugar, and lemon juice in a blender or a food processor to form a smooth thick sauce. Sieve to remove the pits and pour the puree into a jug. If you use frozen berries, make sure you thaw them well, then soak them in water for 10-15 mins before making the puree.

Assembling the Peach Melba
To assemble the dessert, take a wide dessert bowl or a glass. Place 2 peach slices on one side, and add 1-2 scoops of ice cream. Spoon the raspberry sauce over each. You can garnish with some toasted almonds or a sprig of mint if you like. I used some more fresh raspberries just to make it more colorful!

Enjoy your delicious Peach Melba with Vanilla-Cardomom Ice Cream and you'll be able to beat the summer heat!!

Related Recipes:
Panna-Cotta with Balsamic Strawberries
Mango-Mascarpone Mousse(Mango Kulfi)
Raspberry Swiss Roll Cake
Mixed-Berry & White Chocolate Pudding


Read more!

Fiesta Del Mar Mexican Restaurant - Mountainview (bay-area)

fiesta-del-mar mexican restaurantIf you are craving authentic Mexican food, try the Fiesta Del Mar restaurant in Mountainview downtown, and I'm sure you'd thank me for it! With 2 locations, one on Shoreline and another on Villa, you are all set to get some margaritas and some delicious and spicy mexican food, which has been modified a bit to suit the American palate. Literally meaning "celebration of the sea", this promises to be a treat for those who love mexican sea-food. But they also have several other equally delectable options to choose from, including vegetarian. With an ambiance that totally transports you to the shores of Mexico, and food that keeps you wanting to come back for more, the Fiesta Del Mar is an ideal weekend restaurant for dinner!

We went to the downtown location, which, by the way, is called Fiesta Del Mar Too, thought I have no idea why that is so! The bright and colorful decor welcomes you to a world that is so typically Mexican. There's a small bistro area up-front, including a bar area, as soon as you enter the restaurant. Be prepared to wait for some time as this place is pretty famous and almost always crowded, especially as they do not take prior reservations. After giving your name at the counter, you'd probably have to wait outside the door as there's no waiting area, per se, unless you want to stand behind the bar! But you can surely kill some time enjoying the colorful decor and Mexican artifacts; the walls painted in blue, green and red are not as garish as they sound, and almost every wall has a huge shark or whale sculpture hanging on them. The furniture matches the ambiance and is painted in colorful patterns too, but has an appealing charm to it. There's another passage where there's more seating, more suited for families or intimate couples. The whole place has a happy feeling to it, if you know what I mean!

Once seated, a cordial waiter will help you with the house specials and the menu, and leave on your table a basket of fresh tortilla chips served with 3 different kinds of salsa, all of which are pretty spicy; the green tomatillo salsa with chunks of white onion, a blended red salsa with a smoky chili taste and finally the traditional red chunky salsa. Everything on the menu is good, seriously, and most meals come with beans and rice or side-salad! We went for the Drunken Fajitas, the Veg Burrito, and the Verano Enchiladas topped with green sauce, which I have to say, was something I've never tasted at a mexican restaurant before. The helpings are generous, and the specialities include Shrimp and Salmon. Entrees can be ordered as combos, which work great if you are the sharing-type. The food is tasty, and the flavors are like a fusion, with a touch of italian or american spices, keeping the American clientele in mind. But it is delicious, and that is all that matters!

You CANNOT go to Fiesta Del Mar and not order a "margarita", unless you'd prefer their "tequilla"; we had the Blue Dessert and the El Boxeador, but I also had the Virgin Pina Colada, which I think was the best I've tasted in some time now! With 100% Blue Agave tequilas, and home-made sweet-n-sour key-lime juice, the drinks are the highlights on the menu.

"Fun, colorful and spicy" is how some people would probably describe Fiesta Del Mar, and they would be totally true in saying that! We did not expect this place to be so good, but I'm so glad we found a great mexican restaurant that's different and definitely delicious. As any other restaurant in that area, this place is priced a little above average, but with bigger portions, I don't think it can be called over-priced. As long as you are prepared for waiting (at least 20-30 mins), do not mind noise, banter and high-spirited atmosphere, you are sure to enjoy Fiesta Del Mar restaurant for their amazing mexican food, great service, and a fitting decor!

Address:
1005 N Shoreline Blvd
Mountain View, CA 94043
(650)965-9354

735 Villa St
Mountain View, CA 94041
(650)967-3525
Fiesta Del Mar

Fiesta Del Mar Too on Urbanspoon


Read more!

Mandarin Thai Tofu Satay (Stir-Fry) & Jasmine Rice

mandarin thai tofu satay
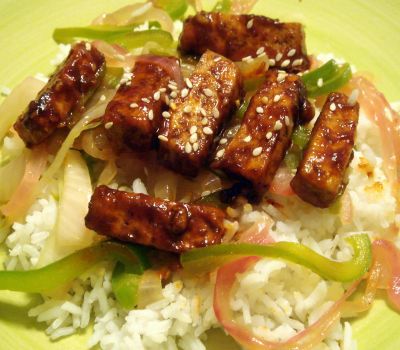
I first tasted Mandarin Tofu Satay in a quaint walnut-creek Thai restaurant, and was immediately taken in by the taste. I'm not a fan of tofu, yet I was totally blown away by the Thai Tofu Satay, which was basically grilled tofu marinated in thai sauce then drizzled with a typical mandarin sauce made with red-curry paste, soy sauce, sesame and peanut sauce. And then recently, I saw a recipe for the classic Mandarin Tofu in Jeanne Lemlin's cookbook, and I knew it was time to take my Thai cooking to the next level! Sweet-n-sour, with a spicy red-pepper kick, I combined the satay with a stir-fry and served it over plain white jasmine rice. The result of this expriment was a beautiful and inviting platter with chunks of marinated, grilled and pan-fried tofu, emanating numerous flavors and aromas that are so typically native to Thai recipes!

I have made Thai Green Curry before, and it was time to try the Red-curry this time. I am going to list the basic recipes in another post, but for now, let's indulge in a fusion of flavors with the recipe below. Traditioinally, Satay is made by marinating the tofu, then grilling it on skewers and serving it with dipping sauce. But here, I've modified the recipe to stir-fry the Tofu rather than grill it, so it can be served over Rice. The addition of mandarin and wasabi is what sets this recipe apart, and is perfect for those who love spicy food! Off this goes to Kaykat, for her Think Spice-Think Wasabi event.

Ingredients
1 pound extra-firm tofu - cut into 1-inch cubes
1 bell pepper - cut into thin strips
1/2 onion - cut into strips
** cut veggies into cubes if you intend to grill using skewers
2 cup plain cooked jasmine rice
crushed peanuts or sesame seeds - for garnish

The Marinade
2 tbsp soy sauce
2 tbsp sesame oil
1/4 tsp wasabi
2 tbsp sherry (optional, but recommended)
1/4 tsp red-pepper flakes (optional, this can get really spicy!)

Mandarin Sauce
2 tbsp coconut milk
3 tbsp peanut butter (or thick peanut sauce)
2 garlic cloves - minced
1 tsp red-curry paste
1 tbsp brown sugar
1 small mandarin - sliced, and skin removed
1 tbsp lime juice or vinegar

Method

Tofu Satay
Mix the ingredients for the marinade and set aside. Take the tofu cubes, pat them dry to remove water content, then toss them into the marinade and let it it in the refrigerator for at least 30 mins.

Mix all the ingredients for the Mandarin Sauce and blend to a smooth paste in a food-processor. Make sure its smooth and there's no residue, especially of the mandarin skin. check for your taste, and add seasoning if necessary.

Now take about 4 tbsp oil in a pan, and shallow-fry the tofu pieces in it. keep turning around so that it does not burn, yet wait till it becomes hard on the edges and turns golden-brown in color.

In another wok, add 1 tbsp oil and saute the onions and bell-peppers till glossy and cooked. Add the prepared sauce to it, then toss in the stir-fried tofu. Mix everything well together till evenly coated. Adjust for taste, then remove from flame and set aside.

Grilling or Roasting the Tofu
If you are grilling the satay, thread the tofu, bell peppers and onions on the skewers. Meanwhile, prepare the grill or preheat the oven to 450 degrees. If you are roasting the tofu in the oven, place it in 1 layer in a large, shallow baking dish such as a 9 x 13-inch lasagna pan for 20-25 mins. Drizzle half of the sauce over tofu, and use the remaining sauce to serve with the Tofu Satay

When ready to serve, start with a layer of cooked rice, then top it with the Tofu Satay. Drizzle remaining sauce over the dish, then sprinkle some crushed peanuts or sesame seeds over it. Enjoy your delicious Thai Tofu Stir-Fry, complete with scintillating flavors of mandarin, wasabi and the ever-traditional soy and peanut sauce!

Related Recipes:
Tofu & Basil Thai Soup
Vegetarian Tom-Kha-Gai Soup
Sweet & Sour Potatoes with Mango


Read more!

Vanilla Panna Cotta with Balsamic Strawberries

panna cotta with balsamic strawberries 
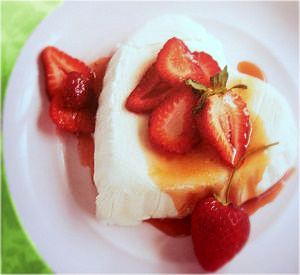
Vanilla Panna Cotta with Strawberries is a refreshingly light yet extremely popular Italian dessert. Literally translated as "cooked cream", this is a rich and creamy custard, topped with berries, caramel or chocolate sauce. When I heard about it for the first time, I was skeptical; pepper and vinegar in a dessert?! doesn't sound very inviting. But I courageously tasted it at a cafe once, and I have to tell you that I was impressed! The sweet and creamy pudding was rich and delicious, and the balsamic strawberry dressing indeed added an element of spice; with just a tiny hint of black pepper, it beautifully compliments the sweetness of the custard. Playing around with flavors, I tweaked the classic traditional recipe with some interesting additions to give you my version of the divine dessert - Panna Cotta with Strawberry Coulis!

I took inspiration from Chef Mario Batali's Panna Cotta with Strawberries recipe, but modified the strawberry sauce considerably by adding orange zest and mint, and reducing the amount of black pepper and balsamic vinegar. I also added some cardamom powder to my Panna Cotta, and used greek-style yogurt instead of plain whole-milk. Overall, this recipe is a sure-shot winner, and definitely makes for a sophisticated yet easy dessert for dinner parties! And it looks extremely pretty too! This strawberry dessert is on its way to Cooksister's WTSIM-Berries event! check out some cool recipe variations at the end of this post!

Ingredients

Panna Cotta
2 tbsp water
1 1/2 tsp unflavored gelatin
2 cups whipping cream
1 1/4 cup greek style yogurt (or whole-milk)
1 tspn vanilla extract
1/2 tspn cardamom powder
1/2 cup sugar

Strawberry Sauce
10-12 medium strawberries - hulled & sliced
2 tbsp sugar
3-4 mint leaves
1/4 tsp orange zest
1 tbsp balsamic vinegar (optional)
1/4 tspn finely ground black pepper (optional)

Method

Vanilla Panna Cotta
Pour 2 tbsp warm water into a small bowl. Sprinkle gelatin over water. Let it stand until softened, about 15 minutes.

Whisk 1 cup cream, yogurt/milk, and vanilla and cardamom in large bowl to blend.

Heat the remaining 1 cup cream and 1/2 cup sugar in a small saucepan over medium heat, stirring until sugar dissolves and cream comes to simmer. Remove from heat and set aside. Add the gelatin mixture to the cream, stirring continuously to dissolve the gelatin.

Now mix the hot cream & gelatin mixture into the yogurt mixture in bowl. Divide the mixture among six ramekins or moulds, using about 1/2 cup for each. Refrigerate desserts uncovered until cold, then cover and refrigerate overnight.

Dressing the Strawberries
Toss the strawberries, vinegar, sugar, orange zest, mint leaves and pepper in large bowl to combine. Let stand 30 minutes, tossing occasionally, to allow the fruit to macerate and soak the flavors. Adjust sugar according to your taste if needed, then cover it with cling wrap and keep it refrigerated until serving time.

When ready to serve, unmould the panna-cotta by inverting on a dessert plate. Remove the mint leaves from the strawberry sauce. Gently layer the custard with the sauce and garnish with a fresh sprig of mint if needed.

Variations: You can also puree the strawberries and add it to the panna cotta mixture to make Strawberry Panna Cotta. Add a hint of orange zest to the cream mixture instead of cardamom. Or use some other essence like almond or saffron. Feel free to experiment with your choice of flavors or fruits for the topping.

Panna Cotta & Strawberries with Balsamic Vinegar is a popular dessert at many restaurants. It serves to be a light yet elegant and easy dessert at several occasions. The dressing in the strawberries compliments the sweetness of the pudding, at the same time giving it a unique sweet and spicy taste that lingers long after you have finished your dessert!

Related Recipes:
Low-Fat Strawberry-Vanilla Cake
Mixed-Berry & White CHocolate Bread Pudding
Traditional Vanilla Pound Cake


Read more!

Natural Fruit Facials For Healthy Glowing Skin

peaches-fruit facials
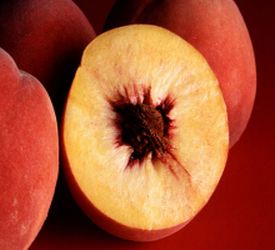
Most of us are aware about the health benefits of fresh fruits, and we also know that most of the nutrients and vitamins in fruits lie in their skin and pulp, and just as they are useful to the body, these nutrients can serve to be excellent scrubs or re-vitalisers for our skin too! Natural Fruit Facials have been preferred since centuries to get a healthy skin that glows. If you know the properties of each fruit, you can pamper yourself with an all-natural fruit mask, without spending too much time or money. And this is the best way to use old, over-ripened fruits that can no longer be eaten raw! Here are a few fruits that can help you get a smooth, healthy and toned skin. (img credit)

This may seem like an off-topic post, but seriously, it has been wonderful to use some of my mushy fruits to pamper my face over the weekend! And as I'm sure every woman loves pampering, I thought I'd share with you these simple tips! Different people have different skin tyes, and each skin reacts differently to a fruit mask. So its advisable to know your skin type first before using any products on your face or skin, and even after that, always test a small area of your skin, preferably the elbow. And since I'm not a beautician, just a normal person like you all trying to achieve a naturally healthy skin, please use this post merely as a guideline! Here is a nice writeup on Skin Types, and also some more natural fruit facial recipes

Before & After a Fruit Facial
When using any fruit mask, wash your face and neck before applying the mixture. Apply the fruit mask gently with your fingertips, avoiding the delicate area around your eyes and lips. Leave the mask on for 15-20 mins, then wipe your face with a soft warm towel and rinse your skin thoroughly with luke-warm water. After this, splash some ice-cold water on your face to tighten your pores, then finish by applying a coating of light lotion (with SPF 15 or higher) over your face.

Listed below are some common fruits that can be used as face-masks due to their specific medicinal properties. Again, DO NOT use any of these without a proper patch-test on your skin to see how it reacts to these fruits.

Peaches
The alpha hydroxy acid (AHA) in peaches makes this a great mask for general skin renewal. It helps reduce wrinkles, remove dead skin, and clean your pores. Combine it with some cooked oatmeal or yogurt and use the puree as a facial. The oatmeal helps to heal irritated skin and moisturizes, as does the yogurt.

Avocados
Avocados offer your skin the antioxidant effects of Vitamin E. The proteins and fats in the fruit draws moisture into your skin and helps fill up the fine lines & wrinkles. Mash it with 1 egg yolk and apply to face for 20 mins, then wash it to soothe and smooth dry skin; this is especially good in summers.

Bananas
Bananas contain vitamins A, B, C, and E as well as potassium. They smooth and nourish your skin while the antioxidants purify it. Mash half of a ripe banana with two tablespoons of honey and four tablespoons of sour cream( for oily skin, use two tablespoons of lemon or orange juice for the sour cream), apply on your face for 15 mins and wash off for instant glow.

Strawberries
A member of the rose family, strawberries contain salicyclic acid, which rids the skin of dead cells, allowing it to absorb moisture more efficiently. Strawberries also have a mild bleaching effect on the skin and help heal blemishes. Just puree 1/2 cup ripe strawberries with 1/4 cup cornstarch; apply for 30 mins, then rinse off with cool water.

Cucumber
The silica in cucumber is an essential component of healthy connective tissue,and helps improve the complexion and health of the skin. The high water content makes it a natural moisturiser, while the ascorbic acid and caffeic acid in cucumbers prevent water retention (puffy eyes and dark circles). You can rub it raw on your face, or use a cucumber facial recipe to instantly rejuvenate your skin.

Fruit facials work great when you choose a fruit that is right for your skin type. but thanks to the power of the web, finding that out is not at all difficult. I could make this a long post, but I just wanted to represent the top 5 fruits, and bring across the idea of using the natural goodness of fruits for your skin. Eating them daily is the best way to get a healthy skin, but when you need some instant glow for a party you have to attend in 12 hours, these fruit facials can come in real handy! Plus, it gives you a chance to relax for 30 mins as the invigorating smell fills the air while the fruit pulp works wonders on your skin! Personally, I love the cucumber and strawberry facials, but I'm going to be trying peaches soon. If you have some secret recipe that has worked for you, please share it with our readers through your comments!

Remember, there's nothing better than using fresh natural products for your skin; find a fruit facial recipe that works for you, and pamper your skin from time to time, because both you and your skin deserve to look healthy and beautiful!

Similar Articles:
Oranges & Their Health Benefits
Fresh Fruit Juices vs Canned Sodas
The Healing Powers of Acai Berries


Read more!

Khasta (Raj) Kachori - Indian Chaat Dish

khasta kachori chaat
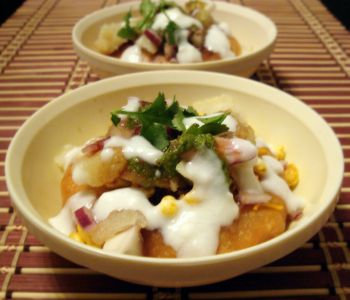
One of my best foodie memories of my hometown is waiting in line for a 3 rupees Khasta Kachori in a small 4 ft x 4 ft roadside food stall so I could satiate my craving for a spicy & tangy indian chaat!! Khasta Kachori, also known as Raj Kachori or Daal Kachori is a popular street-food in India. "Khasta" actually means "flaky", so this is essentially a flat disc-shaped kachori which is filled with a delicious moong dal mixture, then deep fried, and later stufed with potatoes, sev, onions and chutneys. Next to sev-puri, this is my favorite chaat, and once you try it, I bet it will become your favorite too!

Sia asked for Street Food for this edition of Coffee's MBP, and I finally got a chance to try my hand at Richa's Khasta Kachori recipe, which I had bookmarked for quite some time now. I followed her recipe to a large extent, except that I added moong dal to the filling, and used all-purpose flour for the crust. I also modified a few spices according to my taste. It looks intimidating at first, but is not that tough. With a little help from my cousin, I was able to make my Khasta Kachori; they didn't puff up as much as Richa's, but it tasted great and we absolutely loved it!! Its totally worth the effort! Believe me, this is definitely something you'd NOT want to miss!!

Ingredients

For the Crust
2 cups plain flour (maida)
1/4 cup ghee - melted
1/4 tsp soda (fruit salt)
1/2 tspn salt
about 1 cup warm water (approx) - to knead the dough

For the Filling
1/2 cup yellow moong dal (split yellow gram)
1 tspn cumin seeds (jeera)
1/4 tspn asafoetida
1 tspn ginger-green chilli paste
1 tspn chilli powder
1 tspn garam masala
1 tbsp amchur powder(dry mango powder)
2 tbsp Bengal gram flour (besan)
3 tbsp oil
salt to taste

To Serve
green cilantro chutney
khajur-imli chutney
thin yogurt
boiled potatoes - chopped finely
onions - chopped finely
chopped coriander
thin sev

Method

Make the Dough for the Crust
Mix all the ingredients and knead into a firm dough by using a little water at a time. Knead properly for at least 5 to 7 minutes, but keep it hard and firm. Remember, it should be harder than regular chapati flour, as the kachoris need to be thick and flaky. Cover with a wet muslin cloth and leave for 30 mins.

Make the Filling
Soak the moong dal in water for at least 6 hours. Then drain the water and set aside.

Heat the oil in a pan, add the jeera and asafoetida. When the seeds crackle put the soaked and drained moong dal and fry for a few seconds.

Add the green chilli-ginger paste, chilli powder, garam masala, gram flour, amchur and salt. Stir for 5-7 minutes till all the masalas are cooked properly. Pulse this mixture in a food processor to form a coarse-to-fine powder. Divide the mixture into 12 equal parts and shape each part into a ball.

Make the Kachori
Divide the dough into 12 parts. Take each part, roll into a circle of 2" diameter. Add the mixture to the center, then roll the dough over it to cover the filling. Pinch the ends together, then roll it out again gingerly to make a 2 " disc. Make sure that the filling does not spill out.

Lightly press the centre of the kachori with a thumb. Now deep fry them in hot oil over a slow flame till they puff up and turn golden brown on both sides. Drain on a tissue paper and keep aside.

khasta kachori chaat


Assemble the Kachori
Keep one kachori on a plate and a crack a hole in the centre of it. Fill it with 3 to 4 tbsp of the beaten yogurt. Add the chopped potatoes and onions, then drizzle with the green chutney, tamarind chutney, and chopped coriander. Sprinkle the sev on top.

Serve this delicious Khasta Kachori as a perfect evening snack, serve two of these and you are pretty much done with dinner! Hope you enjoy this kachori chaat as much as we did!

Related Recipes:
Hot & Spicy Samosas
Mix Dal Vadas
Sev Usal Chaat


Read more!

Healthy Cooking - A Cookbook Givevaway Event

Healthy Recipes Blog EventAs a home cook, parent & spouse, I am sure each of you must be striving to achieve that perfect balance between healthy and delicious! As a food critic and a self-proclaimed expert chef, I often find myself in the same dilemma - what to cook that is healthy, will keep us fit, and yet qualify as a scrumptious meal?? There's never enough of Healthy Recipes, and what better way to share, learn, cook and experiment than participate in a Food Blog event that focusses on just that! And this is not just a collection of healthy recipes; we also have a prize, a wonderful cookbook based on the same theme that promotes eating right and staying fit! So what are you waiting for?? Get ready to cook healthy and share with us your favorite tips, tricks and recipes, as the "Healthy Cooking" Cookbook Contest has just begun!!

I actually have to thank Yummr for sponsoring this giveaway, and for giving me and my readers a chance to make this event even more interesting! Yummr is a newly-found community of folks who are passionate about good food and enjoy sharing their obsession and connecting with others. There's a lot of activity to keep you busy, but that's not all! Members can earn "food stamps" which can then be redeemed for cool stuff in their Bazaar such as gift certificates to fine retailers, complimentary dining at fine restaurants, the latest kitchen appliances, and much more! Check them out to see what more you can do! For now, here's a chance for you to win Pam Anderson's latest Cookbook - The Perfect Recipe for Losing Weight and Eating Great, which is provided for this event as a courtesy from Houghton-Mifflin Books. It shares her secret for dumping pounds without dieting—and the 250 recipes for her new way of eating.

Healthy Cooking Blog Event


Fed up with whipsaw cycles of losing and gaining, Pam vowed to change—but not if it involved dieting, hunger pangs, or saying no to the foods she loved. Complicated recipes were out. She streamlined, creating meals as satisfying as they are quick—pizzas that take just thirty minutes, big-bowl combos, and gratifying snacks to forestall cravings. She discovered a few simple habits that make all the difference. Four years later, she's still maintaining her forty-pound weight loss. The Perfect Recipe for Losing Weight and Eating Great is a way to eat for life. It's filled with voice-of-experience tips for curbing appetite, no-nonsense shortcuts for getting food on the table pronto, and recipes that could only have been developed by this food-loving pro—no compromises, no wasted steps, just extraordinary results from ordinary ingredients.

If you are someone who'd love to stay healthy and fit, without giving up on your cravings, this is the book for you; and here's a simple way to get your hands on this lovely cookbook. Just follow the rules below to participate in this Healthy Cooking event!

1. Blog about a vegetarian recipe or a dessert that is healthy. It can be anything, a recipe that you concocted or tried from someone else, but modified it to make it healthier.

** Rough Ideas: use whole-grain flour instead of white, olive oil instead of butter, avoid cream and high-fat foods, use more veggies, fruits, salads with light dressings, individual servings less than 300 calories, use oats and nuts, honey instead of sugar on your pancakes, egg whites instead of whole eggs, baking instead of frying, half-&-half instead of whole milk or sour cream, low-fat yogurt instead of whipping cream, use high-protein food instead of high carb or hig fat, etc. Here are som more healthy food substitutions, alternate recipes, and cooking tips to help you out.

2. In your post, please specify why you think your recipe is healthy, clearly stating the methods/ingredients/substitutions/techniques that make it a healthy recipe.

3. Entries can be anything, breakfasts, main course, appetizers, desserts - anything as long as it has NO MEAT or SEAFOOD (cheese and eggs are allowed)

4. Please make a new post for this event and link back to this blog. Only one recipe per blog please. Feel free to use the logo (credit) above and spread the word.

5. Email me at mansibshah[at]gmail[dot]com with your name, blog name and permalink to your recipe, with a photo, if any. Last date to send in entries is 21st July, 2008 Please include "Healthy Cooking" as your email subject.

6. After the roundup, we(me and 2 other judges) will select a winner based on how healthy and tasty the recipe is. In case we find it hard to select one, we'll choose 5 finalists then hold a poll or choose a winner randomly (to be decided)from the finalists. I will personally ship the cookbook to the winner after they provide me with a mailing address.

That's it, there's nothing to do than what you do best! Cook Healthy, and send us the best of your cherished healthy recipe so you can win Pam Anderson's cookbook! And the huge collection of recipes will be an added bonus!! So start cooking to Eat Well & Live Well!


Read more!

Cherry & Almond Sour Cream Scones

cherry almond sour cream sconesCherries, the small and sweet dark red fruits that are full of flavor and fiber are found in plenty in summer. I paired my fresh Cherries with the ever classic Almonds and sour cream to bake these delicious Cherry-Almond Scones. Packed with anti-oxidants and beta-carotene, Cherries are aptly called the "latest super-fruits"! These breakfast scones taste heavenly right out of the oven, and serve to be a perfect weekend brunch with hot tea! Combined with whole-grain flour, sour cream and a pinch of nutmeg, my Cherry Almond Scones were the best way to enjoy the fresh fruits; however, you could easily make these with dried cherries as well. If you enjoy cherries, its hard to resist these scones!

Ingredients
3/4 cup fresh or dried sweet cherries - pitted and chopped
** If you use dried cherries, soak them in warm water for an hour to plump them up
2 cups whole-grain pastry flour
2 teaspoons baking powder
1/2 tspn baking soda
1/2 tspn salt
1/4 cup brown sugar
1/3 cup cold butter - cut into chunks
1 cup sour cream
1 large egg
1/2 teaspoon almond extract
a pinch of nutmeg (optional, for aroma)
1/4 cup slivered almonds

Method
Preheat the oven to 400 degrees.

With a pastry knife, cut the butter into the dry ingredients until it is granular in appearance, like sand, just more grainier.

Mix the sour cream, egg, nutmeg and almond extract together in a small bowl. Make a well in the center of the dry ingredients and add the liquid mixture.

Fold in the slivered almonds and cherries, leaving a few for garnish. Stir with a spatula just until moistened. (Note: DO not mix a lot else the cherries will leave out juice and color the entire dough)

Dust the countertop with all-purpose flour and turn the dough out. Pat the dough into a disk about 12 inches in diameter. Cut the disk into small discs or wedges, whatever shape you like.

Place them on an ungreased baking sheet with room around them to expand. (Note: Do not use grease as that can turn your scones more brown in color!) You can use a parchment paper if you want.

Top each scone with split cherries and pinch them slightly in the dough. Bake for 12-15 minutes or until they are lightly golden. Transfer to a wire rack till they cool down.

Variations: Try these with golden raisins or dried currants, and use shredded coconut instead of almonds.

These scones taste wonderful straight out of the oven; the tartness of cherries is wonderfully paired with alomnds, and sour cream imparts a smooth rich texture. Top them with some butter or jam, kids would love a topping of whipped cream too! I simply enjoyed my Cherry-Almond Scones with a cup of hot tea for my breakfast!

Related Recipes:
Cranberry-Walnut Scones (Eggless)
Mango Streusel Breakfast Cake
Wholegrain Blueberry Pancakes


Read more!

Almond Pesto Fettucini Pasta

almond pesto fettucini
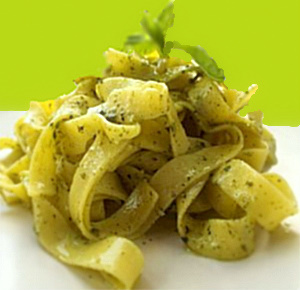
We love Italian food, but when it comes to pasta, its hard to break away from the tried and tested tomato-basil sauce or creamy alfredo sauce. But recently, I've been experimenting with different types of Pesto, and what better way to use up all that sauce other tha blending it with pasta to make this delicious Almond Pesto Fettucini!! Some time back, I made the walnut-cilantro pesto, and this time around, I chose the Almond and Parsely along with Basil to make my pesto sauce. Unlike pine nuts, almonds impart a smoother texture and a unique taste, especially when you use blanched almonds. Adding parsely adds an ever-so-mild kick to the pesto, which works great if you want to use this as a pasta sauce! I used regular Fettucine, but you could go for the spinach or whole-wheat one too. This Almond Pesto Fettucini is a welcome alternative to usual pasta recipes, and the Pesto can also be used as a light dressing for a pasta salad.

Ingredients
9 oz fettucini pasta
1/3 cup whole blanched almonds
1 and 1/2 cup fresh basil
1 cup fresh parsely
4 tbsp lemon juice
** adjust to taste, you may need more if using as pasta sauce
3 large garlic cloves
1/2-1 tsp salt
5 tbsp + 2 tbsp extra-virgin olive oil (divided)
1/4 cup grated Parmesan cheese

Method

Almond Pesto
Pulse the almonds in a food processor until finely ground. Add lemon juice, garlic, basil, parsely, salt and parmesan cheese; process until finely chopped.

With the food processor running, gradually add olive oil and process until smooth. Keep scraping the sides while you pulse, and add olive oil a little at a time to make a smooth pesto. Set aside for later use, or store it in an air-tight box and refrigerate.

Pesto Fettucini
Bring a large pot of water to a boil. Add pasta; cook according to package instructions until done. I generally add 1 tsp oil and a pinch of salt while the pasta is cooking so they don't stick to each other and get cooked faster.

Once done, drain the fettucini, then wash under cold running water and add 2 tsp olive oil. This will prevent the noodles from sticking or clumping and also help them get properly flavored when pesto is added.

When ready to serve, add the pesto to the fettucini, season with some more salt and ground black pepper if desired and mix well.

Transfer the Almond Pesto Fettucini to serving bowls and garnish with fresh basil leaves. Off this goes to Archana's Kitchen for the One-Dish Meal roundup!

Related Recipes:
Vegetarian Schezwuan Hakka Noodles
Baked Rigatoni with Homemade Marinara Sauce
Asian-style Spagetti with Garlic & Cilantro


Read more!

Appetizers & Hors'Doeuvres - The Monthly Mingle Roundup!

appetizers & hors'doeuvres recipesFinally the wait is over! The much awaited roundup (at least for me!:)) that features lovely Appetizers & Hors'doeuvres is nothing but spectacular; thanks to everyone for making this happen! This post is indeed a wonderful collection of beautiful, bite-sized servings that will keep you full of ideas for your next party. Whether you love to entertain, or simply love cooking for your family, this roundup of Monthly Mingle gets you everything, from drinks to appetizers to desserts, we have it all covered, thanks to all you food bloggers out there! So without rambling any further, let's move on to the mega roundup!

appetizers & hors'doeuvres recipes


Savoury Appetizers
Bleu Cheese and Tomato Crostini - Nicole at Cherrapeno
Asparagus & Feta Cheese Tartlettes - Marta at Italian in the US
Double-Dip Mirchi Bhajji - Ramya at RamyaCooks
Assorted Appetizers - Namratha at Fingerlicking Food
Stuffed Mushrooms - Sumathy at Sumi's Kitchen
Homemade Veg Puffs - Kamala at Kamala's Recipes
Greek Appetizers - Ivy at Kopiaste
Parippu Vada - Ranjitha at Ranji's Corner
Asparagus & Pepper Stromboli - Madhuram at Eggless Cooking
Cauliflower Fritters - JZ at Tasty Treats
Hara-Bhara Kabab - Shubha at Chutki Bhar Pyar
Zenzai-Sweet Red Bean Soup - Elsye at Dari Dapur Saya
Parmesan-Garlic Herb Bread - Shilpa at Aayi's Recipes
Quick Appetizers - Jayashree at Spice and Curry
Mini Bites - Shubha at Chutki Bhar Pyar
Vegetable Cutlets - Neha at Easy n Tasty Recipes
Polenta Quinoa Sticks with Rhubarb Sauce - Johanna at Green Gourmet Giraffe
Pastry-shell Kachori - Diksha at What's on the Menu
Red Lentil Appetizers - Chriesi a Almond Corner
Mini Samosas - Neha at Easy n Tasty Recipes
Gobi Wings - Shri at Emiinent Life
Paneer Tikka - Anisheetu at Sweety-My Kitchen
Aloo Samosas - Dee at Ammalu's Kitchen
Savoury Cheese Puffs - Cristina at From Our Home to Yours
Nutritive Maggie Hearts - Anisheetu at Sweety-My Kitchen
Stuffed Mushrooms with Pepper & Cheese - Ruth at Ruth's Kitchen Experiments
Multi-Grain Cucumber Vada - Trupti at RecipeCenter for All
Potato Cheese Bites & Cucumber Nibbles - Deeba at Passionate About Baking
Phyllo-Caprese Bites - Mike at Mike's Table
Veggie Hearts - Hetal at Isha's Kitchen
Asian Corn Fritters - Rosemary at Homemade Heaven
Spinach & Black-eye Fritters - Madhu at Ruchii
Vietnamese Corn Egg-Rolls - Wandering chopsticks
Break Pakoda - Maheshwari at Beyond The Usual
Sev-Dahi Puri - Alka at Sindhi Rasoi
Bread Rolls - Vandana at Vandy's Culinary Adventures
Spinach Tartelettes - Nikki at Canary Girl
Adas Bil Hamod - Easy at Simple Indian Food
Sago Cutlets - Su at iDayz
Mirchi Pakoda - Medhaa at Cook With Love
Bhujiya - Priya at Live To Cook
Summer Rolls with Soy Dip - Cham at Spice Club
Sai Bhajji - Medhaa at Cook With Love
Veggie Bread Cups - Srimathi at Foody Guru
Peanut Masala - Divya at Divya's Cookbook
Gobi Manchurian - Veda at Iyenger's Kitchen
Savoury Mini-Bites - Arfi at HomeMades
Potato Bajjis - Divya at Dil Se
Soy Shangrila - Rashmi at Food Dutchess
Curried Bananas - Sukanya at Hot n Sweet Bowl
Garlic & Honey Bread Cubes - Pat at Patricia Furdato
Stuffed Mushrooms - Nilmandra at Soy and Pepper
Ribbon Sandwich - Aparna at My Diverse Kitchen
Spannakopita - Bhags at Crazy Curry
Cucmber Sandwiches - Erin at Skinny Gourmet
Muthiya - Smita at Smita Serves You Right
Bell-Pepper Rings - Uma at Essence of Andhra
Grilled Baby Eggplants - Christie at Fig & Cherry
Goat Cheese & Red Pepper Crostini - Kim at Live Love Laugh & Eat
Okra Corn Cakes - Kalai at Samithu Paarkalam
Potato Mushroom Cakes - Raaga at Chef at Work
Veg Nugget Saatay - Archana at Archana's Kitchen
Upma Stuffed Bell-peppers - Madhu at Eggless Cooking
Fresh Corn Pakodas - Maya at Konkan World
Cucumber Petits - Sukanya at Hot n Sweet Bowl
Mushroom Rolls - Arundhati at My Food Blog
Cabbage Pakoda - Meera at Enjoy Indian Food
Millet Falafel - Rachel at Tangerine's Kitchen
Sabudana Patties - Jan at Food with a Pinch of Love
Mini Millet Patties - Uma at Essence of Andhra
Savoury Empanadas - Sophie at Flour Arrangements
Crostini Duo - Rachel at The Essential Rhubarb Pie
Tofu Biscuits - Jessy at Cherry Blossom
Goat Cheese Olive Balls - Lisa at Food and Spice
Pasta Tikki - Priya at 365 days of Pure Vegetarian
Fried Herb Mozzarella - DK at DK's Culinary Bazaar
Cauliflower Manchurian - Rama at Andhra Kitchen
Dahi-Vada - Arundati at Escapades
Quail Eggs with Zaatr - Lorraine at Not Quite Nigella
Fava Bean Bruschetta - Karen at Off the Meat Hook
Multani Paneer Tikka - North ki Rasoi Se
Samosas - Sangeeth at Art of cooking Indian Food
Sambosi (Spinach Pastry) - Siri at Siri's Corner
Veg Crostini - Naina at Naina's Recipes
Stuffed Potatoes - Ketki at My Two Cents
Gougre Cheese Puffs - Asha at Aroma
Black-eye Pea Fritters - Srivalli at Cooking 4 all Seasons
Papdi Pizza - Ranjitha at Ranji's corner
Chips & Gaucamole - Kalva at curry in Kadai
Fried Plantain Cracker with Mango Salsa - We are never Full

appetizers & hors'doeuvres recipes


Salads & Drinks
Grilled Asparagus Salad - Abby at Eat the Right Stuff
Mediterranean Couscous Salad - Meeta at What's For Lunch Honey?
Cardamom White Chocolate - Rashmi at Delhi Belle
Kairi ka Jalzeera - Sheetal at My Kitchen
Chilled Pear & Watercress Soup - Glamah at Coco Cooks

Luscious Desserts
Hazelnut Rum Balls - Evelyn at Mountaineous Bites
Bavarian Creme Petit Fours - Alexandra at Addicted Sweet Tooth
Goat Cheese Lollipops - Dhangitt at Dhangitt's Kitchen
Walnut Cake - F at My Kitchen Hobbies
Blueberry Muffins - Mona at Zaiqa
Banana Fritters - Sowmya at Creative Saga
Lemon Flan with Strawbeery Compote - Lisa at Spicy Ice Cream
Peanut-Butter Brownies - Sagari at Indian Home Food
Carrot Muffins - Divya at Dil Se
Date & Walnut Muffins - Raaga at Chef at Work
Madata Kaaja - Sita at For Spice Lovers
Coconut Macaroons - Medena at Cafe Chocolada
Orange Hazelnut Madeleines- Lina at Eat Yet
Chocolate Kiss Cookies - Shibani at Pearls of East
Coconut Souffle - Jennie at My Cake Wardrobe

Fun and Food Entries
Strawberry Margarita
Almond Mocha Frappucino
Vegetable Bread Baskets
Colorful Dhokla Sandwich
Paneer Tikka with Mango Dressing
No-Bake Mini CheeseCake
Spiced Vanilla Tea Cupcakes
Marbled Cream Cheese Brownies

This was indeed a wonderful roundup; I apologise if I missed any entry, just send me an email and I'll double-check it. Once again, thanks Meeta for allowing me to host it, and thanks to everyone for sending in such delicious recipes to make this mingle a huge success! Happy Father's Day everyone!!


Read more!

Mango Mascarpone Mousse (Mango Kulfi)

mango mousse-mango kulfi 
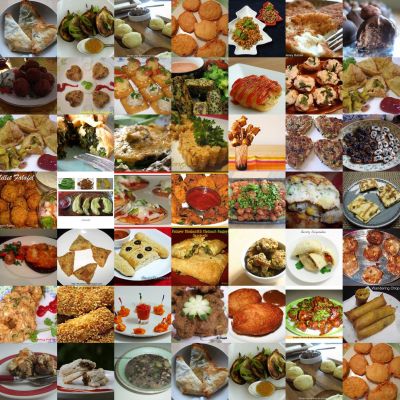
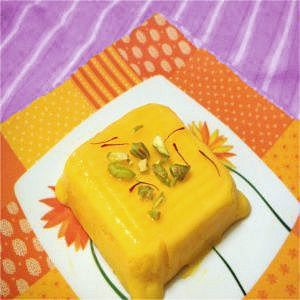
Whenever you are in need for a quick dessert, a little cream, some fruits and a blender is good enough to satisfy your cravings and whip up a luscious dessert. And could you think of any better flavors than Mango and Mascarpone for a Mousse (except chocolate, perhaps!) I bet not, especially if you've ever enjoyed a Mango Kulfi, which is an indian version of mousse, except without eggs. Mousse is one of the easiest desserts to prepare, without compromising on the taste and indulgence factor. Mascarpone, the smooth creamy italian cheese, that's a little on the sweeter side, lends a richness to the mousse, while Mango, saffron and cardamom lend it flavor similar to a Kulfi, so you get the best of both the worlds! Try this Mango Mascarpone Mousse; its heavenly, and I'm sure you are going to get hooked to the taste.

Ingredients
1 egg - separated
1/4 cup sugar
3/4 cup mango puree
4-5 strands of saffron
1/4 tsp cardamom powder (optional)
1/4 cup mascarpone - at room temperature
1/2 cup heavy cream

To make Mango Kulfi instead, replace the egg with 1/4 cup condensed milk, and mix it with the mango puree and mascarpone cheese in Step 2 shown below.

Method
In an electric mixer bowl, whisk the egg yolk and half of the sugar until pale and fluffy.

In a separate bowl, stir the mango puree, cardamom powder and mascarpone until smooth. Fold the yolk mixture into the mango mixture.

Whisk the egg whites until firm peaks form. Add the remaining sugar, a little at a time and continue to whip until glossy. Fold the whites into the mango mixture.

Whip the cream to form soft peaks and add to the mango mixture. Or mix together in a blender on Whip setting till everything is smooth.

Now spoon it into individual moulds of your choice and freeze them overnight.

Cut into slices if you like, or just invert the mousse onto dessert plates. Garnish with some chopped pistachios and saffron strands, and serve immediately (if you wait to take photos, it'll start melting!!:)) I'm sending this over to Mike who's collecting Frozen Treats this summer, and also to Nikki for her Ice-Cream collection!

Tip: You can add the saffron strands and some chopped pistachios in the batter itself, leaving a few for garnish. This gives it a better flavor, color and aroma!

Call it a Mango Mascarpone Mousse or a Mango Kulfi; any way you make it, this is one easy and delicious treat, perfect for summer evenings or a weeknight dessert cravings!

Related Recipes:
Mango Streusel Cake
Mango & Raspberry Thickshake
Mango & Mascarpone Cheese Tart


Read more!

SmartShopper - Kitchen Gadget to Record & Print Your Lists

smartshopper-kitchen gadget If you are like my husband, 9 times out of 10 you'll forget an item or two from the grocery list that you "memorized" before going to the store, simply because you were too lazy to write it down! I have spent days wishing there was an automatic grocery list generator so I could record my list of items (yes, record it, not write it!!), then print it out and hand it to him so he doesn't miss anything on the list; well, looks like God (a.k.a technology) just answered my prayers!! The SmartShopper, an electronic Grocery List Organizer that is voice-activated, and comes with a built-in printer is the coolest kitchen gadget I've found this week!! "Say it, Print it, and Go Get it!!" This tiny kitchen contraption is so cute and efficient that there's no way you can stop yourself from falling in love with it!

Smartshopper is an easy-to-use electronic kitchen gadget that helps you create your grocery list, without having to write it down on a piece of paper that you'd find hard to locate when you actually head out to the store! Smartshopper uses Nuance's state-of-the-art voice recognition technology to record your voice, and keeps adding your items or commands to the list stored in its memory. When it's time to head to the store, press the print button and the embedded thermal printer will print out your list for you. Best of all the printed list is categorized by grocery departments such as "frozen foods" or "produce". This will help you find what you need in each department or aisle easier, therefore making your shopping experience faster and more efficient.

Its intuitive interface is fun to use and easy to master. Just push the record button, say the name of the item you want to add to the list, and it shows up on the LCD screen for your confirmation. keep recording items till you like; and you don't have to finish the list at the same time! It will store it in memory, and update it as you add more items. There are already over 2,500 items in SmartShopper's database, and it can even learn new items tailored to your lifestyle. With a large (2.25 x 1.25) LCD display screen, it shows the items you have already entered in a 9-point font size, and categorized in alphabetical order.

SmartShopper is also an excellent way to keep track of your errands! Just record your list of "To-Do" things and print it out to better organize your day and complete your tasks efficiently. Of course, my husband would prefer to use the iPhone for this, but I guess I can settle for the Smartshopper:)

It is made out of durable hard plastic with a brushed aluminum front. Operating on 4 AA batteries, the printer uses uses thermal paper that is ink-free, which means you don't have to worry about replacing messy ink cartridges. SmartShopper also has built-in magnets so you can stick it to your refrigerator, right beside your family message-board, and also comes with hardware to mount on a wall if needed. A Quick-Start guide, warranty sheet, and 3 rolls of thermal paper are included in the package. Priced at $150, it is not a bad investment, especially if it makes your life more efficient and stress-free!

Similar Articles:
SnapCups - Add Color and Creativity to your Tableware
Egg-Cracker - No More Messy Egg Cracking
Nutriweight Food Scale - Counting Calories for your Food


Read more!

Cheese & Bell-Pepper Pulao (Rice Pilaf)

cheese & bell-pepper rice pulao 
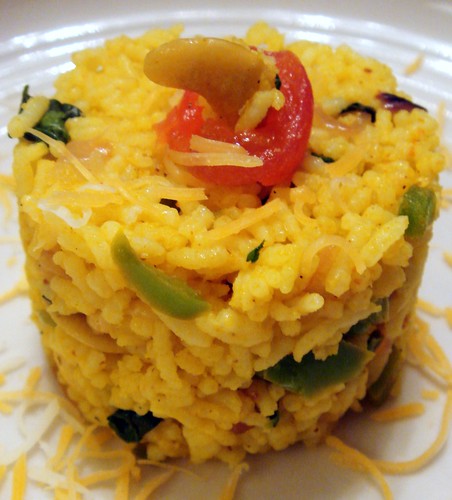
Cheese is one such versatile ingredient that adds taste and glamour to any recipe. Just as it did to our week-night dinner recipe of this delicious Bell-pepper & Cheese Rice Pilaf (Pulao) which was beautiful to look at and even more wonderful to eat! Generally, rice pulao needs a dal or curry to go with it, but this Pulao Recipe stands all on its own, and is definitely not a sidekick! Mildly flavored with saffron, turmeric and spices, the bell-peppers lend it texture while the cheese accentuates the taste and color, as well as induces a smoothness in each bite.

Standing on its own, this beautiful yellow-colored Cheese Pulao is also a symbol of strength, hope and life! And this is just what Bri needs at this point in her life.

Brianna is a fellow food-blogger, who was diagnosed with breast cancer two and half years ago. But after a mastectomy, chemotherapy and two years of relatively good health, the cancer is back. It has metastasized to other parts of her body. At the age of 15, Bri lost her 41-year old mother to the disease. Now, she’s waging her own war against breast cancer. She is going through intensive chemotherapy and other treatments, but her health insurance, unfortunately, does not cover holistic alternatives which she would like to try. Bri and her husband Marc have enough on their plates right now in addition to worrying about her medical bills.

The team at Jugalbandi has organised a fundraiser to help Bri and her family meet her out-of-pocket medical costs for ONE YEAR. CLICK, a monthly theme-based photography contest hosted by Jugalbandi has chosen the theme as: YELLOW for Bri, as an attempt to gather at least 12,000 U.S. dollars. There’s a raffle with exciting prizes on offer. Your donation can be made securely through the Chip-In button below, using credit card or via Paypal and goes directly to Bri’s account. We appeal to our fellow bloggers and readers to help us achieve this. Bri deserves a chance to explore all options, even if her insurance company thinks otherwise. We appreciate your contribution for this cause, and you can support us by making donations, or by sponsoring prizes for Click and spreading the word! This is my entry for the event "Click- For Bri"


And now, for the recipe, which will also go to Astrid, who's hosting this week's WHB, an event started by Kalyn!

Cheese & Bell-Pepper Rice Pilaf

Ingredients
3 cups long-grained rice (Basmati) - washed and cooked
1 medium-sized green bell-pepper - chopped long and thin
1/2 cup yellow cheese - shredded
1/4 cup fresh mozarella or italian cheese - shredded
1/2 onion - finely chopped
2 green chillies or jalapenos - finely chopped
6-8 pieces of cashews - split in half - roasted
2 tbsp fresh cilantro - chopped for garnish
1/2 tsp cumin seeds (jeera)
3 tbsp oil
salt - to taste
lemon juice - to taste
1/4 tsp saffron strands - dissolved in warm water
1/2 tsp turmeric powder
1/2 tsp garam masala

Method
Wash and cook the rice as you normally do. Using long-grained rice like Basmati helps give it a better texture, but you can use normal rice too, without compromising the taste.

Warm 2 tbsp water and add the saffron strands to it. Let it bleed while you prepare the rice.

Take 1 tbsp oil and roast the cashews in it till they turn light brown in color.

Take a wok, add oil and cumin seeds to it. When the latter start spluttering, add the green chillies and chopped onions and saute till they become soft and glazed.

Now add the chopped green bell-peppers and saute again. Add all the dry spices and salt, and cook covered for 5 mins, till the peppers are tender and cooked through.

Add the roasted cashews to the wok.

Next, add the dissolved saffron along with the water, and add the cooked rice to it. Mix everything together so it gets colored and the spices are evenly distributed. Add the lemon juice and half of the shredded yellow cheese, then allow to cook for another 8-10 mins.

When the rice looks cooked and emanates the aroma of saffron, take it off the stove. Gingerly sprinkle the remaining cheese and chopped cilantro and mix just to combine.

Serve with some Raita or a curry of your choice. This Cheese & Bell-Pepper Rice tasted so good we just gobbled it up as soon as I took it off the stove. It's so good, you'll hardly ahve any leftover remaining. And if you do, try using them to make these delicious Rice & Cheese Cutlets

Similar Recipes:
Lemon & Coconut Rice
Vaghareli Khichdi & Kaddhi
Spinach & Corn Pulao


Read more!

Low-Fat Strawberry Vanilla Cake

low-fat strawberry-vanilla cakeThere's a story behind this delicious Low-fat Strawberry Cake! What happens when I have an urge to eat a cake but my weighing scale glares right back at me, reminding me of the zealous workout at the gym this morning which merely burned 300 calories?? I try to talk myself out of the urge, but the chef inside my head feels otherwise, and a new low-fat strawberry vanilla cake is born!! Generally, there's more to it than just this; a battle between my wits and desires often forces me to simply evade eating any desserts, but with my pantry loaded with fresh hand-picked strawberries that we got back from our strawberry-picking weekend, I somehow convinced myself to see that strawberries are really good for health, and so are baked goods! So it wouldn't be a sin to try a hand at this souffle-like vanilla cake that has strawberries in every bite, which is way more filling and delicious than a simple strawberry smoothie:). Flavored with a hint of cardamom & vanilla, and with half the calories than a regular cake, this strawberry dessert recipe is an out-and-out winner!

This recipe is totally an original one that I came up with to suffice my craving for a low-calorie, low-fat dessert. Hence I have substituted some key high-carb ingredients like all-purpose flour, butter and egg-yolk with healthier options like whole-grain and whole-wheat flour, low-fat, low-cholesterol olive oil and egg-white only, which has 40 different proteins and water, and minimal fat content. Also, I used only 1 cup brown sugar, which makes this a little less sweet cake, but combined with the strawberries, it is still rich and sweet enough, and considerably reduced in saturated fats and calories than its original counterpart. I was pleased that even without egg-yolks, the cake came out soft and spongy. So this is definitely a recipe I'm going to hold on to and splurge in with fruit variations for my diet-desserts! Off this goes to Equal Opportunity Kitchen for the Tried,Tested & True event, where they are asking for healthy and delicious recipes!

Ingredients
Make one 9x9 loaf or 6 mini-cakes

6-8 large strawberries - washed
1 cup whole-grain pastry flour
1 cup wheat flour (use all-purpose flour for a richer cake)
1 cup + 2 tbsp brown sugar (divided)
1/2 cup skimmed milk
1 tspn baking powder
1/2 tspn baking soda
1/2 tspn cardamom powder
1/2 tspn salt
1 large egg (whites only)
3 tbsp olive oil (or smart-balance light spread)
2 tspn vanilla extract
strawberries - sliced for garnish

Method
Preheat the oven to 350°F. Coat a 9" x 9" baking pan or 6 medium ramekins with cooking spray.

Slice the strawberries vertically to form thick slices(about 4-5 per berry). Reserve 6 slices for garnish, and sprinkle 2 tbsp brown sugar on the remaining ones. Toss in a bowl gingerly to evenly coat with the sugar. If your strawberries are really sweet, you can omit the sugar at this step.

In a large bowl, stir together the flour, baking powder, baking soda, cardamom, and salt.

In another medium bowl, whisk the sugar, egg-white, and oil until smooth. Beat well to make it fluffy and airy, about 1 min. This step is important as this will determine how much your cake rises. As we are using only one egg-white, beating it adequately is required for a spongier cake. Whisk in the milk and the vanilla essence to this.

Pour the wet ingredients into the dry flour mixture and stir just until blended.

Now arrange 3 sugared strawberry slices on the base of the ramekins. Scrape into the prepared pan or the ramekins. Pour the batter over it, then again layer with another 3 strawberries and finish with the batter on the top, taking care not to fill more than 3/4th of each ramekin, allowing room to expand. If you are using a cake pan, just layer all the strawberry slices below then top with the batter.

Bake for 35 to 40 minutes (about 25 mins if you are using the ramekins), until the cake is springy to touch, shrinks from the sides and a toothpick inserted into the center comes out clean.

By using whole-grain wheat and pastry flour, just 1 egg, and olive oil instead of butter, we can cut down significant amount of calories from this dessert, The whole-grains make it a filling treat, and the combined recipe makes it a low-fat cake which provides only the good carbs and fats to the body.

Strawberries when baked tend to lose their sweetness a little, hence rolling them in sugar at the beginning is recommended. Plus, the cardamom adds a wonderful aroma and a hint of flavor to the vanilla batter which beautifully compliments the strawberries. Its a great way to enjoy a guilt-free treat any time you want, without compromising on the taste!

For a lavish dessert, top it with some whipped cream, or dust it with some icing sugar. This also makes for beautiful individual desserts when entertaining. I really enjoyed my low-fat version of vanilla strawberry cake, and now have a delicious solution for dessert cravings that do not antagonize my weighing scale!

Similar Recipes:
Low-Fat Pear & Almond Yogurt Cake
Low-Fat Blueberry Muffins
Healthy Cranberry-Pistachio Biscotti


Read more!

Sweet Sixteen Birthday Party - Ideas and Tips!

sweet sixteen partySweet Sixteen is one of the most celebrated birthdays, and though every birthday of their kids is special to the parents, there are some milestones that demand a bit more attention! What was once a simple gathering of family and friends has now transformed into a birthday-bash, and hosting birthday parties takes a lot of time and planning these days! Sixteen is a special year because it is one of the most enchanting times in a girl's life, and turning sixteen is a gentle transition between your cuddly daughter to an adult teenager! And if it's important to her, it should be important to you too, so take some time to plan a wonderful Sweet Sixteen Birthday party for your daughter, for that may very well be the last one that she lets you plan, at least for a few years!!

As I said, 16 is a delicate year in a girl's life, and as you plan for her milestone event, it's important to respect the self-image of your growing teenager and her desire to be treated as an adult. At the same time, you want it to be special, as well as fun, something that she'd remember all her life. There was a time when a trip to Party City would be enough for all your birthday party supplies. But times have changed, and the web is now the new place to look for ideas and advice! Throwing a Sweet-Sixten party involves much more than a simple cake, some food and invitations. This is an era of party favors, and people go to great lengths to customize these to make it a memorable event for their daughters and the guests! However, there are a lot of factors that determine what kind of a party you want to host. Here are just a few things to keep in mind before you start planning, and also some ideas that might just click with you!

Avoid a Surprise Party
Parents love planning surprise parties for their kids, but while that would have been fun a few years ago, Sweet Sixteen is not the right time to throw a surprise party. For one, be sure that what you like and choose is going to be mostly rejected by your daughter, and your idea of fun, may be totally different from hers!! So unless you are prepared to face the consequences of a not-so-fun party, I'd advise you to plan it with your daughter. Involve her in all the planning stages, and maybe just keep one small thing at the party as a surprise, so you get the best of both worlds!

Fix a Budget
Needless to say, this is the first thing you should finalise, and be prepared to go over it a little! Parties like these can get really elaborate, and its better to discuss and decide on a budget before you start the planning. Everything that follows governs the budget, and while you can always stretch a little, its never wise to splurge more than you can afford on a party. Better invest it in getting your daughter a wonderful gift rather than throwing away the money for show!

Discuss Your Guest List
This is very important, especially because you need to know who is it that your daughter wises to invite. Is it a girls-only thing, or a mixed party, or a large gathering where a few families are involved? Sometimes parents want to involve close family members, but the birthday girl may have different plans! So talk to her and discuss it; if possible, keep a separate gathering for family and reserve the bash for her school friends. Whatever you choose, make sure everyone agrees on the Guest list, to avoid any embarrasing appearances at the party!

Choosing a Theme
This is one of the fun parts; its not necessary to have a theme, but choosing one is exciting, and also makes planning for other things a little easier, as you only have to focus on a certain theme. You can choose several ideas like a Beach or Pool party, a casual high-tea in your backyard, a high-end formal party at a banquet hall. It can also be a musical rock-concert theme where everyone performs a little something, or plan a lavish affair at the spa for a group of close friends; other favorite themes are Hollywood theme, a decade theme like 70's or 80's or the Pink Sweet Sixteen theme - there are too many options, it boils down to what your daughter likes, and what would be the most manageable for you. Once the theme is finalized, try searching for discount party supplies online, as this is where you'll get the best deals, and also the best ideas and value for your money.

Choose a Venue
Depending on the theme, you need to finalize a place to host the party. Most people prefer their own houses to minimize costs; but if you have a budget leeway, try renting a place as they would take care of everything, generally even the decorations, and you don't have to worry about cleaning up after the party ends. This also gives you more time to focus on the other things like arranging party favors and catering menu.

Send Out Invitations
Once the date, time, place and theme are chosen, its time to send out the invitations. For the traditional approach, you could send paper invites that are designed to suit the theme. But you can easily avoid this expense by opting for Evites that can be customized to make them suit your style. No matter what approach you choose, make sure you include the necessary information - date, time, place, requested attire, any other special events, and a note to RSVP by a date with the number of guests attending.

Planning & Decoration
The decor relies totally on the theme; if you do not have a theme, you just need to arrange tables for food and drinks, clear out the area of furniture, arrange some lighting and music to set the mood, and deck it up with some flowers and centerpieces. But if you choose a theme, take some time to research your options and choose the correct party supplies. Most of the online stores and even retailers will be able to help you once you tell them your theme. From ballons to streamers and boas to confetti, there's loads to choose from. But generally, its advisable to go light on the decorations and focus more on the mood, food, music and party-favors as that is what the kids would really enjoy!

Food & Drinks
When there's a large mixed group, its best to stick to a buffet-style party rather than elaborate meals. depending on the time of the day you choose to entertain, opt for hors'doeuvres, a main course entree, salads, chips and dips, and a course of simple desserts. Remember to plan a menu which can be handled by people as they walk around, chit-chat and play; If its more of a formal affair, you can choose an italian meal with pasta and baked casseroles. You do not want any curries and sloppy meals, nor food that cannot be served in paper plates. Keep it simple, but keep it good. Use plasticware for serving, and set a different counter for drinks. Beers, fruit punch and sodas will totally serve the purpose, and avoid alcohol if possible as these are teenagers, and you don't want to be responsible for what they drink and how much they drink! Stick to finger food, appetizers and desserts as the best choice.

Customize Party Favors
This is a new trend, and it pays to put some thought and time in selecting party favors that are appealing to you and your guests. The possibilities for birthday party favors are endless; from engraved picture frames, trinket boxes, flower vases or chocolates, to the more customized mugs, t-shirts, handbags and more, there is tonnes of stuff that you can choose. YOu can even choose scented candles, goodie-boxes, jewellery or anythign else; just make sure you do not go overboard, and at the same time, choose something that is meaningful, so that the recipient would remember this day fondly.

Dressing Up!
As you plan the party, don't forget to plan for yourself and your family! One of the best things about being a host is that you get a chance to pamper yourself too. Go out and shop for yourself and your daughter, especially if its a formal affair with a ball-room theme. You do not want to look shabby in front of your teenage guests, and definitely not look old!! Also, its customary to get "Tiaras" for the girls and probably "bead-bands" or bracelets for the boys at a Sweet-Sixteen party. So while you shop for yourself, don't forget to get it for your guests too.

Don't Forget the Camera!
Once the party begins, just get into the mood and enjoy with the kids. By planning ahead, you've done your part, and now you deserve to relax and have fun too. Of course, you'll still be on your toes chaperoning your daughter and seeking out the (male) friends she lingers longer to talk to, but trust your daughter and let her enjoy, and don't forge to take loads of pictures! Some people opt for professional photographers as they want to order an album; but frankly, its not such a big deal. If you are good with a camera, you can take pictures yourself! However, if its a themed party with dances and performances, then a professional video will be a better option. Plus, it allows you to enjoy more if someone else is responsible for the outcome of the priceless pictures and videos!:)

Just like any other birthday party, a sweet sixteen party is also intended to be fun; being a milestone, it does demand more planning and preparation, and I hope this article helps some of you plan a memorable sweet sixteen for your daughter! If you have your own ideas, please feel free to share it with our readers via the comments section. After all, there are never enough ideas, right?!

Similar Articles:
Tips & Ideas to host a Cocktail Party
Tips & Tricks for Bbq and Grilling in Summer


Read more!

Sprouted Bean & Lentil Salad - Healthy & Tasty

sprouted lentil salad
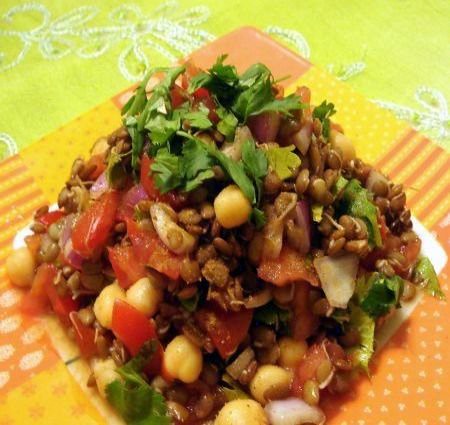
Summer means more time at the beach, which in turn means getting into shape as soon as you can! Joining the "eat healthy" bandwagon, the Sprouted Bean & Lentil Salad has become my current favorite as weeknight dinners, at least twice a week. A healthy diet should include a mix of essential nutrients, a primary one being Proteins. And for vegetarians, beans, legumes and lentils are the best way to fill up on your protein needs. I love this salad because it's easy to prepare, tastes really great, and is extremely filling! Sprouted beans are combined with chopped veggies and flavored with fresh herbs and spices to help you get the best of "tasty & healthy". Customize it to suit your liking, or enjoy this summer salad the way I like it!

Lentils are a great source of protein, calcium, and are also rich in fiber. They have a unique flavor when you sprout them, and they can fill you up in no time, which works perfectly for diet plans and portion control. Garbanzo Beans (also called chickpeas) are a good source of cholesterol-lowering fiber, and also help keep your blood-sugar under control.

For my salad, I used Horsegram Dal, but you can use any other legume of your choice. I made a mild sweet and sour tamarind sauce, which was used as a dressing for my salad. I added sprouted Green Mung, along with chickpeas and other veggies, and sprinkled some spicy chaat masala and cilantro to add a zing to the sweet and tangy chutney dressing. I had never eaten sprouted horse-gram before, and I was really skeptical about how it would taste, but this salad came out great, and now its become one of my favorite salad recipes!

Ingredients

1/2 cup horsegram dal
1/2 cup whole green mung
1/2 cup boiled garbanzo beans
1 tomato - finely chopped
1/2 onion - finely chopped
1/2 cucumber - finely diced (optional)
1/4 cup fresh cilantro - finely chopped
salt - to taste
black pepper - to taste

For Dressing
3 tbsp tamarind chutney
lemon juice - to taste
2-3 tsp chaat masala

Method
Soak the horsegram and whole green mung in 2 containers in sufficient water overnight. Cover with a lid and allow them to swell-up. Then remove the water from the containers, cover with a damp cotton cloth or kitchen towel, and allow them to sprout, probably another 6-8 hours. You can even use a sprouter for doing this. The sprouted beans can be dried and stored in an air-tight box or zip-lock bags in the refrigerator for 5-7 days.

Now mix all the ingredients for the salad in a large bowl, except cilantro. Add the salt, and black pepper to it and let it sit for 5-10 mins.

Meanwhile prepare the tamarind chutney, or you can use the store-bought one. If you are not a tamarind-person, you can easily omit it and use only lime juice for the dressing.

Add the dressing to the salad, taste and add any more spices as required. Finally sprinkle a generous helping of chaat-masala, again, according to your taste. Chaat Masala is merely a blend of spices and adds a fresh taste to your food, so don't be afraid of using it! Top it with chopped cilantro.

Enjoy this healthy Sprouted Lentil Salad on its own, or top it on a slice of bread. Combine with a glass of orange juice and you are all set for a healthy and tasty dinner indeed!

Similar Recipes
Spinach & Strawberry Salad
Cranberry & Mixed Green Salad
Vegetarian Mexican Salad


Read more!

Coconut Cookies with Vanilla Icing

coconut cookiesI've always been a fan of Coconut Macaroons or Coconut Cookies, and it was finally time to start the oven and bake some cookies over the weekend. Starting with the simpler of the two, I opted for Coconut Cookies, which are similar to the macaroons, except that they are a lot more easier to make! Just to add some glamour, I decided to add a simple vanilla icing on the top. The cookies came out great; and with the perfect balance of sweetness and taste of coconut, these cookies did not survive in the jar as long as I had imagined they would! They came out chewy, yet not too much, and have a wonderful texture due to the toasted coconut adding a wonderful aroma as well as the texture. To kick things up a notch, just use some vanilla or flavored icing and drizzle it onto the cookies to transform these simple coconut cookies into something more suited to a festive occasion.

Ingredients
1 cup all-purpose flour
1/2 tspn baking soda
1/4 tspn salt
1/2 cup butter
1/2 cup packed brown sugar
1 egg
1/2 tspn vanilla extract
1 cup flaked coconut
1/2 tsp coconut essence (optional, but recommended)
ready-made icing - as required

Method
Preheat oven to 350 degrees F (175 degrees C.) Combine the flour, baking soda, and salt and set aside.

Take 1 tbsp butter, melt it a little, then add the shredded coconut to it. Saute lightly to get a golden, toasted look and aroma. Divide into 2 parts and keep aside.

In a medium bowl, cream the butter and brown sugar until smooth. Beat in the egg and vanilla and coconut essence until light and fluffy. Gradually blend in the flour mixture, then mix in half of the toasted coconut to it.

Cover with a plastic wrap and freeze the dough for 10-12 mins.

Take a little dough at a time, grease your palms with oil and roughly shape the dough into a cookie. I like the corrugated edges in my cookies so I use this method. You can even use a long fork to make some marks on the cookies for a fancier effect. Instead, you could even drop dough by spoonfuls onto an ungreased cookie sheet.

Roll each cookie dough in the remaining shredded coconut, or simply sprinkle a little on the top. Place the cookies about 3 inches apart on the baking sheet.

Bake for 5-8 minutes in the preheated oven, or until lightly toasted. Then turn the cookie sheet around by 180 degrees and bake for another 5 mins until lightly browned on the top. Cool on wire rack till completely cool.

For the icing, take the ready-made icing and add 1 tsp of vanilla essence. You could even use lemon zest or orange zest for a delicate flavor. Use a piping bag with a thin hole (about 2mm) then gently pipe the icing on the cooled cookies in any pattern you want.

You can store the coconut cookies in an airtight container (without icing) for about 20 days. As the cookies themselves are not very sweet, the icing adds a nice touch though.

These coconut cookies are on their way to Suganya who's hosting AFAM-Coconut this month!

These Coconut Cookies with Icing are a wonderful treat any time of the day. Without the icing, they taste like coconut macaroons, albeit a bit less sweet; with the icing, they are fancy enough to be served to guests at a tea-party, and I think I'm going to try orange icing next time!

Similar Recipes:
Chewy Chocolate-Chip Cookies
Thumbprint-Jam Cookies
Eggless Almond Cookies (Nankhatai)


Read more!