Mango Cake with Streusel Topping

mango cake with streusel topping
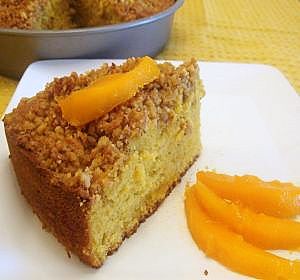
One of the best ways to flavor cakes is by using seasonal fruits, and when you are thinking about fruits and cakes in this warm summer, you cannot dare to ignore a delicious Mango Cake! They are not called the king of fruits for no reason; with a lovely shape and smell, a juicy and fibrous interior, mangoes lend a wonderful texture, sweetness and softness to cakes. So intending to use my indian mangoes, I had been planning to bake a Mango Streusel Cake for quite some time now. Trying to choose healthier options, I opted for a crumb streusel topping for my cake rather than the regular frosting. Plus, a streusel cake can be really versatile; serve it with coffee for a filling breakfast, or top it with whipped cream or ice cream for a luscious dessert. The nuts in the streusel topping give it a nice crunchy layer, making it a great recipe for Mango coffee cake; but you can opt to replace it with any other icing or frosting of your choice to suit your taste and occasion. But no matter how you choose to relish it, this Mango Cake is sure to leave an impression!

The term "Streusel" is a German word meaning "something scattered or sprinkled"; in terms of cooking and baking, it refers to a crumb topping of butter, flour, and sugar (traditionally German) that is baked on top of muffins, breads, and cakes. Slowly over time, this German recipe evolved with addition of spices like cinnamon, nutmeg or cardamom and finely-ground nuts. I've always enjoyed coffee cakes with streusel topping, and have been wanting to bake one at home. Finally I got to bake this Mango Cake with Streusel Topping and it was wonderful.

Ingredients

Mango Cake

2 cups all-purpose flour
** I used 1 cup wheat and 1 cup AP flour for a healthier option
3/4 cup unsalted butter
1-1/2 cup sugar
1 cup fresh mango puree (thick puree, no water added)
1 tsp vanilla essence
1/2 cup chopped mango or 8-10 slices
1 tsp baking powder
1 tsp baking soda
1/2 tsp salt
2 eggs

Streusel Topping
1/2 cup walnuts- finely ground
1/2 cup brown sugar
1/2 tsp nutmeg or cardamom (optional)
3/4 cup flour
1/2 cup butter

Method

To make the Streusel Topping, combine all the ingredients listed above with hand until it forms a crumbly mixture. Make sure you rub the butter evenly into the mixture for even texture.

Heat the oven to 350° F. Lightly coat a 9" x 9" cake pan with butter and dust with all-purpose flour, or use non-stick cooking spray.

Sift the flour, baking powder, baking soda and salt into a large mixing bowl.

Beat the butter and sugar in a separate bowl until light and fluffy. Now beat in the eggs, one at a time, whipping a lot after each addition. Mix till soft peaks form.

Now slowly add the flour mixture to the butter mixture, beating continuously as you combine the two. If you are using a large spoon or hand beater, make sure you are always stirring in the SAME direction (clockwise or anticlockwise).

Finally add in the vanilla essence and mango puree and blend everything together.

You can choose to add the chopped mangoes in the batter or use them as a top layer, as I did. Pour the batter into the prepared pan; top with the mango slices and then cover completely with the streusel mixture.

Now bake for 35-40 mins at 350 degrees, or until the edges have separated from the sides of the mould and a wooden toothpick inserted in the center comes out clean. Remove from the oven and let the cake cool on the wire rack fr at least 15-20 mins.

For a breakfast option, slice your Mango Cake and serve with tea or coffee. To enjoy as a dessert, cut into wedges, top with vanilla ice cream, and garnish with more mango slices!

I served this Mango Streusel Cake to friends last weekend and it was a great treat indeed! Find more German recipes.

Tip: Just like any other fruit-based cakes, this Mango Cake tastes better after 12-24 hours as the flavor of mango seeps in. So try baking it ahead to save time and get more flavor!


Read more!

Audiovox Homebase - A Sleek Kitchen Message Board with Picture Frame

audiovox kitchen message boardI'm sure each one of you has a kitchen "white-board" sticking to your fridge on which you scribble your grocery lists and leave messages for your family! Till now, I thought it was a wonderful addition to my kitchen, but a look at the Audiovox Homebase totally won me over! It combines the extremely essential message center with a digital picture frame, all in a sleek and stylish design that adds a lively dimension to your kitchen. With an ability to record audio and video messages, or scribble in the old-fashioned way, and also find a place for sticking notes and post-its, Audiovox has thought of everything when it designed this Homebase Message Center. It is creative, innovative, and really easy to use; in fact, it simply calls out to you to "leave a message" on the refrigerator! But there's more to this kitchen gadget than what meets the eye!

The Homebase features a 7 inch LCD color display, and comes with 512MB of built-in memory, which can be expanded with an external memory card. You can buy the combined Audio-Video Homebase, which allows you to record audio and video messages. Elegantly designed in white with green menu buttons, it looks sleek and can fit any kitchen decor. The small size makes it ideal for mounting on the fridge, but you can choose to mount it on a wall instead, or level it on a counter-top, whichever suits your convenience.

The Homebase doesn’t require any software setup to get started. The setup is extremely simple, even for non-tech-savvy people! As soon as you plug it in, a homebase logo pops up on the screen, followed by a slideshow presentation guiding you through the settings and options. With simple navigation and Yes/No selections, you can easily train the unit to record memos, timer settings, calendar options, and of course, record and playback audio/video messages; a green light indicates new messages and turns off after you've listened to it! The unit also has slots for a dry-erase marker and magnetic borders for post-it pads useful for quick scribbling.

But the highlight of this gadget is the ability to upload and play digital photos. You can choose to store photos (via USB) on the device memory, then keep playing them as still images or slideshows! pretty cool huh! It even makes the Homebase to be a beautiful gift for someone! The voice and video quality is pretty decent from the reviews I read, and the look and feel is definitely appealing. Besides, its also actually useful. The Audio-only version is currently selling for $149 (the A/V version will be available in late summer for $199). It does sound a bit high for just a message board, but if you compare it to digital picture frames, the price is pretty competitive!

The only change I might have liked was that it should support battery-power, so that its easy to mount and reduces clutter. Its hard to cover wires behind the frame on the fridge! But other than that, the Audiovox Homebase sure looks like a useful and innovative kitchen gadget that I've seen in some time.


Read more!

Cheese & Rice Cutlets (Croquettes) - Party Appetizers

cheese-rice cutletsOne of the most important things in a party menu are appetizers, as they have the power to make or break your first impression as a host. Its better to stick to simple yet presentable food for the first course, and these Rice & Cheese Croquettes totally fit the theme. When you think about vegetarian cutlets, people often think of potatoes, paneer, or lentils. But what's a chef who doesn't break boundaries, right? Inspired by some leftover rice and a bag of cheddar cheese, I decided to try a hand at these spicy Rice Cutlets; with minimal ingredients and very little prep-time, they work great for a quick snack, as a nifty picnic lunch, or as inviting finger-food in a party.

Ingredients
1 cup cooked rice
1/2 cup cheddar cheese
2 tbsp all-purpose flour plus some more for dusting
1-2 green chillies - chopped finely
2 tbsp cilantro - chopped finely
4 tbsp onions - chopped
3 tbsp bell-peppers - chopped finely
salt and lemon juice - to taste
1 tbsp corn flour (or 3 tbsp bread crumbs)
Oil for frying
few baby roma tomatoes
few toothpicks

Method
Add 1 tbsp oil to a pan, and saute the chopped onions and bell-peppers for about a minute.

Now mix all the ingredients together with rice except the tomatoes. Mix gingerly with your hands. Add the flour slowly as you shape them into balls or cutlets.

Heat oil for frying (or shallow-fry) in a wok. Once you've shaped all the croquettes, dust them in all-purpose flour; make sure to coat it completely so the cutlets do not break while frying

Fry 3-4 cutlets at a time at medium-high temperature. Flip them over gingerly till dark golden in color. Remove them and dab them on a tissue-paper to get rid of excess oil.

Now pass a tooth-pick through each cutlet, then top it with a baby tomato and drizzle with some sweet tamarind chutney. These croquettes are on their way to Culinarty's Original Recipes Roundup!


These rice & cheese croquettes are really tasty, with the rice adding the crispiness and the cheese making it gooey at the same time. Serve them hot, and both you and your guests are sure to ask for more!

Related Recipes:
Cheese & Bell-Pepper Rice Pulao (Pilaf)
Vegetable Cheese parathas (Stuffed Flatbread)


Read more!

No-Bake Mini CheeseCake - Orange & Pistachio

no-bake mini cheesecake
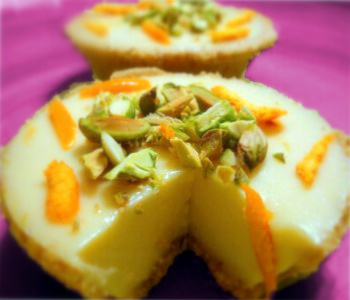
These "semi-homemade" No-Bake Mini Cheesecakes are a perfect recipe for an extremely simple and fuss-free dessert! They are so cute and adorable, and can serve to be perfect individual desserts for dinners or cocktail parties. The best part about cheesecakes is their versatility; blend some chocolate & liquer with cream cheese for an "adult dessert", or combine fresh seasonal fruits and berries for an all-time favorite recipe. As we move to warmer weather forecasts, I decicded to try a citrus flavor for my easy instant cheesecake. Oranges and Pistachios dominate this delicious sweet treat, coming beautifully together for a smooth creamy center with an invigorating burst of orange flavor!

It so happens that Helen selected a Citrus theme for this month's SHF#43, and I had these lovely tangerines waiting to be juiced and put to good use! Plus, it's my birthday this weekend, the stunning summer dress that was gifted to me by a special someone fits me perfectly, and so I'm all excited and in a mood to indulge!! And when I get excited, I need to eat something sweet (yeah, people have their addictions!:)) I had some ready-made mini tart-shells and a packet of cream cheese in the fridge, which sparkled the idea for these glorious cheesecakes. They are simple to make and wonderful to eat. Let your imagination run wild and experiment with whatever flavor you like. For now, here's the refreshing Orange & Pistachio Mini CheeseCake, to soothe your sweet-tooth cravings!

Ingredients
Makes 4 to 6 mini cheesecakes, depending on size

4-6 ready-made graham-cracker pie shells
1 packet(4 oz) Philadelphia cream cheese
4 tbsp cool whip (or use heavy cream, whipped a lot)
1 cup powdered sugar
1 tsp gelatin
4 tbsp water
6 tbsp orange juice (adjust according to taste)
1 tsp grated orange zest
chopped unsalted pistachios - for garnish

Method
Warm the 4 tbsp water till its almost boiling, then sprinkle the gelating and stir well. Set it aside and allow to bloom for 3-4 mins.

Meanwhile, whip the cream cheese, cool whip, orange juice and sugar in the blender. Whip it all together to form a smooth topping, or whip with a hand-mixer till smooth and creamy. Check for taste; adjust orange flavor and sugar to suit your taste.

Now add the bloomed gelatin to the cream mixture and again mix everything together.

Fill the pie-shells with the cream-cheese mixture and gently tap around to spread evenly.

Allow to refrigerate and chill for at least 1 hour so the gelatin sets the mixture. Insert a toothpick to see if it comes out clean, else leave in the refrigerator for some more time. I'd generally recommend at least 2-3 hours before serving.

When its time to serve, Garnish with some freshly-grated orange zest and finely chopped green unsalted pistachios.

We loved these fresh and flavorful mini-cheesecakes! It's such a simple and easy alternative to the traditional recipe, perfect for entertaining guests or whipping up a dessert on very short notice!

Similar Recipes:
Kahlua Cofee Cheesecake
Low-Fat Strawberry-Vanilla Cake
Marbled Cream-Cheese Brownies


Read more!

Cooking with Asparagus - Recipes & Methods

asparagus recipesUntil recently, I was unknown to the culinary world of asparagus, or its health benefits. But since I started blogging about food, I have seen so many different ways to cook asparagus, that I was inspired to give this perennial herb a try. Low in calories and packed full of nutrients like Folic Acid, Vitamin K, potassium and flavonoids, its a boon for the body. And the best part, you can serve it in several innovative ways or pair it with your food to get some greens into your system. And if you don't like them plain (like me!), don't worry, one of the different methods and recipes listed below will surely suit your style and taste!

Few would know that "Asparagus" are actually the young shoots of a cultivated lily plant. They're considered to be a "vegetarian delicacy", which I'm sure you'd agree if you've paid for a bunch of these at the supermarket! They have a distinct, intense savoury flavour, and while French asparagus is purple, the British and American varieties are green. In contrast, Spanish and much of Dutch asparagus is white, as it's grown beneath the soil and cut just as the tips emerge.

Being my first time, I wanted something quick and tasty to ease myself into the "eat asparagus" syndrome. I have eaten it with pasta before, but never really got to enjoy cooking it at home. I opted for the easy stir-fried asparagus with garlic, seasoning and a dash of parmesan for my first project, but now that I have developed a taste for it, I'll be trying more adventurous things with these greens! Meanwhile, here's a look at different ways to cook asparagus.

Note: Always be careful to wash asparagus spears in cool water to clean any soil or sand clinging to the tips. Then bend the spears so that they snap at the natural breaking points, or remove the two ends with a knife. Now you are ready to cook them using any of the methods below.

Boiling
Boil asparagus in 1-2 inch of salted water in a wide skillet or pan for 3 to 5 minutes. Immediately rinse them under cool water to stop the cooking and preserve the bright green color. Boil the asparagus with butter and onions, then add some seasoning, broth and heavy cream and blend to make a delicious Asparagus Soup

Steaming
You can even steam asparagus spears or pieces for 3-4 minutes using a standard steam cooker; just rinse under cool water after done so they don't become too limp. Add the semi-boiled asparagus to a pan with 2 tbsp olive oil, then add pine nuts, sun-dried tomatoes, some lemon juice and salt/pepper for a delicious take on Cooked Asparagus Better yet, whisk an egg in a small bowl, and some bread or cracker crumbs in a separate bowl. Dip the steamed asparagus pieces into the egg, then coat with cracker crumbs, and fry in hot oil until golden to make easy Asparagus Fritters.

Roasting
Bake or Roast asparagus in an oven preheated to 450 degrees F for for 3 to 5 minutes, or until tender. This method is generally preferred for thicker spears, and I particularly love it as it makes the stalks more crispier compared to steaming or boiling. Roasting asparagus is an easy, and flavorful way to enjoy these delicious green spears. The flavor is concentrated as the asparagus turns a deep, dark green. A topping of chopped nuts toasted in butter and olive oil, combined with some fresh salt and pepper makes for a great Roasted Asparagus Salad

Stir-Frying
Just like any other green beans, you can stir-fry 2-inch lengths of asparagus with some light oil, salt, pepper and seasoning. You can also add some finely chopped garlic while sauteeing the stems. Add these seasoned stalks to your favorite pasta, mix all in a creamy wine sauce, and you have an easy and delicious Pasta recipe with Asparagus.

Grilling
As barbecue season sets in, Grilled Asparagus can be an easy way to relish the greens. You can arrange smaller pieces of asparagus on skewers along with other veggies and grill them over a bbq. Just brush them with some olive oil and keep turning it around on the grill over medium heat, until the edges get browned and the stems are barely tender-crisp (about 5-7 mins). Drizzle with some lemon or orange juice, cajun seasoning and fresh parmesan cheese for a quick appetizer.

Choosing & Storing Asparagus - It is generally in season from May to July, and is best cooked within 2-3 days of purchase, just like any other vegetables. The tips should be tightly curled and perky; choose stalks that are firm and straight, rather than limp and wilted. You can wrap asparagus shoots in damp kitchen paper, put them in a perforated paper or plastic bag and keep in the salad drawer of the fridge; you can also store it in a glass or jug of cold water in the fridge for 3-4 days.

I was thrilled to have discovered so many lovely recipes using Asparagus. From appetizers to soups and pastas to salads, it is one of the most versatile veggies! And with so many different ways to cook asparagus, there's no way you can resist including these lovely summer stalks in your daily menu, right? If you have some favorite asparagus recipes to share, please add them here via comments.


Read more!

Tofu & Basil Thai Soup

thai tofu-basil soupIf there's one thing I love about Thai food, it is the variety of flavor in their curries. A spoonful of red, green or yellow curry paste can add such a wonderful taste to an assortment of veggies! After mastering the recipe for Veg Tom Kha Soup, I decided to try a hand at this classic Thai Soup with Basil and Tofu. Its a very simple broth made of coconut milk and flavored with all the Thai herbs like lemongrass, galangal, kafir lime and ginger, coming together with the basil, tofu and peas to make this delicious and healthy soup.

Tofu, which is generally considered to be very bland, can miraculously take on the flavor of its surrounding ingredients making it a highly versatile as well as highly nutritious part of a healthy diet. Tofu is a very good source of protein, specifically soy protein, as well as numerous other nutrients like manganese, copper, iron and omega-3 fatty acids. It is also an excellent source of calcium which can help prevent the accelerated bone loss and untimely rheumatoid arthritis. Basil comes with its own share of heart-healthy properties, and also acts as a great cleansing agent. Hence it would be a fitting entry to Susan's Beautiful Bones event, and also to Michelle's Herbal Essence!

Ingredients
1 cup firm tofu (cubed or diced)
1/4 cup fresh basil leaves
1/4 cup peas - boiled
1/2 cup coconut milk
1/2 tsp salt
1/2-1 cup water (or veg broth)
2 tsp green curry paste (recipe below)
fresh lime juice - to taste

Green Curry Paste
2 green Thai chilies
1 tbsp chopped garlic
1 tbsp chopped shallots
1 tspn chopped galangal
1/2 tspn chopped kaffir lime rind
1 tspn chopped lemongrass
1/4 tspn roasted cumin seeds
1/4 tspn roasted coriander seeds
1/2 tspn salt

Add the green chillies to a food processor and blend. Then add the garlic and shallots. Again give a whirl on the mixer. Finally add all the remaining ingredients and blend well to form a thick smooth paste.

You can either use the recipe above or use the store-bought Thai green curry paste. I've tried the ones from Trader Joe's before and they are pretty good.

Method
In a heavy pan, add the green chilli paste with 2 tbsp of coconut milk and roast a bit. Add salt and lemon juice, then the rest of the coconut milk and water to form the base of the soup. Add half of the basil leaves, then cover and let it simmer for about 5-7 mins. Keep stirring in between to let the coocnut milk be infused with the flavor of the thai green paste and basil.

When it starts to simmer, add the boiled green peas and pieces of tofu. Now lower the heat and cook for another 7-8 mins. Check for taste and add more green chilli paste or lemon juice if required.

Finally, just before serving, add the remaining basil leaves. Top with some shredded ginger if you like and serve hot. The spicy green chilli paste adds a wonderful flavor to this Basil and Tofu soup, giving it a Thai touch. You can add more veggies like carrots, shallots, or baby corn to the soup to make it suit your taste. The Thai Green Chilli paste can be made in advance and stored in the refrigerator for about a week.

Similar Recipes:
Chinese Hot & Sour Soup
Green Pea & Mint Soup
Roasted Cauliflower & Bell-pepper Soup


Read more!

Whole Grain Blueberry Pancakes

wholegrain blueberry pancakesThere's nothing that can keep me away from IHOP and its whole grain and nut pancakes, except an absolutely full stomach! Pancakes serve to be ideal breakfast in many american homes, and if you can make them healthier, there's nothing better! These healthy whole-grain blueberry pancakes were a perfect weekend brunch, and if you feed these to your kids, you won't feel guilty either! Loaded with the goodness of whole-grains, and the antioxidant power of blueberries, these pancakes are the ultimate balance of "tasty & healthy". What more could you ask from food, right?!

Pancakes are never out of fashion. And there are plenty of ways to mix-and-match and customize the basic recipe, which makes it interesting too! They go well with tea, coffee or orange juice, and as far as variety is concerned, the possibilities are endless! I love whole grain pancakes; they have an earthy texture and are very filling indeed. Here, I combined the classic whole-grain pancakes with blueberries and some coconut milk which brings a fresh tartness that nicely balances the sweetness of maple syrup. And they are light, fluffy, healthy and filling, all at the same time! Try experimenting with different berries; adding shredded coconut and some nuts wouldn't be a bad idea either!

Ingredients
Makes about 6 pancakes

3/4 cup white whole-grain (wheat) flour
1/4 cup oat flour (or substitute the oat flour for regular or whole-grain one)
1 tspn baking powder
1/2 tspn baking soda
1/4 tspn salt
1 cup fresh blueberries (or frozen and thawed)
1 cup buttermilk (or milk)
1 large egg - lightly beaten
2 tbsp butter - melted
1 tbsp coconut milk (or plain water)
confectioner's sugar - for dusting

Method
Combine the flour, baking powder, baking soda, sugar, and salt in a large bowl. Add the buttermilk, eggs, and melted butter to this.

Stir all the remaining ingredients until they are just combined. Don’t worry if the batter is a bit lumpy, you don't want to over mix. Finally fold in the blueberries.

Heat your skillet, pan, or griddle to medium-hot and brush it with a bit of butter. (If a drop of water dropped onto the pan starts to sizzle, the pan is hot enough). Now pour about 1/3 of a cup of batter into the skillet. Wait until the pancake bottom is deep golden in color (about 30 seconds), then flip with a spatula and cook the other side until golden and cooked through. Repeat with the remaining batter.

Serve with a dab of butter and maple syrup, or simply dust them with some confectioner's sugar! These whole grain blueberry pancakes are simply delicious! In fact, I could say this is my best pancake recipe ever!

Similar Recipes:
Whole-wheat Chocolate-chip Pancakes
Low-fat Blueberry Muffins
Banana-Walnut Pancakes


Read more!

Vegetarian Mexican Salad

wine-giftsMexican food is synonymous with spicy, hot and piquant! From authentic mexican salsa to crispy tacos or big, fat burritos, mexican food is often quick to make, and even quicker to eat! Mexican salad, as un-interesting as it may sound, is an enriching meal by itslef. Just as colorful as the mexican culture, this salad has several layers to it. Healthy, nutritive, tasty and filling at the same time, the vegetarian mexican salad is often served in a large cripsy tortilla shell called "Tostada". Layered with beans, vegetables, salsa and cheddar cheese, everything about this salad from its appearance to taste is irrestible! If you've enjoyed eating a "Burrito Bowl" at Chipotle, there's no way you can turn away from this recipe!

Ingredients
2 cups lettuce - shredded
1 cup refried beans
1/2 cup black beans - boiled
1/2 cup sweet corn kernels
1 cup cooked rice
1 small bell-pepper - finely choped
1 large semi-ripe tomato - chopped
1/2 cup cheddar cheese - shredded
3 tbsp gaucamole
3 tbsp sour cream
3/4 cup spicy mexican salsa
1 tbsp olive oil
salt and pepper - to taste

Method
Take a pan, heat 1 tbsp oil and add the chopped bell-peppers to it. Saue them lightly till they become a little tender.

Mix the shredded lettuce, beans, cooked rice and chopped tomatoes all together and allow to sit for some time. Then add the sauteed bell-peppers and spicy salsa to it. Add salt and pepper according to taste.

Add the sour cream and gaucamole on the top, and cover with a generous helping of cheddar cheese.

Top with some corn tortilla chips and serve! Indulge in the flavors of Mexico as you enjoy this vegetarian mexican salad. This goes to DK's Culinary event that celebrates Mexican Food this month.


Read more!

Personalised Wine Boxes Make Excellent Gifts

wine-gifts
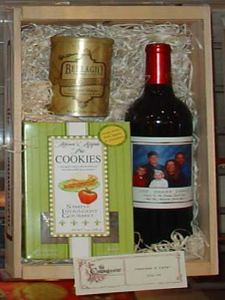
Wines have served to be excellent gifts since ages, be it a house-warming, wedding, anniversary, a simple dinner or a holiday celebration. Lots of meals, occasions and gatherings are incomplete without a serving of wine. But in today's high-tech world, almost everything is personalised, from wardrobe to cell-phones, any gift you give or receive comes with a "personalised" message; so its no wonder then that Personalised Wine Gifts have become a new rage, and you'd be amazed to know how many options there are! But after my recent trip to Napa Valley, I am convinced that there's more to wine-gifting than I thought and a few tips to customize your next gift will surely go a long way!

We have a neighbor who is a 63-year old woman, and we often chat with each other over a cup of coffee. This Mother's Day, she received a personalised wine bottle from her daughter who stays in Missouri, and the package arrived when I was there. I was intrigued by the lovely gift box that housed a bottle of premium wine, along with some tinned goodies, all decked up with a lovely message from her daughter and grandkids and also a photo of the entire family, artistically printed as a personalised wine label on the bottle. One look at her face and I knew she was thrilled to have received it; even I would feel special if someone gifted that to me!

Lucky me, I not only got to share a glass of the exquisite wine with her, but also a look at the company that had provided the service. Connoisseur is a company specializing in organic wines like Domodimonti's Organic Wine. They have a large range of premium wines and champagnes that serve to be great gifts for friends, family or even clients and colleagues. From regional varieties to dessert wines, organic wines or sparkling ones, right upto other liquors and spirits, there's a lot of options to choose from. I really liked their packaging of rustic wooden boxes, which gave it that old-world charm. The gift boxes also include customised crystal stemware and gourmet food items like chocolates and cheese to go with your wine gift. You can create your own labels by providing your own text or verse, even choose fonts and style; for the less imaginative ones, they have some suggestions for all the major occasions. The cool part is that you can upload your photo so that it becomes a part of the message, as if you are there delivering the gift in person! They also add a personalized gift card made out for the recipient with a little story to suit the occasion! The prices are affordable to fit any budget, and if you are not a wine connoisseur, you can opt for gift certificates instead.

There's nothing like taking that extra step to personalise your gift. Wine is already a coveted gift, and with personalised wine labels you can make it even more fancier! Believe me, if you had seen my neighbor's face you wouldn't doubt it! Mother's Day is gone, but there's still plenty of time to buy a gift for Father's Day(June 15th)!! So if wine-gifting is on your agenda, make sure you personalise it to add that extra touch of sentiment and love, which is sure to bring a huge smile to the recipient's face!

Related Articles:
Which Wine to Pair with your Food


Read more!

Stuffed Bell Peppers (Shimla Mirch)

stuffed bell-peppersBharwan Shimla Mirch, or Stuffed Bell Peppers simmered in a rich creamy sauce is a cherished entry on an Indian restaurant menu, and is indeed a favorite with many of us! The perfectly grilled bell-peppers, stuffed with vegetables and sauces inspired me to try my own verison at home. And believe me, I couldn't have been more surprised when I saw that the end product was just as delicious, if not better-tasting that the one we eat at the restaurants! I used spiced onion and potato filling, then topped it with some homemade-sauce and feta cheese. I made a separate yogurt-based gravy, slightly modified from regular indian curries, and dumped the stuffed bell-peppers into it!

There are several variations you can try with the stuffing. In fact, I have previous cooked stuffed bell-peppers with tomato gravy too. But this time, I decided to boil the capsicum first before stuffing and baking, and I highly recommend doing so as it softens the hard outer skin and allows the spices and flavors to soak through completely when you bake them. I'm sending these to Pooja for her JFI-Bell Peppers event, and also to Abby for her Vegetables-2008 event.

Ingredients
4-5 small-sized bell-peppers
2 medium potatoes - boiled
1 small onions - finely chopped
1 cup feta cheese - crumbled
10-15 raisins
2 tbsp tamarind chutney
2 tbsp oil
1/2 cup cilantro - finely chopped
1/2 tsp ginger-garlic paste
salt - to taste
lemon juice - to taste
1/2 tsp paprika or red chilli powder
1 tsp garam masala

For the Gravy
2 cups yogurt
2 tbsp tamarind paste
1/2 tsp sugar - if required
1 cup water (or a little more)
1/2 cup tomato puree
2 tbsp oil
2 tsp ginger-garlic paste
1 tsp garam masala
1 tsp red chilli powder
1 tsp turmeric powder
2 bay leaves
salt and lemon juice - to taste
1/2 tsp cumin seeds
2-4 tbsp milk(optional)

Method
Boil the Bell-Peppers
Wash and cut off only the top of the bell peppers. Remove all the seeds and pith.

Then put them in a pot of boiling water. Cover and cook for about 10 mins or until they are tender and soft, but retain their shape.

Prepare the Stuffing
Now take the boiled potatoes, mash them evenly and add all the spices for the filling to it. Take a pan, add 2 tbsp oil and saute the finely chopped onions. When they turn soft and glazed, add them to the potato filling mixture. Also add the chopped cilantro, leaving some for garnish, and the raisins.

Stuff the boiled capsicum with the filling. Add 1 tsp of tamaring chutney on the top, followed by the crumbled feta cheese.

Baking the Bell-Peppers
Grease a cookie-sheet with non-stick spray. Now take a cooking brush and apply a thin layer of oil to the outside of the bell-peppers. Now place them at least 2-inches apart on the baking sheet.

Preheat oven to 450 deg F and bake for 40-45 mins(may be longer), until the outer skin becomes broiled and thoroughly cooked. Rotate the baking tray by 180 deg after 20 mins for even distribution of heat. A nice test is to see that it starts peeling, and becomes soft to touch. When a fork or a tooth-pick passes through the skin without much effort, you know that the peppers are roasted and cooked.

Preparing the Gravy
you can serve the above Baked & Stuffed Bell Peppers as an appetizer or a side dish by itself. To make this as an entree, we will add these to an indian-style curry.

Beat the 2 cups yogurt with 1/4th cup of water to form a smooth paste.

Now take 2 tbsp oil, add cumin seeds, and when they start spluttering, add the bay leaves, ginger-garlic paste and the tomato puree. Add all the dry spices for the gravy in the list above, and saute for about 2-3 mins.

Now add the tamarind paste, sugar and the blended yogurt to this mixture and cook everything on medium-flame for 8-10 mins. Keep stirring in between. and add some water as required to form a thick, creamy gravy. Add 2 tbsp whole milk if required just to add to the thickness.

Assemble the Bharwaan Shimla Mirch
Once the gravy is thick enough, remove from flame and allow a to cool a little. Drop one heaped tablespoon fo the gravy on top of each capsicum. Arrange the baked bell-peppers on a serving dish. Now add the gravy all around, or alternately, add the capcicum to the gravy itself, however you wish to present.

Serve these Baked & Stuffed Bell Peppers with some Chapatis or Parathas and Jeera Rice!


Read more!

Announcing Monthly Mingle - Appetizers & Hors'Doeuvres

spago-beverly hillsAfter the fabulous roundup of Bollywood Cooking, its now time for another round of Monthly Mingle, an event started by dear Meeta of What's For Lunch Honey? This time, I get to play the hostess, and as all of you know that I love entertaining, this week's theme should not be a surprise! We'll try to spice it up this time with Appetizers & Hors'Doeuvres. "Hors'Doeuvres" is the fancy french name for what is referred to as "Appetizers" in English. These are served as starters before the main course, and are often the only highlight of cocktail parties. These are the tasty bite-sized servings that are always a favorite at any party or gathering. Unlike main course dishes that are rich and filling, hors'doeuvres are light and petit, and can be sweet or savoury!

For this monthly mingle, we'd like you to share some fancy vegetarian appetizers. Cook something that's pretty to look at and tasty to bite in, something that looks good on a plate and is irrestible to your guests!

This event has been completed and the roundup is now available at Appetizers & Hors'doeuvres - Recipe Roundup!

Thanks everyone for making this event a huge success!


Read more!

Spago Beverly Hills Restaurant - A Celebrity Destination

spago-beverly hillsWolfgang Puck is a name not unknown to anyone. Spago Hollywood on Sunset, originally known as Bistro Garden and a favourite with all hollywood celebrities, has been re-surrected as Spago Beverly Hills, the latest venture by chef Puck, and remains to be a cherished dining destination for the people of Los Angeles. With its beautiful ambience, shaded patio with tall trees and the inviting open-kitchen architecture, Puck and his wife have truly created an upscale restaurant in the already star-studded Beverly Hills. Standing the tests of time and taste since 1997, Spago is undoubtedly one of the best in terms of cuisine, standards and style! Romantic yet affable at the same time, and featuring the creativity of celebrity chefs, there's no way you can go wrong with Spago!

The interior is aesthetically done and carries the sophisticated, elegant and warm touch that is a bit uncharacteristic of designer Barbara Lazaroff. At the center of the sophisticated restaurant is the old Bistro Garden's romantic patio, beautifully designed and shaded by tall pepper trees. It offers a relaxing outside venue for a lunch. A fountain inscribed with the word "passion" (in various languages) stands next to a pair of 100-year-old olive trees imported just for Spago. But the highlight has to be the spectacular kitchen, which can be viewed through a giant wall of colorful, etched glass. The dining room is striking, with colorful tiles, vibrant stained-glass windows and wildly colorful carpets. Spago is a place where you can expect to be given the red-carpet treatment; it does not matter that you are a "somebody" sharing the space with the hollywood stars! Original artwork and jeweled details surround the dining room and add to the beauty of the restaurant, which also offers two private dining rooms with a separate bar for receptions and functions.

As Wolfgang Puck's flagship restaurant, Spago remains at the forefront of L.A's dining style. Executive chef Lee Hefter's menu features such signature dishes as the deservedly famous salmon and creme fraiche pizza. Using the finest ingredients and his artistic flair, Hefter creates culinary masterpieces. It's difficult to list the best dishes, but we had the Risotto with oregon Porcini Mushrooms and the famous Sweet White Corn and Mascarpone Agnolotti, followed by the Giant Farmer's Cheese Ravioli, and I have to tell you everything about the dishes, from taste to texture to presentation, was simply fabulous! They have several daily specials with cheese and seasonal produce, and the salmon dishes, variety of salads, pasta and noodles, everything is a classic. Actually, I was surprised to find so many choices on the Menu- there's something for everyone to enjoy! But the nightlight, and also the primary reason we visited Spago, was the classic desserts by Pastry Chef Sherry Yard. I own her cookbook and marvel at her creations, and though the luscious Tiramisu and the buttery Apple Streudel was all we could eat, you'd want to sample every entry on the menu!!

They also have an extensive wine list to suit the rest of the menu. You can easily expect a tab of $70-100 for a couple, but that's pretty competent with other upscale restaurants like Tantra Indian Restaurant and La Fondue, and definitely worth the quality of food and service. You are sure to enjoy your time at Spago, with the added bonus of sighting your favorite hollywood celebrities, and you'll leave feeling culinarily blessed! If you are looking for an upscale romantic and memorable lunch or dinner destination, Spago at Beverly Hills will not disappoint you!

Spago Beverly Hills on Urbanspoon

Address:
176 North Canon Dr.
Beverly Hills, CA 90210
(310)-385-0880
Spago Beverly Hills

More Restaurant Reviews


Read more!

Counting Calories for Weight Loss

healthy weight-lossAs the awareness for staying healthy and fit increases day by day, more and more people are looking towards ways to achieve healthy weight loss, and the most important step in doing so is to count your calories and create a deficit or increase to achieve your target healthy weight. No matter how much time you spend at the gym, if you consume more calories than you burn, you'll never lose weight. But as daunting as it may sound, there's a formula to measure how many calories you should eat based on your BMR(Basic Metabolic Rate), and its advisable to choose a good diet and fitness plan based on this figure so that your weight-loss plan is more meaningful and successful. (img credit)

What is BMR(Basic Metabolic Rate) and how to Calculate it?
BMR is the amount of energy your body needs to function. We use about 60% of the calories we consume each day for basic bodily functions, and this number is based on your height, weight, age and sex. There's a general formula that can be used for adults to calculate your BMR:

Adult Women
BMR= 655 + (4.3 x weight in pounds) + (4.7 x height in inches) - (4.7 x age in years)

Adult Men
BMR= 66 + (6.3 x weight in pounds) + (12.9 x height in inches) - (6.8 x age in years)

Activity Factor
Sedentary = BMR X 1.2 (little or no exercise, desk job)
Lightly active = BMR X 1.375 (light exercise/sports 1-3 days/wk)
Mod. active = BMR X 1.55 (moderate exercise/sports 3-5 days/wk)
Very active = BMR X 1.725 (hard exercise/sports 6-7 days/wk)
Extr. active = BMR X 1.9 (hard daily exercise/sports & physical job)

Maintenance Calorie Level = BMR x Activity Factor

Calorie Deficit to Lose Weight = 15%-20% of Maintenance Calorie Level

How Many Calories Do I need?
Depending on your physique and work, the above number indicates the amount of calories you can eat every day to maintain your current weight and work demands. In order to lose or gain weight, you'll need to take in fewer or more calories than this number. Keep re-assesing your new BMR as you see a change in your weight, then re-calculate your calorie target accordingly. But remember, there's always a minimum calorie threshold that you should meet so your body can function without feeling weak. Dropping down to a very low calorie intake can make you anorexic! You will lose weight very fast, but that is NOT Recommended. Do not cut back to fewer than 1,200 daily calories for women or 1800 calories for men without medical supervision, as it can lead to serious health problems. There are several online calorie-counting tools to estimate how many calories are there in your food. Use these or consult a nutritionist to get a rought estimate of your daily intake and decide how to plan your diet to meet the calorie target.

Creating a Calorie Deficit for Healthy Weight Loss
The basic law says that 3,500 calories is equivalent to one pound. So, if you create a deficit of 500 calories a day, you should be able to lose about one pound per week. But this deficit can be created by a combination of cutting back on food and burning the remaining calories by working out (such as cut back 250 calories in food & burn an extra 250 calories in the gym). However, keep in mind that Muscle weighs more than Fat. So when you do strength-training, you may see that your weight increases, but that's actually your fat being converted into muscle, which is good, nothing to worry about. Even when your weight increases, you'll lose inches and be more toned than before.

Example:
Your BMR is 1339 calories per day
Your activity level is moderately active (work out 3-4 times per week)
Your activity factor is 1.55
Your MCL = 1.55 X 1339 = 2075 calories/day
Target Calories for weight loss = 2075 - (15% of 2075) = 1764

The easiest ways to cut calories from your food is by using simple substitutions. Leave out the condiments, use skimmed-milk instead of whole, wheat-grain instead of all-purpose flour, eliminate all white foods(cakes, cookies, muffins), cut back on sugar and sodas, and stuff yourself with vegetables,fruits and lean meat. Space your meals correctly, and you won't even feel like you are dieting!

Rapid Weight Loss is not Healthy Weight Loss
A healthy weight loss goal is to lose 0.5 to 2 pounds per week. Losing more than 2 pounds per week will mean the weight is less likely to stay off permanently. Its easy to stop eating for a week and see your weight drop 5 pounds drastically, but as soon as you start eating again, those pounds will come back, much faster than you expect, and you'll have more fat in your body, which in turn will be harder to burn! So stick with a target of losing maximum 2 pounds (or 1000 calories deficit daily) a week. As you can see, this by itself is a difficult goal to achieve! But keep a diary of your progress, re-evaluate your goals every month, and change your calorie target accordingly.

Achieving healthy weight-loss by counting and cutting back on calories is not something that should scare you. Just by understanding how the calorie-counting works, and then defining your diet and exercise regime accordingly can help you maintain a healthy body, and you'll feel happy and satisfied as your weight loss will be permanent. Hope these tips guide you in achieving your target weight-loss!

Disclaimer: Please consult your doctor or nutritionist before changing your diet or starting a new exercise regime.

Similar Articles:
Replace Sodas with Fresh Juices and get Slimmer
Foods that Fight Bad Cholesterol
How to Combine Cardio with Strength-Training


Read more!

Vanilla Tea Cupcakes

vanilla cupcakesTea parties are one of the most easiest ways to entertain on a bright summer afternoon. Some crackers or cookies, vanilla cupcakes and a pot full of simmering hot tea or coffee and you are all set to make your friends feel at home and enjoy a quiet afternoon, reliving fond memories. Vanilla is such a universal flavor it can make anything taste better, and cupcakes are one of the simplest contenders! But here, we adapt a simple cupcake recipe for a tea-party by adding some spices and orange zest, and decking them up with a dollop of jam and some sprinkling of powdered sugar. Pulled out of mini-muffin pans and placed on a party platter, these vanilla tea cupcakes will surely make it worth your while!

Ingredients
Makes about 12 mini cupcakes

1-1/4 cup all-purpose flour
1/2 tsp baking soda
2 tsp vanilla essence
1 tsp all-spice (or nutmeg, cinnamon,dry ginger and star anise pwd)
1/2 tsp orange zest
1/2 tsp salt
2 tbsp vegetable oil
1/4 cup granulated sugar
1 large egg
2 tbsp unsalted butter - softened
4 tbsp confectioners' sugar - to sprinkle on top
4 tbsp jam (raspberry or strawberry works best)

Method
Preheat oven to 350 degrees F. In a bowl, whisk together the flour, the baking soda, the spices, and a pinch of salt.

In another bowl, cream together the butter and the granulated sugar, beat in the egg, till its light and fluffy. Add the oil and whisk together.

Slowly combine the liquid mixture to the dry ingredients, beating well after each addition. Finally add the vanilla essence and orange zest to the batter.

Divide the batter among 12 paper-lined mini-muffin tins and bake the cupcakes in the middle of an oven for 15 to 20 minutes, or until a tester comes out clean.

Turn the cupcakes out onto a wire rack and let them cool completely. Whip up the jam mixture with 4 drops of water. Drop a tiny spoonful on the top of each cupcake. Dust with some confectioner's sugar.

The spices do balance well with the orange zest and vanilla...so there's a little bit of everything without any of it being overpowering..and the jam and sugar on the top makes it worth serving at a party!:) No need for frosting!! Serve these Vanilla Tea Cupcakes at a tea-party and dazzle your friends and guests, just like I'm sending them to Erin's Spring Tea party event!

Similar Recipes:
Chocolate Cupcakes with Orange Cream Sauce
Raspberry-filled Molten Cupcakes


Read more!

Napa & Sonoma Valley - Wine Tours, Food and Scenic Countryside

Napa ValleyNapa Valley, famous around the world as the Wine Country, is one of the most popular tourist attractions in California. More than five million visitors come each year, often overcrowding the roadways on summer weekends. Peak times are the summer months and the harvest "crush" during September and October. Napa Valley is home to more than two hundred wineries. With wine as a focus, great dining naturally emerged to compliment it, making it a food-and-drink lover's paradise!
Spring and fall are the best times to visit. Summers tend to be hot and dusty, as well as decidedly crowded. Fall (September-November) combines fine weather with the grape harvest, and the wine-making season is on in full swing! The gloroious vineyards of the beautiful Sonoma county are a visual and gratifying treat,irrespective of weather you are a tourist, foodie or a vintner! If you happen to be in California, you would definitely not want to miss a tour to Napa!

If this is your first time in the scenic napa Valley, and you are not sure what you'd like to do, take a moment to browse through this Napa Valley online Guide, which is like a complete directory of the wine country. You can't do the entire Wine Country in just one day! I'd concentrate on the Sonoma and Russian River valleys, which I think offer the best combination of food, wine, and outdoor activities. Calistoga, Hot Springs offers many excellent restaurants and shops, ballooning, cycling, jogging, tennis, golf and much more.

Sightseeing and Recreation
Napa Valley situated in the Bay Area in California, is the main wine growing region of the United States of America and one of the major wine regions of the world. On a day trip or a long weekend in the Napa Valley, you can revel in hedonistic pleasures some folks fly to France for: world-class wines at chateaulike wineries, innovative meals in elegant settings, memorable lodges surrounded by vineyards. It is also known for its gourmet restaurants, cafes, and spa-treatment centers. Named for the Roman goddess of abundance, Copia: The American Center for Wine, Food & the Arts is a $50 million cultural centre, bringing together all things Wine Country in one smart package. Interactive exhibits include a wine-tasting station that demystifies the experience, preparing you to visit wineries unafraid. Every ticket includes free tastings and a cooking demonstration. Napa Valley Museum can be another worthy attraction for those of you interested in the history of the city. The famous Balloon Rides offered in Sonoma are an experience in themselves. As you soar through the scenic county at an altitude of 100 feet, you can witness some amazing natural beauty, not to mention the thrill of the ride itself. But reservations are recommended, and make sure to check that you pick a good day, as winds determin the schedules for these baloon rides. If you are in the mood to splurge, check out the Napa Valley Wine Train, which is by far the best way to cover a range of hand-picked vineyards, free wine-tasting and lunch included! Biking along the vineyards is also a great way to check out the beautiful countryside.

Food and Restaurants
Everyone knows that a trip to Napa is incomplete without the famous wine tours. But even if you don't drink, there's a lot of food, history, resorts and natural beauty to keep you occupied. This place is like a heaven for food-lovers; with food that ranges from mediocre to exclusive, Napa Valley is a celebration of fine dining. There are many upscale restaurants that offer pairing of wine and food, combined with a decadent chocolate experience. Chowhound offers some great suggestions for dining; there's also an Artisan Food and Wine Festival hosted every year, and is something you'd not want to miss!

Vineyards and Wine Tasting Tours
Most wineries offer tastings and/or tours of their products. The largest, most well known wineries such as Mondavi and Beringer are open daily with large hosting facilities and guided or reserved tours of the operation. The many smaller wineries may offer tastings only by appointment, but your tour or tasting may be conducted by the owner. Most vineyards charge a small fee for the tastings, especially at the more popular vineyards, perhaps $5-$10. Winery tours are generally very interesting and informative. Reserve room tastings provide an opportunity to sample expensive wines without having to spend a larger amount for a bottle. For novices like us, I'd recommend a guided tour; the California Wine Tours has several affordable options all year round to suit your budget and time of visit. Unless you are a wine connoiseur and know the area well, tours are simply the best way to take in the beauty and essence of the country!

I'd suggest having at least 3 days to really soak yourself in the Napa Valley. It acts like a wonderful retreat, and with the plethora or resorts and spas available, its the ideal destination for a romantic getaway! Sonoma County is the preferred destination, and is a great place to visit in summer or early fall. There's a lot you can do in the California Wine Country, but most of all, its the feeling of peace and relaxation that leaves an impression. The large open space, the beautiful and colorful countryside, the exotic villas and resorts, and of course, the food and wine, all these make Napa Valley a cherished tourist destination.


Read more!

Chocolate Banana Bread or Cake

banana-chocolate bread
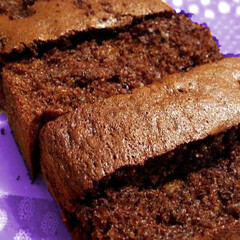
Chocolate Banana Bread has been an old favorite, and needs no preamble or praise. The pairing of chocolate and bananas is one of the most reliable ones where baking is concerned, and though bananas were traditionally baked with walnuts or pecans for the classic banana-nut loaf, this new combination has indeed found a place in the hearts and minds of foodies. Chocolate can get really overpowering, especially in baked desserts; but this Chocolate-Banana Bread recipe still focusses on the distinct flavor of ripe bananas, while chocolate, nuts and dried cranberries make it both festive as well as delicious! Every chef will certainly have their signature banana bread recipe, but there's always room to improve it, right?! So here I share my recipe with you - a classic recipe adapted to make it eggless and also to suit my tastebuds!

Banana Bread is pretty similar to a Banana Cake, except for its shape; while one is baked in a loaf pan, the other uses a non-loaf pan!:) But this, to me, is not really a valid difference! I chose to bake my chocolate-banana bread cum cake in a rectangular pan rather than a standard loaf one, and believe me, it still tasted as great as ever! Serve this with a cup of tea or coffee for a bread-like feeling; drizzle some chocolate syrup and whip cream on the top and it transforms into a decadent dessert. So now you have not one, but two wonderful reasons to put those 4-day old ripe aged and yellow-skinned bananas to good use! Also, a tip from Stephanie's chocolate-banana bread recipe about sprinkling some brown sugar on the top to get the crusty golden texture while it bakes sounds interesting! This beauty is on its way to the Banana-Bread Bakeoff hosted by Not Quite Nigella!

Eggless recipe - A banana bread or cake is the most appropriate type of recipe to make into an eggless version. Mashed bananas impart the same texture and softness to the cake that egg yolks would; you might have to compromise just a tiny bit on the fluffy part, but if you use self-raising flour, even that difference would melt away! So for an eggless version, omit the eggs, use self-raising flour instead of regular one, add 1 more banana, and 1/2 tsp more of baking soda.

Ingredients
1 and 1/2 cups all-purpose flour
1/4 cup cocoa powder
1 tspn baking powder
1 tspn baking soda
1 tspn salt
1 cup brown sugar
1/4 cup unsalted butter (at room temperature)
1 large egg
2 large ripe bananas (yellow-skinned ones)
1 tbsp milk
3 tbsp walnuts - coarsely chopped
3 tbsp dried sweetened cranberries
1/2 tsp nutmeg (optional)
1 tbsp poppy seeds (optional)

Method
Preheat the oven to 350 degrees F. Butter a 9 x 5 x 3 inch loaf pan, or a 9x9 inch cake pan and set aside.

Cream the sugar and butter in a large mixing bowl until light and fluffy. Add the egg and beat well till it becomes light and fluffy.

In a small bowl, mash the bananas with a fork. Mix in the milk and nutmeg. In another bowl, mix together the flour, cocoa powder, baking powder, baking soda, salt, cranberries, poppy seeds and walnuts.

Add the banana mixture to the creamed sugar mixture and stir until combined. Add the dry ingredients, mixing just until flour disappears.

Pour the batter into prepared pan and bake for about 1 hour (depending on oven and pan size), until a toothpick inserted in the center comes out clean (Do the toothpick test after 45 mins, then bake a little longer if needed).

Set aside to cool on a rack for 15 minutes. Remove the bread from the pan, then use a buttered knife to cut into slices.

Suggested Variations: White chocolate chips, raisins, pecans, macadamia nuts, toasted walnuts

This delicious Chocolate Banana Bread is great with your morning tea. The cranberries and poppy seeds add a nice flavor as well as a crunch to the loaf, at the same time balancing the sweetness of bananas. As bananas tend to give out a distinct smell as they get old, it is best to consume this bread within 2-3 days while keeping it refrigerated.

Similar Recipes:
Hazelnut & Mocha Bread
Banana & Walnut Fluffy Cake
Persimmon & Chocolate Spice Cake
Fried Banana with Ice Cream


Read more!