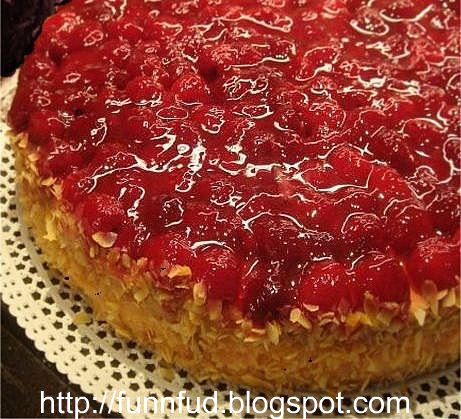
Upside Down Cranberry Cake

cranberry-upside-down-cake
Thanksgiving without a Cranberry Cake is almost incomplete, don't you think? Of course, you could bake a simple cake and drizzle it with cranberry sauce, or instead, you could bake this beautiful Upside-Down Cranberry Cake that will surely be the highlight of your Thanksgiving Dinner! With a touch of all-spice adding to the festive Fall mood, and a layer of slivered almonds & shredded coconut splashed on the sides of the cake to add the perfect crunch to the mushy cranberries, this traditional Cranberry Upside-Down Cake is a lovely addition to your holiday table! But use any fruit that you like, Pears, Plums, Apples, Peaches or Pineapples - this basic recipe for upside down cake can be used to bake any fruit cake that you please!

I'm sending this beautiful cake over to Susan who's collecting "Shiny & Glittery" desserts for this month's edition of Sugar High Fridays! And it also goes to my friend DK who's hosting AWED - American treats this month.

Ingredients
Makes an 8-9 inch cake

8 tbsp unsalted butter at room temperature
1 cup sugar
1/2 tspn allspice
2 cups cranberries
1 large egg
1 tspn vanilla extract
1 1/4 cups all-purpose flour
1 1/2 tspn baking powder
1/4 tspn salt
1/2 cup milk
1/2 cup white frosting (optional)
3/4 cup slivered almonds (optional)

Method

Preheat oven to 350 degrees with the rack in the center. Rub the bottom and sides of an 8-inch round cake pan with 2 tablespoons butter.

In a small bowl, mix together 1/2 cup sugar with the allspice. Sprinkle this mixture evenly over bottom of pan; arrange cranberries in a single layer on the top and spread them out.

With an electric mixer, cream remaining 6 tablespoons butter and 1/2 cup sugar until light and fluffy. Add egg and vanilla; beat until well combined.

In another bowl, whisk together flour, baking powder, and salt. With mixer on low speed, add flour mixture to butter mixture in three batches, alternating with the milk, until well combined.

Spoon the batter over the cranberries in the pan and smooth the top. Bake the cake until a toothpick inserted in the center comes out clean, about 30 to 35 minutes.

Let it cool on a wire rack for 20 minutes. Run a knife around the edge of the cake, then invert onto a rimmed platter. If you would like to add some slivered almonds or shredded coconut on the sides, apply a real thin layer of frosting (crumb coat) on the sides and slap the toppings onto it.

Before serving, add some fresh cranberry sauce on the top of the cake to give it that fresh shine and glitter! Serve the delicious and ravishing red Cranberry Upside-Down Cake as the perfect dessert for your Thanksgiving dinner!

Wish you all a very Happy Thanksgiving, and may you have a great time with friends and family! Have a great holiday weekend!

Related Recipes
Spiced Upside-Down Plum Cake
Mini Pineappple Upside-Down Cake
Layered Chocolate Cake with White Cream Frosting


Read more!

Festive Fruit Juice Cocktail


juice-cocktail
Its the season for fresh fruits, with Plums, Pomegranates, Apples, Cranberries and more filling up the stalls at the farmers' market! And one of the easiest ways to enjoy the flavor and health benefits of fruits is by juicing them and drinking them down. Though Cocktails are more preferred on festive occasions, fresh fruit mocktails have a charm of their own! Using some fresh POM pomegranates, plums, raspberries, cranberries and some pineapple, we enjoyed blending them all together to make this beautiful red Juice Cocktail. Pleasing to they eyes, you can even pass it off as a Wine cocktail! It had the perfect balance of sweet and tart, and the small dose of juicy pulp that you can only get from fresh fruits! Healthy, festive and fancy enough to be served at any Holiday Dinner, I might just have found the refreshing Thanksgiving drink recipe I was looking for!

Ingredients
Makes 4 servings
1 cup POM juice or 1 fresh Pomegranate
4 large plums - de-seeded and chopped
1/2 cup chopped pineapple
1/2 cup cranberries
1/2 cup raspberries
1/4 cup water
1 tsp lemon juice (optional)
sugar (optional, if needed)

Method
Remove the seeds if using fresh pomegranates. Blend them alone to extract juice, then pass through a strainer to get clear Pomegranate juice

Now mix all the other ingredients along with the POM juice and blend well to make a smooth Puree. Check for taste, and add the lemon juice and sugar if required. Add water as needed, but just enough to blend the fruits; don't make it too liquid!

Then strain the juice through a fine sieve, especially to remove pomegranate and raspberry seeds.

Pour the festive fall Juice Cocktail into serving glasses. Garnish with a lime wedge if you like, and enjoy!

Related Recipes
Spiced Cranberry Plum Sauce
Pomegranate Martini
Beetroot Juice


Read more!

Layered Chocolate Cake with Fluffy White Frosting


layered-chocolate-cake
When it comes to Layered Cakes, a beautiful layered Chocolate Cake enhanced with fluffy white frosting, and drizzled with some chocolate shavings on the top will never go out of style! Though I love original chocolate cakes with deep dark chocolate buttercream frosting, the white and brown in this recipe creates a wonderful contrast, both, in looks and in flavor. Whether you are celebrating a birthday, an anniversary, or a special occasion, Layered Cakes are the best ones ever! Showing off my recent coursework from my cake decoration class, here's a delicious and moist 3-Layered Chocolate Cake with luscious and fluffy White Cream Frosting.

You can use regular White Buttercream Frosting too, but I found this really nice fluffy frosting recipe from a friend that works much better, as it stays soft and fluffy. It compliments the chocolate cake quite well, which is a recipe I adapted from Martha Stewart Living. By using sour cream and hot water, you end up getting a really moist cake with firm texture. This goes to Lorraine for her Best Chocolate Cake challenge!

Ingredients
Good for 3 individual 9" cake layers

For the Cake
16 tbsp (2 sticks) butter , softened
3 cups firmly packed dark brown sugar
4 large eggs
2 teaspoons vanilla extract
3/4 cup cocoa powder , sifted
1 tbsp baking soda
1/2 tsp salt
3 cups cake flour (not self-rising flour)
1 1/2 cups sour cream
1 1/2 cups hot water

For the Fluffy White Icing
5 large egg whites
2 cups icing sugar
2/3 cup water
1/2 tsp cream of tartar
2 tsp vanilla
1 cup packed chocolate shavings - to garnish the top

Method

Making the Cake
Preheat oven to 350°. Grease three 9-inch round cake pans with butter; line bottoms with parchment paper, and butter the paper.

In a large bowl with an electric mixer, cream together butter and brown sugar on medium speed, about 5 minutes. In a separate bowl, combine eggs and vanilla; add to brown sugar mixture in two batches, mixing on medium speed until incorporated. Scrape bowl thoroughly; beat 1 minute on high speed.

Sift together cocoa powder, baking soda and salt; add to brown sugar mixture and beat on low speed until just combined.

Sift flour. Add 1 cup to batter and beat on low speed until just combined. Add 3/4 cup sour cream to batter; beat on low speed until just combined. Alternate adding flour and sour cream to batter until there's none left. With mixer still running on low, slowly add hot water, beating until just combined.

Scrape bowl thoroughly; beat batter on low speed about 20 seconds. Scrape bowl thoroughly once more, then divide batter evenly among the three pans, about 3 cups per pan. Bake 30 to 33 minutes, or until cake pulls away from sides of pan. Remove from oven. Cool layers in pans about 30 minutes, then remove from pans and cool completely on wire racks. Wrap in plastic and refrigerate up to one night before assembling.

Make the Frosting
In large deep bowl, combine egg whites, sugar, water, and cream of tartar. With hand-held mixer, beat until foamy at low speed, about 1 minute. Place the bowl over a saucepan of simmering water, making sure that bottom of bowl does not touch the water. Beat constantly at low speed until mixture reaches 160F, about 7 minutes. Remove bowl from heat, add vanilla, and beat frosting at high speed until stiff peaks form, about 7 minutes.

Assembling the Layered Chocolate Cake
To assemble the cake, level each cake layer by slicing off their tops. Place bottom layer on a serving platter cut side up. Spread 1/2 cup filling on top. Place middle layer cut side down on top of bottom layer. Spread remaining filling on top. Place top layer cut side down on top of middle layer. Spread top and sides of cake with frosting. Top with a few chocolate shavings, reserving half for later. You can even plaster some crushed peanuts or almonds to the side of the cake as I did. Allow to refrigerate for at least 30 minutes so the frosting sets well.

Transfer the layered Chocolate Cake onto a serving platter, then garnish with the reserved chocolate curls or shavings. Then just grab a fork, dig into the cake, pop it into your mouth, close your eyes and experience a taste of sensuous happiness that very few other things can provide!!:)

Related Recipes:
Mocha Pistachio Brownies
How to Frost a Cake in 5 Easy Steps
Mango Cake with Streusel Topping


Read more!

What is Trans Fat ?

what-is-trans-fat
Since past couple of years, Trans-Fat has picked up a lot of attention, and more and more people are trying to include "No-Trans-Fat" foods in their diets. But do we know What Trans Fat really is? And why is it unhealthy? A better understanding of what they are, how they react inside our body, and why should they be avoided is not only a good study on health education, but it will also help you identify trans-fat-containing foods easily, and thereby help you avoid those specific foods! I'm no expert in Nutrition, but I'd like to share what I have learned so far, as that may help you fight the evil called Trans-Fat, something that has become the primary reason for Obesity in many countries around the world! [Image courtesy of Putnam County, NY]

This article is largely based on the information I collected from the University of Maryland's Medical Center, and has been adapted to portray my thoughts on this topic. For further reading, I would recommend a great article on WebMD about understanding Trans Fat and ways to avoid it.

What is Trans-Fat?
I have to admit I never payed quite a lot of attention to understanding this myself, until I saw all the latest supermarket foods being labeled as "Contains No Trans-Fat". The U.S. FDA made it mandatory for companies to include the Trans-fat content on all food labels, and in fact, restaurants in New York city will be required to eliminate the artificial trans fats from all of their foods by July 2008. Intrigued to know what it really was, I set upon to find its composition.

"Trans fats can be natural or artificial. Small amounts of trans fat occur naturally in beef, lamb and full-fat dairy products. But when you add hydrogen to liquid vegetable oil and then add pressure, the result is a stiffer fat, called Trans Fat, also known as "hydrogenated fat"."

How Is It Different from Regular Fat?
We all know about the Good Fats & the Bad Fats. Saturated fats, like those found in butter, cheese, white processed foods, or meat, are bad for our body. They raise the cholesterol levels, clog the arteries that pump blood into our body, and make us more prone to heart diseases. However, our body also contains some good mono-saturated fats, which can help increase the amount of Good Cholesterol, or high-Density Lipids(HDL), which helps keep the system in control, and prevents untimely clogging of arteries.

Trans Fat, on the other hand, is a saturated fat that not only raises the Bad Cholesterol levels (LDL), but it is artificially hydrogenated and altered so that it also causes reduction in the level of Good Cholesterol (HDL), which helps protect our bodies against heart disease. So its like a Double Whammy - it kills the good, and raises the bad, which will undoubtedly raise the risk of having a Heart Disease or on of the millions of other problems related to High Cholesterol.

Foods to Avoid
You should avoid, or at least limit the intake of any and every food product that contains Saturated Fats - whether its Trans-fat or not! And do NOT get fooled by food labels that say "Zero Trans Fat"; It is not required by law to list any nutrients that are present in a quantity less than 0.5 gram per standard serving. So even if your bread is Zero-Trans-Fat, each slice may have 0.5 grams of fat, which means a LOT of trans-fat when you consider the entire loaf of bread!

Trans fats are generally added to packaged foods to increase their "shelf-life"; they are not good for the body, and totally unnecessary for any other value. Arnold Schwarzenegger signed a bill earlier this year to phase out the use of trans fats in California - linked to heart disease, diabetes and obesity, trans fats in foods will no longer be allowed on restaurant menus by 2010, and all retail baked goods in 2011. However, Packaged foods are still exempt from this law! So next time, try baking your own cookies and pastries at home rather than buying them from the stores - they are still high in fats, but not trans-fats!

The Best Advice
The age-old-message to avoid high-calorie, high-fat foods is still the best advice you can give to yourself. Cook at home more often, and when you have to eat out, try to pick a place where you'll get fresh food rather than pre-packaged stuff. Its ok to indulge, but keep a tab on your portion-size, and if you are worried about feeding your kids, try this list of Healthy Kid-friendly Snacks to beat hunger and obesity, both at the same time!

Related Articles:
Foods that Help Lower Your Cholesterol
Are Nutrition Supplements Necessary or Safe?
10 Simple Habits for Healthy Eating


Read more!

Spicy Tomato & Bell Pepper Rice


tomato-bell-pepper-rice
Tomatoes and Bell Peppers, are both great sources of antioxidants and useful nutrients for the body. Add to that the fact that they are both colorful, pretty and full of flavor too, and you have a winning combination! These two come together beautifully in this colorfully spicy and tasty Tomato Bell-Pepper Rice. For that extra wow factor, I added a teeny-weeny bit of ginger-garlic paste, some garam masala, and of course, freshly chopped cilantro! Its real simple to make, requires no preparation, and can be enjoyed with a simple Tomato-Cucumber Raita for a light and tasty weekday meal. Its a great variation to the authentic Tomato Rice, and packing up all those antioxidants is an added bonus!

Ingredients
3 cups long-grained rice (Basmati) - washed and cooked
1 small yellow bell-pepper - chopped finely
1 small red bell-pepper - chopped finely
2 medium firm tomatoes - chopped finely
3 tbsp tomato puree
1/2 onion - finely chopped (optional)
2 green chillies or jalapenos - finely chopped
2 tbsp fresh cilantro - chopped for garnish
1/2 tsp cumin seeds (jeera)
3 tbsp oil
salt - to taste
lemon juice - to taste
1/2 tsp turmeric powder
1 tsp garam masala
1/2 tsp red chili powder

Method
Wash and cook the rice as you normally do. Using long-grained rice like Basmati helps give it a better texture, but you can use normal rice too, without compromising the taste. Cook the rice and keep it aside to cool down.

Take a wok, add oil and cumin seeds to it. When they start spluttering, add the green chillies and chopped onions and saute till they become soft and glazed. Add the tomato puree and all the dry spices, and mix well. One it starts bubbling a little, add the chopped green bell-peppers and saute again. Add salt and cook covered for 10-12 mins, till the peppers are tender and cooked through.

Now add the chopped tomatoes, along with any of their juice. Saute for a minute or so, then mix the cooked rice to it. Mix everything together gingerly, so it gets colored and the spices are evenly distributed. Add the lemon juice, cover with a lid and allow to cook for another 8-10 mins on low-flame.

When the rice looks cooked, take it off the stove and transfer to a serving bowl. Gingerly sprinkle the chopped cilantro and mix just to combine.

Serve with some Tomato-Cucumber Raita or with a curry of your choice. This simple yet tasty recipe for Tomato & Bell-Pepper Rice is fancy enough to be served to your guests at a party, and won't eat up much of your time!

Related Recipes:
Cheese & Bell Pepper Rice
Lemon & Coconut Rice
Brown Rice & Barley Salad


Read more!

Skiing in Switzerland - Europe

switzerland-ski-holidays
(Views from our hotel in Interlaken!)
As winter sets in, there's one thing that excites me as much as my Baking, and that is the prospect of going Skiing! I'm not an expert skiier, nor pursue it with great dedication; BUT, I LOVE skiing, and make it a point to indulge in this fabulous sport at least once or twice a year. So, this post is for all of you who share the love of skiing. As we are planning our next Ski Holidays trip, I thought sharing this writeup would be an interesting weekend read if you love winter sports, especially Skiing! Its a weekend post, and I'm entitled to write something other than a recipe on a Saturday, right?:) Plus, many of you asked me to post about my trip, so here's to all those requests!

Living in Northern California, we have several Ski destinations close-by accessible by car. Tahoe and Dodge Ridge remain our favorites, as they are both close by and we can plan a weekend ski trip. But I'd love to go to Colorado sometime! However, after our recent trip to Switzerland, one look at the magnificent Swiss Alps and both me and my husband have become huge fans! It is indeed the best place to vacation, if you like nature and peace! The only place, perhaps, where you can enjoy green fields, waterfalls, sunny lakes and snow-capped mountains, all in the same vacation!

There are several great Ski resorts in Europe to choose from - Austria, Switzerland, Italy and of course, I'd love to ski France too! But for this post, I'll simply share our experience in Swiss and the surrounding countryside. We had the pleasure of visiting Mount Matterhorn, which is famous as the "most photographed mountain in the Alps"; The view of its triangular peak is already breathtaking from the valley village of Zermatt, where we stayed. It is a quaint town to enjoy the country-side, and the best part is, it is Care-free Town! So you either walk, ride a horse-carriage, or use the electric tram within the village!

switzerland-ski-Alps
(can you spot the Skiiers?!)

To enjoy skiing, you'd have to head to Klein Matterhorn, Europe's highest cable station at 12,530 feet. From there, you can ski north to Zermatt (which is the easiest one!), south to Cervinia (in Italy), or just stay at the top of the peak and enjoy some spectacular peaks in the Alps, including the mighty Matterhorn. The best part, this is one place which offers Skiing all year round, so you can make the most of your skiing holidays any time you visit! There are several hotels and ski resorts to choose from, and I'm sure any online travel adviser will be able to help you find what suits your need.

switzerland-ski-holidays
( Happy Vacationers & the JungFrau Express - Me, Bhavin, my brother Arpit & his wife Preeti)

Next we headed to Jungfrau, the top-most peak of Europe, accessible by train or cable car. Interlaken, Lauterbrunnen, Wengen, Grindelwald and Mürren are some of the best ski and travel destinations in the world. We stayed in Interlaken, which is aptly known as the "Gateway to JungFrau" With majestic views of the surrounding countryside, glaciers and the renowned Alpine range, its like a dream-come-true for the high-adrenaline adventure sports! BUT, let me remind you that is is NOT for the faint-hearted. Skiing in the Alps is tough, and should not be attempted unless you are an Expert! For those like us who want to have the fun but are scared of the ski slopes, you can always find activities like Snowboarding, Sledging, or the more relaxed Train Ride to JungFrau, which is both, picturesque and safe! Believe me, even if you do nothing, at least take this Train - its about $150 per person, but its totally worth it!

If Skiing is not your forte, don't worry, there's loads of things to do in Switzerland, and you'll not be disappointed. But if you do get a chance, try doing some snow-activity in the Alps - there is no other experience like it!

But hey, now we are back in US, and we'll have to settle for Skiing in Tahoe, so no more lingering on the Alps!! But in a way, I'm happy I got to see those majestic views, and now we can actually enjoy some mediocre skiing in those first and second-level slopes, without breaking a bone or two! All budding Skiiers out there, be good, and be safe! Hope you enjoyed my weekend rant, and I'll be back with a recipe on Monday, I promise!:)


Read more!

Fudgy Mocha Pistachio Brownies

recipe-brownies
Baking Brownies is an uplifting process for me! And these Chewy Mocha Pistachio Brownies have become my current favorites! Unlike other baking desserts, brownies are more stress-free, and easily customizable.The texture of a brownie, whether its fudgy, moist and chewy, or light like a cake, depends on the amounts of chocolate, butter, sugar, and flour that you use in the recipe. I chose to go with the Chewy this time. And as it was for a weekend breakfast, I added some flavored coffee powder to my pistachio brownies. I also threw in some cranberries, to make them more chewy, and the result was a seriously decadent Brownie recipe that I wouldn't trade even for a store-bought one!

Coffee lovers will always find a way to enjoy more caffeine in their lives; so off this goes to Meeta's Mingle, featuring Coffee & Tea this month. And as I'm really proud of these decadent Brownies, which have a great flavor combination, I'm sending these to Aparna's Sweet Celebrations as well!

Ingredients
1 packed cup all-purpose flour
2 tbsp natural cocoa
4 oz. unsalted butter
4 oz. unsweetened chocolate
1-1/2 cups sugar
1/4 tsp. salt
2 tsp cafe mocha (flavored instant coffee powder)
2 large eggs, at room temperature
1/4 cup slivered unsalted pistachios
2 tbsp craisins or dried chopped cranberries (optional)

Method
Position an oven rack on the middle rung. Heat the oven to 350°F. Butter an 8-inch square brownie pan, line the bottom with parchment paper, and spray it with some non-stick cooking spray.

In a double boiler, melt the butter and chocolate, stirring continuously to form a smooth ganache. Remove the pan from the heat and allow to cool slightly.

Stir in the sugar, salt, and the mocha coffee powder. Mix in the eggs, one at a time, stirring each time until blended. Finally add the flour and cocoa.

Beat well, until incorporated and the mixture is smooth, 30 to 60 seconds. Add the chopped pistachios and craisins, and give a final whisking.

Scrape the batter into the prepared pan and bake until the brownies are thoroughly baked, form a slightly-cracked layer on the top, and a toothpick inserted in the middle comes out almost clean, about 35 to 45 mins.

Set the pan on a rack until cool enough to handle. Run a paring knife around the inside edge of the pan and then invert the pan onto a flat surface and peel off the parchment. set the baked brownie back onto the rack to cool completely.

Cut into squares with a sharp knife. Enjoy your Chewy Mocha Brownies with a cup of hot Mocha, and you'll start appreciating caffeine even better!:)

Related Recipes:
Chocolate Peanut Butter Bars
Almond Mocha Iced Frappucino
Mocha Hazelnut Coffee Cake


Read more!

Vaghareli Khichdi and Gujarati Kadhhi

gujarati-khichdi-kaddhi
Its pouring this weekend, and I'm craving for some simple comfort food, something that brings back fond childhood memories, is easy to make, and is indeed warm and comforting in this gloomy cold weather! As me and B sit chatting together, we find solace in a plate of hot Mung Dal Khichdi and authentic Gujarati Kaddhi. "Khichdi", literally means "hotch-potch", where you cook rice and lentils together, and throw in a bunch of spices, and maybe some vegetables of your choice. "Kaddhi" is the perfect counterpart for Gujarati Toor Dal, and is made of buttermilk and besan (chickpea flour) Together, they create a healthy, satisfying and very comforting meal that no restaurant menu can match! Here is a recap of my original Khichdi-Kaddhi recipe.

Ingredients

For Khichdi
3 cups moong dal
2 cup basmati or plain rice
3 tbsp ghee (clarified butter)
7-8 whole black pepper-corns
1 cup onions - finely chopped
1 cup potatoes - finely diced
1 cup fresh/frozen green tuvar (lilva)(optional, but you can get it in Indian stores)
3 tsp turmeric powder
2 green chillies - chopped
2 tbsp cumin seeds (jeera)
salt - to taste (about 1 1/2-2 tbsp)
lemon juice - to taste (about 2 tbsp)

For Kadddhi
3 cups sour buttermilk
1/4 to 1/2 cup besan (chickpea flour)
2 tbsp ghee
salt and lemon juice - to taste
jaggery or sugar - to taste (start with less if you like it sour!)
2 green chillies - chopped
1 tbsp cumin seeds (jeera)
2 tsp fenugreek seeds (methi)
a pinch of asafoetida (hing)
chopped corander for garnish
5-6 curry leaves (limdo)

Method - Khichdi
Take the rice and moong dal and wash them under running water for a couple of times. Then take a pressure cooker, add add 3 tbsp ghee and add the cumin seeds, black pepper-corns, onions, and green chillies. Saute for 2 mins, then add the diced potatoes and the rice and moong dal mixture. Add in the turmeric powder and saute again so everything is mixed well. Now add the required amount of water(I generally use the ratio of 1 cup rice to 1-1/2 cup water), cover with the lid and cok it for 4-5 whistles.

Alternately, you can cook the khichdi separate in a rice cooker, and saute the remaining ingredients (use boiled potatoes in this case) in a frying pan, and add the cooked khichdi to the vegetables later.

Method - Kadhhi
Take a large vessel and por the buttermilk in it. Now slowly keep adding the besan a little at a time, constantly stirring or beating the mixture (use an egg-beater) so no lumps are formed. This is very important, and you should make sure there are no lumps at all or the kadhhi will not taste nice. Taste a little to make sure you do not get a pronounced taste of besan, it should mainly be buttermilk with a hint of besan in it.

Now take a kadhai, put 2 tbsp ghee in it, add the cumin and fenugreek seeds, asafoetida, the green chillies and the curry leaves. When they start spluttering, slowly add the buttermilk mixture and stir. Add about 3 cups of water. Keep the flame on medium to medium-high. Now add the jaggery or sugar, salt and the lemon juice. Cover partially and let it boil. Once it gets a bit thick, but not too tick, check for taste and see that it does not taste like a spoonful of besan. If so, add a little more water. Garnish with chopped coriander.

This is a really simple gujarati recipe that anyone can easily make at home. Serve the Khichdi and Kadhhi hot with pickle and enjoy the taste of a traditional gujarati meal:)

Related Recipes:
Rava Dhokla
Instant Khandvi (Suralichi Wadi)
Methi Palak na Muthiya


Read more!