
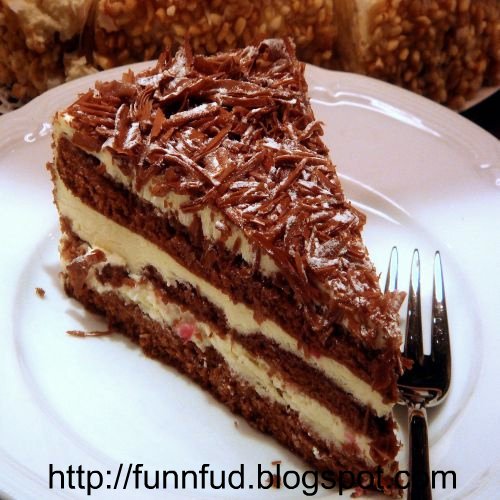
Layered Chocolate Cake with Fluffy White Frosting

You can use regular White Buttercream Frosting too, but I found this really nice fluffy frosting recipe from a friend that works much better, as it stays soft and fluffy. It compliments the chocolate cake quite well, which is a recipe I adapted from Martha Stewart Living. By using sour cream and hot water, you end up getting a really moist cake with firm texture. This goes to Lorraine for her Best Chocolate Cake challenge!
Ingredients
Good for 3 individual 9" cake layers
For the Cake
16 tbsp (2 sticks) butter , softened
3 cups firmly packed dark brown sugar
4 large eggs
2 teaspoons vanilla extract
3/4 cup cocoa powder , sifted
1 tbsp baking soda
1/2 tsp salt
3 cups cake flour (not self-rising flour)
1 1/2 cups sour cream
1 1/2 cups hot water
For the Fluffy White Icing
5 large egg whites
2 cups icing sugar
2/3 cup water
1/2 tsp cream of tartar
2 tsp vanilla
1 cup packed chocolate shavings - to garnish the top
Method
Making the Cake
Preheat oven to 350°. Grease three 9-inch round cake pans with butter; line bottoms with parchment paper, and butter the paper.
In a large bowl with an electric mixer, cream together butter and brown sugar on medium speed, about 5 minutes. In a separate bowl, combine eggs and vanilla; add to brown sugar mixture in two batches, mixing on medium speed until incorporated. Scrape bowl thoroughly; beat 1 minute on high speed.
Sift together cocoa powder, baking soda and salt; add to brown sugar mixture and beat on low speed until just combined.
Sift flour. Add 1 cup to batter and beat on low speed until just combined. Add 3/4 cup sour cream to batter; beat on low speed until just combined. Alternate adding flour and sour cream to batter until there's none left. With mixer still running on low, slowly add hot water, beating until just combined.
Scrape bowl thoroughly; beat batter on low speed about 20 seconds. Scrape bowl thoroughly once more, then divide batter evenly among the three pans, about 3 cups per pan. Bake 30 to 33 minutes, or until cake pulls away from sides of pan. Remove from oven. Cool layers in pans about 30 minutes, then remove from pans and cool completely on wire racks. Wrap in plastic and refrigerate up to one night before assembling.
Make the Frosting
In large deep bowl, combine egg whites, sugar, water, and cream of tartar. With hand-held mixer, beat until foamy at low speed, about 1 minute. Place the bowl over a saucepan of simmering water, making sure that bottom of bowl does not touch the water. Beat constantly at low speed until mixture reaches 160F, about 7 minutes. Remove bowl from heat, add vanilla, and beat frosting at high speed until stiff peaks form, about 7 minutes.
Assembling the Layered Chocolate Cake
To assemble the cake, level each cake layer by slicing off their tops. Place bottom layer on a serving platter cut side up. Spread 1/2 cup filling on top. Place middle layer cut side down on top of bottom layer. Spread remaining filling on top. Place top layer cut side down on top of middle layer. Spread top and sides of cake with frosting. Top with a few chocolate shavings, reserving half for later. You can even plaster some crushed peanuts or almonds to the side of the cake as I did. Allow to refrigerate for at least 30 minutes so the frosting sets well.
Transfer the layered Chocolate Cake onto a serving platter, then garnish with the reserved chocolate curls or shavings. Then just grab a fork, dig into the cake, pop it into your mouth, close your eyes and experience a taste of sensuous happiness that very few other things can provide!!:)
Related Recipes:
Mocha Pistachio Brownies
How to Frost a Cake in 5 Easy Steps
Mango Cake with Streusel Topping
If you liked this post, please subscribe to our feed so you'd never miss a recipe or article again!


32 comments :
oh that is divine! have bookmarked to try!! :D
Beautiful cake Mansi! I do think that fluffy (egg) white frosting is a perfect pair for deep chocolate cake :)
Cake looks pretty!
i love layered cakes! dont think i have the patience to try making one yet though :)
Very nice looking layered cake. Looks professional. I am still working on getting a good finish to such cakes.
I prefer cakes finished off with a ganache, as I'm not a frosting fan, though.:)
wow..that looks divine..absolutely fantastic..i wish you posted some more pictures of it..
I love this cake, i wouldlove to have a huge slice with my coffee
awesome mansi, great job here!
This looks great. I really envy people with a flair for baking!
thanks everyone, for your kind comments!
the top layer of frosting wasn't that smooth, but the chocolate shavings cover it quite well, huh?:) I think taking that class is paying off:)
sowmya - It's hard for me to just finalize one great pic and make it delicious enough to go on this blog! I don't think i have the patience to take more shots, so sorry about that!:)
again, thanks people!
Looks gorgeous.. very professional!! Love the icing even if its "covered" with choco shavings:-)
this looks soooooo goood. i love cakes and pastires and chocolate is all time fav. the pic tempts me to dig right in with the fork.....
Wwowoowww looks fabulous...yummy..lovely picture...
thank you folks! I loved thie ising too, much btter than the regular buttercream frosting, which you'll see on my other soon-to-post cake:)
And the chocolate cake recipe is indeed a keeper, as its the moist-est cake I've had in quite some time!!:)
Nice work... I always flub the cutting/layering so this is really inspiring me to try again.
This cake looks simply wonderful. It sure is good lookin' too!
The cake looks delicious!!!
You're right those contrasting layers look heavenly! YUM! I'd love to dig into that slice you so thoughtfully plated.
~ingrid
thanks so much guys! I'm really really happy everyone enjoyed this cake:) it was the first "presentable" layering-frosting experience for me, and your comments give me encouragement to try more of these!:)
Wowthat looks very professional...the neat layers and all...Gorgeous.
Thats one yummy cake Mansi...
what a lovely cake Mansi.. looks so professional.
This is beautiful Mansi...can't wait to try it out..!
Looks incredibly delicious! I like the sound of the fluffy frosting.
Hi Mansi,
Just wanted to confirm: Place the bowl over a saucepan of simmering water, making sure that bottom of bowl *does not touch the water*. Did you mean "does not touch the water" or "does not touch the base of the saucepan"? I want to try this cake for my husband's birthday and I so don't want to get it wrong. :)
Hi there, it is indeed "do not touch the water". To make this frosting, you need indirect heat, so keep the icing bowl a little over the pot of boiling water, just so that some vapors touch the base of the icing bowl. This very low indirect heat is enough to make the icing fluffy, at the same time it will not break the texture of egg whites.
So the instructions are correct - hold the bowl over the warm water, without touching it. If you find this hard, just hold the bowl over warm water for about 30 seconds, then remove and put on a flat surface and beat the icing. that would work too.
you say that you need to add "filling" in between the layers, is this frosting or something else?
Hi there, yes, the filling is the same as the "frosting"...sorry for the confusion:)
Hi mansi, I tried this cake. It came out well. But after few hours, the cake absorbed the frosting and became hard to cut. I didn't know y. I took this to a party and I was disappointed. Plz tell me y it became so
hi there! I'm sorry to know that the frosting did not turn out that great for you! but seriously, there are several reasons why this could've happened...
when you say "cake absorbed the frosting", what does that mean? did the cake become soft and mushy? how long did u refrigerate the frosting, and did u thaw it to room temp before applying to the cake?
its really hard to make perfect frosting, even for a pro sometimes, however, check out my post about frosting below and maybe it'll give u some more insight on diff types of frosting(medium is what you generally use for layered cakes):
http://widget.linkwithin.com/redirect?url=http%3A//funnfud.blogspot.com/2008/12/5-basic-frosting-recipes.html&hash=c71164881c6d937064d22407c55de2d0202b50c3&ts=1245686921641
hope this helps! if u have more questions, please email me using the Contact Form on the blog:)
hi i read your recipe and do want to try it out . however i am not sure about getting cream of tartar .Where can i find it?? Can i use a substitute??? If yes how much??
hi shivani - Substitute the cream of tartar for an equal amount of lemon juice or vinegar. this should be good for the frosting, vinegar would be a better option, but you'd have to add more sugar accordingly...however, due to sour acidic taste of both of these, they r not recommended for frosting recipes.
I would suggest this - Try leaving the cream of tartar out completely. If you do this, just make sure you beat the egg whites thoroughly to create the wispy, frothy and airy texture needed for the recipe.
good luck!
Post a Comment