Instant Microwave Khandvi (Suralichi Wadi)

khandvi-suralichi-wadi
What is known as Khandvi in Gujarat, and Suralichi Wadi in Maharashtra, is an extremely popular Indian snack. Its like a savoury swiss-roll, made from chickpea flour,spices and sour buttermilk, then topped with a splash of coriander, coconut and sesame seeds. For most people who have only relished it in Snack shops, Khandvi seems to be a very tough recipe; actually, the traditional cook-top method did require monitoring and technique. But with this microwave-recipe, it is easy to make Khandvi whenever you want, and in practically half the original time. The key to making good Khandvi is the exact proportion of ingredients, and the final test which determines if the mixture is cooked or not! So all those of you who have been intimidated by this recipe before, read on and discover the easiest recipe for the best Khandvi, aka Suralichi Wadi ever!

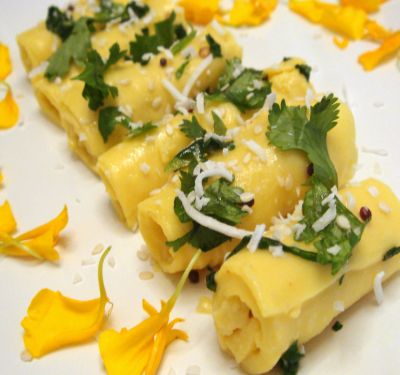
I'm sending this platter of Khandvi to Ruth, who's hosting MM-Sensational Sides event this month.

Ingredients
1 cup besan (chickpea flour)
2.5 cup sour buttermilk
1/2 tsp turmeric powder
salt to taste
a pinch of asafoetida (hing)

For Tempering
1/4 cup grated coconut
1/4 cup fresh cilantro - chopped
2 small green chillies - chopped finely
2 tbsp oil
2 tsp mustard seeds
2 tsp sesame seeds

Method
Prepare 4 medium-sized flat steel dinner plates (upside-down), or use a large pizza plate covered with aluminium foil. You can even use a large cutting board, wrapped with aluminium foil.

In a large microwave-safe bowl, whisk together the besan, buttermilk, turmeric, asafoetida and salt making sure there are no lumps. Cook the mixture by microwaving for 30-45 second spurts and stirring after each interval.

repeat this procedure for about 4-5 times. After the 4th time, check to see if the mixture appears to be thick enough. Then perform the Test to see if it's done.

Smear a small amount (teaspoonful) of the mixture on a steel plate and let it cool for a few seconds. Try rolling it off the surface. If it comes off easily and can be rolled, it is ready. If it sticks to the plate even after cooling, or breaks when you try to roll it, cook it for some more time.

Once done, evenly spread the mixture onto the upturned plates and spread it thinly, using a spatula. Let the mixture cool for 10 minutes or so.

Use a blunt knife to gently cut the sheet into 1 inch wide strips. Then gently roll each strip into a tight roll. Finish with all the rolls and arrange them in a serving bowl. Set in the refrigerator till its time to serve.

Meanwhile, take oil for tempering, add the mustard seeds to it and allow to splutter. Add the sesame seeds, cilantro and shredded coconut. Remove from heat and mix everything together.

Sprinkle this onto the Khandvi rolls and serve!


Read more!

How to Choose a Culinary School?

culi8nary-cooking-school
A few weeks back, I was browsing for some culinary schools in the US, trying to find if there are courses that one can take to gain expertise in one particular field. You may aspire to be a an expert chef, or merely a great home-cook who loves feeding hungry palates at home; Whatever be your motive, I found that there is a plethora of information about pursuing culinary education, and its better to explore your options, especially if you aim to become a trained chef! I thought I'd share some of my findings with you, which may help you choose a good culinary school if you are interested, or just provide a light weekend reading if not. I also thought this would give me an opportunity to learn more from other experts, and gain insight into their thoughts and ideas.

If you are serious about joining a culinary school you need to be clear about a few things before you start applying. A little research and ground-work can make this process way more simple; it could also help you explore your options, and compare the costs, benefits, courses and specialities, which can influence your choice to a great extent.

Choose your Speciality
Just like any other career, becoming a chef is challenging and requires not only the aptitude, but also a solid degree to back up your skills. From all that I read, I found that its imperative to know what you want to do after getting a culinary degree. Do you want to start a catering company, make become a pastry chef, manage a restaurant, or better yet, start one of your own? Do you have the commitment to pursue a chef school, or are you just loking for an opportunity to enhance your cooking skills to make tasier meals for your frinds and family? Once you have an idea of what it is you would like to specialize in, you can limit your search to only those schools that offer the necessary classes. If you think you'll just join a culinary school and see where it takes you, be prepared for some surprises on the way, as its not as easy as it may look!

Choose a Location
This may or may not be a priority for people, depending on what you seek as important. If you are looking for an expert course or a graduate degree which offers internships and exposure, you may have to move to a place like New York or San Francisco. However, lots of people prefer to find something in their city and closer to home. In that case, research your options and find the best, but be prepared to know that it may not be the best school as far as your degree is concerned.

Check out the Schools
Word of mouth is the best propagator - if you know someone who has done this before, talk to them and take advice. Make a short-list of schools that interest you, request detailed coursework from them, amd get in contact with an administrator who can answer your questions. Better yet, visit a few of these schools so you get a feel of the place. This will definitely help you judge better, and see if you fit in the environment. Seeing actual students in action may make you think twice whether you are ready for a culinary school or not!

Apply to Multiple Schools
After you narrow down your top 3-5 choices, take a leap of faith, and apply to these schools. Make sure to call and ask about all documents before you send the package. Incomplete applications can cause a lot of waste of time and money; so let someone else look through your package too before you mail it in. Include all your qualifications and recommendations, then mail your application, and relax. Don't be paranoid if you don't get approvals from all of them - you just need one good school to make a mark!

Be Prepared
Once you get your acceptance letter, choose from your approvals and find the best school or course. The first phase of your hard work has paid off, so take a moment to relax and enjoy! Then get ready for phase 2! Start preparing well in advance for your semester - get all required things in order so you don't flounder on the last day, especially if you have to relocate to a new place. If you have some extra time on hand, start reading books about your subject, and of course, there's no harm in experimenting good cooking at home too!

Joining a culinary school is similar to any other graduate school, in fact, it could be more fun! But if this is a career move, you should be dedicated to it, and even if it is just a course to help you make better desserts or decorate beautiful cakes, be attentive and always practise what you learned when you come back home. It is not a child's play, and requires attention and dedication like any other school.

However, this is one field in which practicals are as fun as the theory class, so go ahead on your way to Happy Cooking! Hope this article helps you choose a good culinary school, and if you have some suggestions or advice, please do share them with our readers!


Read more!

Is Red Wine Good for Health?

red-wine-health-benefits
Many of us have heard about red wine being good for our health, but do we know why? Here are some reasons which may help you appreciate your glass of wine more, knowing that it is actually doing you some good. It does not mean you can help yourself to a glass of wine every day! It only brings to your notice that Red Wine contains certain phytochemicals which have shown to reduce the risk of heart disease, certain cancers and slow the progression of neurological degenerative disorders like Alzheimer’s and Parkinson’s Disease. But this is all true, only when you drink it in Moderation! The moment you go over the safe limit, the health benefits are overpowered by the harmful side effects of excessive drinking, leading to deteriorated health. So be educated about what you are drinking, and the next time you have to choose a single glass of alcohol, go for the Red Wine instead of anything else!

A Look at the Positive Side
To benefit from drinking red wine, it must be drunk in moderation. Studies have shown that it helps in the prevention of heart disease. In fact, these studies also show that for middle aged people, one glass of wine for women and two glasses for men will actually lower the risks involved with heart attacks by between 30 and 50 percent. Here are a few health benefits of red wine:

Lowers Blood Cholesterol
It’s been proved that moderate amounts of alcohol can raise your good cholesterol (HDL-cholesterol) and thin your blood. This is true for red Wine too, which means that by drinking in moderation, the body's cholesterol level will be reduced, so reducing the risk of having blood clots due to fatty deposits in the blood vessels.

Source of Antioxidants
Being a good source of antioxidants which cleanses the human system, red wine is indeed beneficial to the body. Other substances found in red wine include Resveratrol, which is a substance know to help increase the levels of HDL or good cholesterol, and various other antioxidant properties that assist in the prevention of blood clot and plaque formation within the arterial walls of the veins and arteries, as shown by medical studies.

Prevent Deafness
I was surprised at this one too! But moderate amounts of red wine protects the delicate hair in the inner ear, according to Dr Jochen Schacht in America. He told New Scientist magazine that experiments found antioxidants in red wine neutralized chemical agents that attack these hair. Red wine has similar protective properties to green tea, which can help prevent deafness upto a certain limit.

A Look at the Negative Side
Wine, however, is not for everyone. Certain medical conditions are worsened by the consumption of wine, so it’s vital you seek the advice of your personal physician before making this a daily habit! Wine, is after all, a type of Alcohol, and comes with its own set of negatives:

High Triglycerides
One downside to wine consumption is that it can elevate triglyceride levels, which is associated with health problems such as diabetes. Those who already have high triglycerides should, therefore, avoid or dramatically limit their wine (and alcohol) consumption.

Breast Cancer Risk
Studies have shown alcohol can increase estrogen levels and raise tumor progression in women with (or at high risk for) estrogen positive breast cancer.

Migraines
Wine is often a big trigger for people who suffer with migraine headaches. Although white wine contains more sulfites than red wine (sulfites are added to white wine to preserve its light color), red wine seems to be a much bigger migraine trigger. That’s probably due to the accumulation of histamines and tannins from prolonged contact with the skin.

Weight Gain
People who drink alcohol also consume empty calories, calories that lack nutrients and can lead to weight gain. One glass of wine is equivalent to 120 calories - so you can imagine how easy it is to load up on calories if you get to drinking at a party!

After all this, people will continue drinking wine as a habit. This article is not to pass a judgment whether Red Wine is good for health or not - rather, it should be treated as an insight into the composition of wine, which makes it beneficial and harmful at the same time. Enjoy a glass within the safety limits, and you'll relax your body and mind; but always know when to stop, even if it's red wine!

Related Articles:
How to Select & Buy Wine
How to Serve Wine to your Guests?
How to Pair Wine with your Food?


Read more!

Chocolate-Hazelnut Coffee Cake - From the Archives

hazelnut-mocha-coffee-cake
Chocolate-Hazelnut Coffee Cake is my all-time favorite, and I never fail to order one whenever I stop at a Starbucks for a hot cup of coffee. I just love the flavor and the taste that blends so well with my mocha. So when I found this Mocha-Banana bread recipe at Amy's blog, I couldn't resist to try out a variation myself. I skipped the bananas, and instead added hazelnut, coffee and nuts. I also changed the sugar and butter contents to make my bread a little more cake-like, just the way I like it! This is kind-of a mix between a coffee cake and a bread, yet it is not as sweet as a cake, so pairs well with your morning breakfast. And with chocolate flvor to bring it all together, there's no resisting a piece of this delicious Chocolate-hazelnut Coffee cake!

Ingredients
2 cups all-purpose flour
2-3 tbsp cocoa powder
1 tsp baking powder
1 tsp salt
1 cup sugar
1/2 cup butter-softened
2 large eggs
1 tsp vanilla
3 tbsp instant hazelnut coffee powder
1/2 cup walnuts and pecans - chopped
Cooking spray

Method
Preheat oven to 350 degrees and grease a loaf pan with cooking spray.

Use a sieve and pass the flour, cocoa powder and baking powder through this and combine all 3 in a medium bowl. Add salt, and break any lumps with your fingers.

In another bowl combine the sugar and butter, beating with a mixer or a wooden spatula until well creamed (about 2-3 mins). Add eggs and beat well. Add the vanilla and the hazelnut flavored coffee and beat again. finally add the flour mixture, stir in the chopped walnuts and pecans and combine and beat until you can see stiff peaks. Do not add milk or water. Spoon the batter into a small greased loaf pan (preferably square or rectangular so it's easy to slice the bread later).

Bake for 1 hour or until a wooden pick inserted in center comes out clean. Allow it to cool completely after done. Do not try to slice while hot otherwise the bread will crumble and you won't get clean slices.

Cut into thin cake-like slices and enjoy with a sizzling hot cup of coffee or tea!! This Hazelnut Coffee Cake is a perfect recipe to entertain with at cocktail parties!

Related Recipes:
Espresso Kahlua Brownies
Chocolate-Banana Bread
Persimmon & Chocolate Spice Cake


Read more!

Zucchini Crab Cakes

vegetarian crab cakes
The day I saw Crab Cakes being served at a restaurant, I've been dying to eat them! But I was averse to eating those "fake" Vegetarian Crab Cakes which uses "stuff" that looks like meat, but is not actually meat! So, taking things in my own hand, I decided to go for a less glamorous but equally tasty option - Vegetarian "Crab" Cakes made with Zucchini! I had heard about zucchini fritters before, but never tried them; I don't have particular affinity for zucchini too, but as it was the most viable alternative for my crab cakes experiment, I went for it. And to my immense surprise, these Vegetable Zucchini Cakes turned out to be a classic! They are very easy to make, and can definitely give a tough competition to the original Crab Cakes recipe!

Ingredients
3 cups grated zucchini
3/4 cup bread crumbs
1/4 cup fat-free or low-fat milk
3 tbsp mayonnaise
2 tbsp cilantro -finely chopped
6 green onions - finely chopped
1/2 tsp salt
1/4 tsp black pepper
2-3 tsp chili garlic sauce
3 tbsp all purpose flour
2 tbsp olive oil
1 boiled potato - mashed
2 tbsp lemon juice

Method
Drain all water from the grated zucchini by pressing tightly.

In a large bowl, combine the zucchini, bread-crumbs, potato, milk, mayonnaise, cilantro, green onions, salt, pepper and chili sauce. Moisten hands with water and form the mixture into 8 cakes. Cover with plastic wrap and refrigerate for 1 hour.

Lightly coat each cake on both sides with flour. Heat olive oil or butter in a large nonstick skillet over medium-high heat. Cook the crab cakes until crispy and golden brown, about 4 to 5 minutes on each side. Then allow to cool on a tissue paper.

Serve the delicious Vegetarian "Crab" Cakes with a dipping sauce of your choice!

Tip: To prevent the crab cakes from falling apart while cooking, make sure to refrigerate the cakes for at least an hour before frying.


Read more!

Summer Salad with Poppyseed Dressing

summer-salad-recipe
There's something about light yet filling summer salad recipes - the fact that they help you stay fit and keep you full longer makes them a viable choice for dinner, at least once a week! I still remember the time when I was so skeptical about salad dressings - I was used to nothing but simple Indian salads that have no soury, creamy, ranchy dressings, and it was hard for me to enjoy any salad in the US at all! Over time, I started liking Ceasar, and though I can't say I love them, I've grown a taste for a few of them, like this latest Poppy seed dressing, which is perfect for light salads with mixed greens and fruits! I made one with spring greens, craisins, candied pecans,carrots and red grapes; topped with crumbled feta cheese and the delicious poppy seed dressing, it was a truly healthy, filling and tasty salad meal!

Ingredients
1 bag of mixed green salad
4 heaped tbsp grated carrot
3 tbsp candied pecans
1/4 cup craisins
1/4 cup red seedless grapes
salt & pepper - to taste
1/4 cup crumbled feta cheese
3 tbsp olive oil
5 tbsp poppy-seed dressing
garlic croutons - optional

Method
Mix the salt and pepper in the olive oil and drizzle over the spring greens and carrots. Toss to coat evenly; add 3 tbsp poppy-seed dressing and let it sit for at least 5-7 mins to soak the flavors.

When ready to serve, add washed grapes, craisins, candied pecans and the remaining dressing, and toss around a few time to mix well. Top with the crumbled feta cheese and garlic croutons. Serve immediately with a huge slice of garlic bread,or as a side order of Summer Salad to a scrumptious meal!

Related Recipes:
Spinach Strawberry & Almond Salad
Sprouted Bean & Lentil Salad
Vegetarian Mexican Salad


Read more!

Thai Basics - Red & Green Curry Paste

thai red-green-curry
Thai recipes are favorites for many people, including myself! I love coconut-based gravies, but its the special herbs and spices that are so typical of Thai cuisine, which attract me even more. Use of exotic spices like lemongrass, galangal and kafir leaves makes it interesting to the palate, and an easy way to incorporate vegetables in your diet! With these basic recipes to make Thai Red & Green Curry paste, you are all set to enjoy authentic Thai Curries any time you want, made fresh in your kitchen!

These are Basic Thai Curry pastes, and once you gather all the ingredients, you can make both of them at home, and store them for future use. They will stay fresh in a refrigerator for more than a month! You can find all the spices below at either an Asian food store, or the asian-food aisles in your local supermarkets, or even at World Food Market.

Red Curry Paste
3 shallots - sliced
1-3 red chillies (or 1-3 tsp Thai red chilli sauce)
3 cloves garlic
1/2 inch piece galangal, peeled and sliced (or use ginger instead)
1 tsp ground cumin
3 tbsp fish sauce
**for vegetarians, use soy sauce instead
1 kaffir lime leaf
1 tsp sugar
1/3 cup coconut milk

Method
Place all ingredients in a food processor or blender and process well.
To use immediately, fry the paste in some oil to release flavors before adding meat, tofu or vegetables. Add more coconut milk, as desired. Refrigerate in an air-tight jar for preserving up-to 1 month.

Green Curry Paste
1 stalk lemongrass
1/2 tbsp ground coriander
1 tbsp cumin
1 tsp sugar
1-2 green chillies - chopped
3 cloves garlic
1 thumb-size piece of galangal
3-4 kaffir lime leaves - stems removed
1 cup fresh coriander, include both leaves and stems
1 tsp. dark soy sauce
1/3 cup coconut milk (or more - enough to keep the blades turning)
2 tbsp soy sauce

Method
Place all ingredients in a food processor or blender and blend nicely. To use the paste immediately, first fry it in a little oil until fragrant. Then add the rest of your can of coconut milk and your meat, seafood, or vegetables. Also add leftover lemongrass stalk, if desired, for added flavor.

Non-vegetarians can replace the soy-sauce with fish-sauce for more authentic flavor. Add more chili sauce directly to the curry if this is not spicy enough for you. To lower the spice level, add more coconut milk and lime juice. Use fresh lemongrass and basil for enhancing the Thai flavors in your curry, adding these at the last minute.

Just keep a small spice jar handy, filled with these basic Red & Green Thai Curry Pastes; this will make preparing Thai recipes much more easier on the fly; in fact, these spices are highly versatile, and can be used to flavor Tofu Soups and Stir-Fry's too!

Related Recipes:
Tofu & Basil Thai Soup
Vegetarian Pad Thai
Mandarin Tofu Satay


Read more!

Boiling Water in Microwave Can Be Dangerous!

boiling-water-microwave
I got this email from a friend a few days back about the dangers of using Microwave for heating water and liquids. For something that we practically do at least 8-10 times a day, I was shocked at how harmful it could be, if not done in the right way! Here is a story about a person who got serious burns trying to brew coffee in a microwave. I'm not sure about the origins of this tale, but it does sound scary, and a little research showed me that this can indeed happen to anyone who is not careful while using a microwave to heat liquids. While it is not a common occurrence, you should definitely be informed about it so you can prevent an accident at home.

It boils down to simple science, and is not hard to digest; its just the fact that we all are so habituated to doing things a certain way, that something like this shakes us out of our comfort zone! I for one, have learnt a lesson, and I hope you too; please use caution while heating liquids in a microwave, and inform your kids about it too!

A Story (from Unknown Source)
A 26-year old decided to have a cup of coffee. He took a cup of water and put it in the microwave to heat it up (something that he had done numerous times before). I am not sure how long he set the timer for, but he told me he wanted to bring the water to a boil. When the timer shut the oven off, he removed the cup from the oven. As he looked into the cup, he noted that the water was not boiling, but instantly the water in the cup 'blew up' into his face. The cup remained intact until he threw it out of his hand but all the water had flown out into his face due to the build up of energy. His whole face is blistered and he has 1st and 2nd degree burns to his face, which may leave scarring. He also may have lost partial sight in his left eye.

While at the hospital, the doctor who was attending to him stated that this is fairly common occurrence and water (alone) should never be heated in a microwave oven. If water is heated in this manner, something should be placed in the cup to diffuse the energy such as: a wooden stir stick, tea bag, etc. It is however a much safer choice to boil the water in a teakettle.

General Electric's (GE) response
"The e-mail that you received is correct. Microwaved water and other liquids do not always bubble when they reach the boiling point. They can actually get superheated and not bubble at all. The superheated liquid will bubble up out of the cup when it is moved or when something like a spoon or tea bag is put into it. To prevent this from happening and causing injury, do not heat any liquid for more than two minutes per cup. After heating, let the cup stand in the microwave for thirty seconds before moving it or adding anything into it."

Scientific Explanation
There is actually some truth to this. It is caused by a phenomenon known as Super Heating, which is common for a microwave. It can occur anytime water is heated and will particularly occur if the vessel that the water is heated in is new. What happens is that the water heats faster than the vapor bubbles can form. If the cup is very new then it is unlikely to have small surface scratches inside it that provide a place for the bubbles to form. As the bubbles cannot form and release some of the heat that has built up, the liquid does not boil, and the liquid continues to heat up well past its boiling point. . What then usually happens is that the liquid is bumped or jarred, which is just enough of a shock to cause the bubbles to rapidly form and expel the hot liquid. The rapid formation of bubbles is also why a carbonated beverage spews when opened after having been shaken.

Take care if you use a microwave to heat water. In some cases, boiling water can explode causing serious burns to your face and hands. Do not use excessive amounts of time to heat water, check the water frequently and absolutely never look closely at the cup to determine how hot your water is. Mixing other materials in the water before it is heated, such as instant coffee or sugar, also reduce the risk.

If you are still not convinced, read more about How to Boil Water in a Microwave; Be Informed, and Stay Safe! As they say, Prevention is better than Cure!


Read more!

Green Coconut Pandan Cakes - Asian Delight

coconut-pandan-cakes
Pandan Cake is a light, fluffy cake of Malay origins (Indonesia, Malaysia, The Philippines) flavored with the juice of Pandan (Pandanus amaryllifolius) leaves. I've always been fascinated by their beauty! These cakes are light green in color due to the chlorophyll present in the leaf juice. But most of the times, additional green food coloring is used to further enhance its colour. Right from the time I tasted one at an Asian Cafe, I've been wanting to try these at home. Luckily, I found some Pandan Extract in my grocery store and I could finally make this chiffon cake, where I paired Coconut with Pandan! This may not be the best flavor for cakes in the world, but these Coconut Pandan Cake slices are definitely unique, looks pretty, and is should be tried at least once!

I used a recipe given by Anna, my colleague's wife, and I did trouble her a lot with phone calls as I was really apprehensive about how these would turn out! She was pretty patient with me, and I'd like to thank her for all her help and tips! I did end up adding a teeny-bit more green food color, hence the darker shade. Also, maybe the Pandan extract is not as good as the Pandan juice, hence I got a little "stretchy" texture in the bottom part of my cake. But otherwise, this was a successful experiment, which tasted great!

Ingredients
1 1/2 cups all purpose flour
1/2 cup sugar
2 tbsp butter
1/2 cup water
1.5 tsp baking powder
1/2 tsp baking soda
1/4 tsp salt
1 tsp Pandan extract
1/2 tsp green color
1 egg
2 tbsp cooking oil
4 tbsp coconut cream

Method
Preheat oven to 375F. Line a bread-baking tray, or a cake pan with a wax paper and set aside.

In a bowl, lightly beat the eggs, add water, coconut cream, oil, pandan extract, salt, sugar, baking powder & baking soda and mix well.

Sieve the flour, and slowly pour into the mixture, mix well, and set aside.

Pour the mixture into the prepared bread or cake tin. Bake for 20 to 25 minutes or until a light brown crust appears on the top, and the tooth-pick test is satisfied.

I particularly loved the flavor of coconut with pandan; by itself, it may not have been as tasty, but the coconut cream made this a winning recipe! After a lot of hype and hooplah, I was happy at how this cake turned out.

Thanks Anna, for a beautiful Coconut Pandan Cake recipe!


Read more!

A Pledge for Help - And a Vacation

Hope you folks are having a great weekend! I'm typing this up as I leave for a long-awaited vacation in a couple of hours, but I needed to inform you about 2 things before I leave!

The first is a pledge for help, where I request you to be generous and donate for a life of a young mother Lakshmi, who needs to be operated within 5-6 months. She is currently prescribed heavy dosage of medicines to sustain. Lakshmi is 28 years old and suffers from Coronary Artery disease. She has two children, aged 3 & 6. She is financially dependent on her parents who have already spent whatever they have, for her first operation and their other daughter's marriages. Srivalli has organized a Fundraiser with Raffle Prizes so we can help raise money for Lakshmi's operation. I request you to contribute in any way that you can! You can donate via Paypal using the Chip-In button on her blog. I appreciate your support and prayers!

Vacation
And now for the good part - I'm heading off for a vacation to Europe with my hubby, my brother and his wife, and we are going to be enjoying the heritage of Rome & Venice, strutting in the fashion-filled streets of Paris, and relaxing in the beautiful countryside of Switzerland, then finally heading off to India to spend some time with our parents! I am totally excited, and I'll be sure to keep you updated as and when I get time to hook on to the internet!

Meanwhile, I have scheduled some recipes and posts for you all, so you don't miss your dose of Fun & Food! The activity level will be a bit low, and I might not be able to respond to comments and queries immediately, but please bear with me on that! Also, the past few days, I've been working on another project, so I have a Surprise to share with you all when I get back!

So keep visiting Fun & Food, Miss me, and stay healthy and happy!

Signing off for now, but will be back soon! Starting Monday, look out for posts that I've scheduled for the next 2 weeks!


Read more!

Savoury Cheese Breakfast Muffins

Gujarati Dal
Savoury Muffins are the best way to kick-start a day, especially when they are loaded with Cheese and veggies, providing enough protein and other nutrition that will make you fresh and fit early in the morning! I had some left-over Pizza sauce and as I'm going to be leaving for a vacation in a couple of days, I wanted to clear my pantry of the cheese and veggies that needed attention! So, what better way to use these than throw it all together in muffin moulds?!! - the result, these easy and wonderful Breakfast Muffins. Filled with the goodness of protein-rich cheddar cheese, eggs, anti-oxidant -rich bell peppers, yogurt, and the flavors of Italian spices, these Savoury Muffins are indeed a treat to bake and to devour!

Ingredients
2 cups all-purpose flour
1 tbsp baking powder
1 tsp salt
1 tsp dried basil
1/2 tsp baking soda
1 cup orange cheddar cheese cubes (or shredded cheese)
1 cup plain yogurt
2 eggs
1/4 cup butter, melted
1/2 cup chopped red or green bell-peppers
1/4 cup pizza sauce
1/2 cup shredded mozzarella

Method
Preheat oven to 400ºF. Line 12 muffin cups with paper liners and keep ready.

In a large bowl, whisk together flour, baking powder, salt, basil and baking soda until combined. Stir in the cheddar cubes.

In a medium bowl, whisk together the yogurt, eggs and butter until smooth. Stir into flour mixture just until well combined and no dry spots remain; stir in the pizza sauce and the bell-peppers at the very end. The batter will be very thick, but don't worry, that's how it's supposed to look!

Spoon the batter into muffin cups, dividing evenly. Sprinkle shredded mozzarella cheese on top of each one.

Bake about 20 minutes, until golden brown, and a toothpick inserted in the centre of one of middle muffins comes out clean.

Let the muffins cool in pan at least 5 minutes before removing, then allow them to cool completely on a wire rack.

Brew a cup of fresh cappucino (or espresso, if you must), and serve these delicious Savoury Cheese Muffins for a healthy, nutritious and lavish breakfast!

Related Recipes:
Steamed Dhokla Sandwich
Tomato Herb & Cheese Bread
Paneer & Sun-dried Tomato Muffins


Read more!

Gujarati Dal (Healthy Lentil Soup)

Gujarati Dal
Gujarati Dal is famous for its spices, and the distinct taste of sugar; never before has sugar & spice tasted so great together! The traditional Gujju Dal is made from Tuver dal, and characteristically uses ingredients like Kokum, cloves, peanuts, sugar and methi, which give it a subtle flavor. This is one "no onion, no-garlic" recipe that will be cherished for ages, by Gujaratis(people from a state in western India) and non-gujaratis alike! It is a highly versatile recipe - you can modify it to suit your taste-buds. Healthy and filling at the same time, it can be consumed by itself as a Lentil Soup, or can be paired with rice or rotis for a complete meal. Anyway you eat it, you are sure to enjoy the taste of authentic Gujarati Dal!

Ingredients
2 cups Tuver Dal
10-12 raw peanuts
1 tsp each of mustard seeds
1 tsp cumin seeds (jeera)
1/2 tsp methi seeds(dried fenugreek)
2-3 cloves (lavang)
5-6 curry leaves
3-4 pieces of dried kokum
1 tsp ginger-green chili paste
a pinch of asafoetida (hiing)
salt - to taste
sugar or jaggery - to taste
1 tsp red chili powder
2 tsp coriander powder(dhana-jeeru powder)
lemon juice - to taste
1/2 tomato - chopped
3 tbsp coriander - chopped

Method
Take the tuver dal and pressure cook it (covered upto 5 whistles) with a little extra water to make it soft. Add the peanuts, jaggery and kokum in the cooker along with the dal.

Now take a saucepan, add some mustard and jeera seeds, black cloves, and a pinch of asafoetida. When the seeds start to splutter, add the cooked dal in the pan. Use a hand blender to make a thick soup and add water to achieve the consistency you like.

Now add salt, sugar, lemon juice(to taste), and all the dry spices. Add curry leaves, chopped tomatoes, green chili-ginger paste, half of the chopped coriander and bring the mixture to a boil. Then lower the flame, cover partially, and let it cook for another 8-10 mins.

Garnish with the remaining coriander leaves. Serve the traditional Gujarati Dal with a hot plate of Jeera Rice!

Related Recipes:
Panchvati Garlic Dal
Gujarati Kaddhi


Read more!