Homemade Garam Masala Recipe

garam-masala
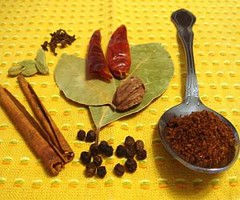
Garam Masala is almost always the secret magic ingredient that imparts most of the flavor to Indian food, and there's nothing like a homemade garam masala recipe! There are several recipes for curry powders, but this one is the most widely-used. A mix of several spices lightly roasted and ground into a fine powder, Garam Masala is much like all-spice, except with different flavors. This fragrant spice is best made fresh just before you begin cooking, but since most of us do not have the luxury of time, it works in our favor that Garam Masala can be stored for 3-4 months without losing its flavor and aroma! It is indeed very easy to make, and just adding a pinch will go a long way to give a lasting impression to your recipes. Every household has its own recipe, and here I share my mom's garam masala recipe, hoping that it will win you more accolades as a cook, just as it has done to me!

Garam Masala, which literally means "Hot and Spicy" is undoubtedly the heart of most Indian Cuisine, especially north indian and mughlai dishes. And almost every one has a "mom's garam masala recipe" to share. It is basically just a combination of different spices, and you can modify the basic recipe shown below to suit your taste by adding or omitting spices as required. It is best to add this spice towards the end of cooking your meal; and don't worry, unlike its name, this spice powder is more aromatic than spicy!

Ingredients
Makes about 4 tbsp of Spice Powder

1 tbsp cardamom seeds
1 2" long cinnamon stick
1 tsp black cumin (shahjeera)
1 tsp cloves
1 tsp black peppercorns
1/4 nutmeg
1 tsp cumin seeds
1/2 tsp dried coriander seeds
1/2 tsp mace powder (javantari)
1 piece star anise
1 long bay leaf

Method
Roast all the aboe spices lightly on low-flame for about 2 mins. Now powder them in a clean, dry spice grinder until smooth. Store in an airtight container in a cool, dry place.

This Garam Masala can be added to any gravies or curries, and not just indian! The aromatic spices in this recipe add a subtle flavor to your dish. But remember to use this very sparingly, as it is very powerful in taste. Freshly ground garam masala can be stored for upto 3 months in an air-tight container in a cool, dry and dark place.

My mother has been my biggest inspiration in cooking, now surpassed by my husband. Upto this day, she deligently makes her signature garam masala and parcels it to me all the way from India, just so I wouldn't have to compromise on the taste of freshly-ground spices. If that doesn't convey love, what does?! So this post is dedicated to my mom, and I hope her recipe adds more "spice" to your life, just like it did to mine!:)

More Basic Recipes:
How To Make Paneer
Homemade Recipe for Marinara Sauce
Restaurant-Style Recipe for Indian Gravies


Read more!

Dhokla Sandwich (Savoury & Steamed)

tri-colored-sandwich-dhokla
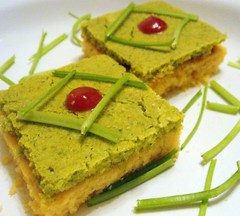
There are times when I get a huge urge of eating something attractive and delicious, but also something that does not come with loads of calories! Sandwich Dhokla, a delicacy originated from Gujarat, is one such low-fat recipe that is not only beautiful to look at, but tastes great too. With 2 kinds of dhoklas (savory steamed cake) layered one on top of the other, sandwiching a spicy cilantro sauce in between, serve to be perfect finger food served with your choice of dipping sauce. The color of the dish is pleasing to the eye, and with hardly any calories or fat content, these savory sandwich dhoklas are a healthy alternative to other fried appetizer choices. Not only that, as you can see in the picture, the Tri-colored Sandwich Dhoklas look great on a plate too!

Ingredients

Yellow Dhokla

1 cup Besan (Chickpea flour/gram flour)
2 tbsp Rava (Sooji)
1/2 tsp Citric acid crystals (or Eno Fruit salt)
Salt - to taste
2 tbsp Sugar
1 tsp Baking soda

Green Dhokla

2 cups Rava (semolina)
1/2 cup sour curd or buttermilk
1/2 cup chopped coriander
1 tsp soda bicarb
2 tbsp oil
3-4 green chillies - chopped
salt - to taste
2 cups water (use only 1 1/2 cup if you have used buttermilk instead of curd)

Method
Mix all the ingredients for the Yellow Dhokla except the baking soda. Add about 3/4 cup of water. The batter should be about the consistancy of dosa batter. Add little more water if required. Cover the batter and keep it aside, allowing it to ferment for at least an hour or two if possible (this makes softer dhoklas).

Take the chopped coriander and green chillies, and blend to form a smooth paste with about 2 tbsp water. Repeat the same procedure as above by mixing all the ingredients for the Green Dhokla, except the soda bicarb and keep aside.

Steaming the Dhoklas
Apply some oil to a deep, flat bottomed stainless steel vessel (like a cake pan) that fits into your pressure cooker. Pour some water into the cooker and let it boil.

Once the water boils, add the baking soda to both the batters and mix it up. You should see the batter froth up a little.

Pour it into the prepared vessel to half the height, leaving ample space for the steamed batter to rise up and expand. If you are going to do this in batches, add the baking soda to the divided batter each time before steaming rather than adding it to the whole mixture. This ensures that the dhokla will become soft and fluffy.

Place it into the cooker and let it steam for about 10 minutes. Do not put the whistle on the cooker (just like idlis) Insert a toothpick in the center to see if its cooked through, then remove from the cooker and allow to cool a little.

Repeat this process for both the batters.

Layering and Assembling the Sandwich Dhokla
Cut squares (or other shapes) for both types of steamed cakes. Take the yellow dhokla pieces and apply some green cilantro chutney liberally on top of it. Now layer the green dhokla slices on top of it like a sandwich.

You can use any other desired spread for the sandwich, like salsa or cheese. Then add a dollop of ketchup on the top.

Serve the Sandwich Dhokla with your favorite dip as an attractive and healthy appetizer!

Related Recipes:
Soft & Fluffy Khaman Dhokla
Methi-Palak na Muthiya(Steamed Dumplings)
Chana-Masala Sandwich-Indian Bruschetta


Read more!

Cilantro and Walnut Pesto

Many people have a misconception that "Pesto" can only be made with Basil. But actually, the name pesto comes from the same Latin root of "pestle," which means a sauce made by crushing a few key ingredients together. Basil, parmesan and pine nuts have been primary for the basic italian Basil Pesto, but lately, parsely and cilantro have become favored alternatives to the traditional recipe. I used cilantro, sweet-corn, parmesan cheese and walnuts for my Cilantro-Walnut Pesto, and added some jalapenos for the spicy kick. This pesto has a smooth texture, and serves to be a great dipping sauce with chips or any other finger food.

Ingredients
1 and 1/2 cup fresh cilantro - washed and chopped
1/4 cup sweet corn kernels
1/3 cup walnuts
1/2 cup parmesan cheese
6-8 tbsp olive oil
2-3 jalapeno rings (or serrano chillies, adjust to spice level)
1 tbsp lime juice
salt - to taste

Method
Take half of the cilantro and the sweet corn kernels and grind in a mixer with 2 tbsp oil. When properly blended, add the remaining ingredients and pulse. With the food processor running, slowly keep adding olive oil as you blend to form a smooth paste. It should resemble a smooth dipping sauce as shown in the picture.

You can refriferate this Cilantro-Walnut pesto and preserve for upto a week. For longer use, freeze it and store. Thaw to room temperature before using. Serve with your favorite veggie platters of finger food! We enjoyed ours with some gluten-free savoury pancakes!

I'm sending this to Anh who's hosting this week's edition of Kalyn's WHB event.

Similar Recipes:
Cilantro and Cucumber Dip
Roasted Tomato & Peanut Sauce


Read more!

Thumbprint Cookies with Jam

Baking cookies is the best way to placate yourself and your kids, and for me, its also a favorite passtime! What I love about cookies is that they can be simple and festive at the same time. I had my eyes on Cenk's thumbprint cookies since a long time. The mere sight of these colorful cookies was enough to motivate me to make my own eggless Jam Thumbprint Cookies. The name 'thumbprint' comes from the fact that you use your "thumb" to make an indentation into each ball of dough which is then filled with some jam. The best part is that these tiny delights are very easy to make and extremely versatile. Just follow the basic recipe and use your choice of fruit flavors or even chocolate as a filling. No matter what's the occasion, they are sure to be a hit!

Ingredients
Makes about 18-20 cookies

1 cup all-purpose flour
1/2 cup ground walnuts
4 oz butter - at room temperature
1/4 cup sugar
1/3 cup mixed-fruit jam (or any other of your choice)

Method
Preheat your oven to 350 deg F. Line two baking sheets with parchment paper and set aside.

In a bowl, cream butter with sugar until light and fluffy, about 7-8 mins.

In another bowl, whisk together the flour and ground walnuts and add to the creamed butter mixture. Mix until well combined to form a soft dough. Do not knead a lot as this can get pretty sticky. Use some all-purpose flour for dusting.

Now refrigerate the dough for 30 minutes. This makes is easier to shape the cookies.

Take a teaspoonful of dough in your hand, form a small ball, and press lightly in the center with your finger to make a shallow hole (use light pressure with your thum or index finger)

Arrange the cookies on the baking trays, 2 inches apart. Leave enough space as they will spread a bit as they bake. Bake for 15 minutes, until the edges are slightly colored and the cookies look firm.

Let the cookies cool completely on a wire rack, then fill the holes with your favorite jam.

These Thumbprint Jam Cookies are pretty to look at, easy to make and delicious to eat, and eggless too! The semi-hard texture with nuts is nicely balanced with the smooth sweetness of the jam, making this recipe to be a sure-shot winner. I'm so glad I tried them and will definitely be baking more of these!

Similar Recipes:
Eggless Almond Cookies (Nankhatai)
Peppermint-Vanilla Butter Cookies
Chewy Chocolate-Chip Cookies


Read more!

Raspberry Lassi (Smoothie)

Last week we witnessed temperatures peaking at 90, and my gym is suddenly so full of people trying to get into shape for the beach that there's no doubt in my mind that summer is definitely here! And that means more sun, more barbecues and more cool and refreshing drinks. We celebrated the onset of summer with the luscious Rasperry Lassi, which is a fancy name for a smoothie or yoghurt cooler. Lassi is a traditional Indian yogurt drink which originated from the state of Punjab. Its more like a thick-shake, but with yoghurt and milk. Over time, the basic recipe underwent a makeover with addition of fruits and other flavors. Everyone is familiar with the Mango Lassi, which you must have seen on several restaurant menus. But this Raspberry Lassi is a class apart, because the tartness of the raspberry works perfect blended with the yoghurt, and it looks so pretty you can serve it as a light dessert too!

I used fresh raspberries and pureed them in a blender, then passed it through a colander/sieve to remove the seeds. You can use fresh fruits or ready-made raspberry sauce. Other interesting and tasty variations would be mangoes or strawberries. For now, this raspberry delight is on its way to Dee who's hosting this month's AFAM-Raspberries event!

Ingredients
2 cups plain or vanilla yoghurt
1 cup milk
6-8 ice cubes
3/4 cup raspberry puree
3 tbsp sugar(or more if needed)

Method
Make sure the raspberry puree does not have seeds in it. Strain it through a sieve to remove seeds as much as possible. A few tiny seeds here and there are fine.

Add the ice cubes to a blender cup and crush to form powder.

Now mix all the remaining ingredients in a blender with the ice and power on the blend or puree setting till everything is uniformly combined.

Pour in tall glasses and garnish with more fresh raspberries. Serve the Raspberry Lassi chilled and fresh, and raise a toast to the beginning of summer!

Similar Recipes:
Banana and Peanut Butter Smoothie
Tropical Fruit Punch Lemonade
Almond-Mocha Frappucino


Read more!

Food and Diet that Helps Increase Memory and Brain Power

Researchers have studies food since ages, and it has always been a favourite topic. Lately, there has been a lot of momentum in determining whether certain healthy foods can help increase your memory and brain power or not? Eating a healthy diet has always been wise. But can certain foods and supplements actually make you smarter by increasing brain power? The concept of "brain food" is not new, and there is ample research to show that some foods can indeed maximize your brain's potential, make you more alert, enhance memoryand pervent or aleviate brain disease.

Food For Brain
The brain mainly uses carbohydrates for energy and omega-3 fatty acids for forming its cell structure. B vitamins play an essential role in brain function. In combination with folic acid, vitamins B6 and vitamin B12 help manufacture and release chemicals in the brain known as neurotransmitters. The nervous system relies on neurotransmitters to communicate messages within the brain, such as those that regulate mood, hunger, and sleep. In addition, foods rich in antioxidant nutrients, such as vitamin C and vitamin E and beta-carotene, help protect brain cells from free-radical damage. A balanced diet with protein, good fats and complex carbohydrates can balance the activity in the temporal lobes of the brain. Eating protein at every meal can help stabilize blood sugar levels and help prevent the brain fog that sometimes happens after high carbohydrate or high sugar meals.

The following list has been compiled from several sources, mainly the diet channel's article on brain foods. There would be many more foods that can be added to the list, but here are the top 10 which can be easily added to your daily diet that will boost your memory and help your brain function better.

Omega-3 fatty acids - To improve brain activity
Omega-3 fatty acids are a major component of the gray matter of the brain and can also improve brain activity. The fat in the brain is essential to proper nerve function, in nerve membranes, and as a component of brain synapses. Flax seeds, walnuts, olive oil, fish, tofu, beans and nuts are excellent sources of these fats, and you should include them to be at least 2% of your daily calorie intake.

Antioxidants - To Boost memory
Antioxidants in the diet also can improve memory by decreasing the free radical damage that can occur with age. Foods highest in antioxidants include fresh, colorful fruits and vegetables. Some of the best antioxidants are found in berries (such as blueberries, strawberries, raspberries and blackberries), spinach, Brussel sprouts, plums, broccoli, beets, avocados, oranges, red bell peppers and cherries. Eating many colors of fruits and vegetables ensures a wide variety of antioxidants to nourish and protect the brain.

Supplements - To improve memory, learning and verbal skills
Supplements that support memory include antioxidants such as alpha-lipoic acid, vitamin E and vitamin C. Ginkgo biloba is an herb that enhances circulation in the brain, which can improve memory and concentration. Phosphatidylserine is a nutrient that is found in food and in cell membranes in the body. In studies where it is given as a supplement, it increases the metabolic activity in the brain and improves memory, learning and verbal skills.

Spinach & Strawberries - Prevent age-related brain disease
Spinach helps protect the brain from oxidative stress while reducing the risk of suffering from an age-related decline in function, while just half a cup pf strawberries provides 70% of the Recommended Daily Value (RDV) for vitamin C. Both of these can increase your learning capacity and motor skills.

Egg yolks & Yellow-fin Tuna - Prevent Alzheimer's disease
A healthy benefit of egg yolks is that they contribute "Choline" to the diet, which is a component of two fat-like molecules in the brain that are responsible for brain function and health. Yellowfin Tuna is a rich source of omega-3 fatty acids, which keeps cell-membranes flexible and maximizes their ability to allow important nutrients in. Both of these have been said to prevent or aleviate age-related mental decline and Alzheimer's disease.

Cranberries - For memory and coordination
Cranberries can protect brain cells from free-radical damage and the tartness in the fruit can enhance your memory, balance and coordination. They also provide necessary antioxidants which keep you healthy and fit.

Raisin bran - Prevent migraines and headaches
Raisin bran provides carbohydrates, iron, B vitamins, folic acid, calcium and magnesium, which are all important nutrients for brain fuel, as well as health and vitality. In addition, magnesium is a mineral that helps relax blood vessels, preventing the constriction and dilation characteristic of migraine and tension headaches.

Yellowfin Tuna - Protects against Alzheimer's
Yellowfin tuna is a rich source of omega-3 fatty acids, which keeps cell-membranes flexible and maximizes their ability to allow important nutrients in. Yellowfin tuna is rich in the B vitamin niacin, which also protects the brain against Alzheimer's disease.

Kidney Beans - To improve cognitive function
One cup of cooked kidney beans contains almost 19% of the RDV for the B-vitamin thiamin, which is critical for cognitive function because it is needed to synthesize choline. Kidney beans are rich in inositol, which again improves symptoms of depression and mood disorders.

Sweet potatoes-Beetroot-Carrot- For nourishment of the brain
Tubers like sweet potatoes and beets are highly nourishing for the brain. They are rich in vitamin B6 as well as carbohydrates and antioxidant nutrients (vitamin C and beta-carotene), which not only purify the blood, but also help increase brain power significantly.

Spring is the best season to horde up on all these foods as fresh fruits cover the markets! So get out and do some serious grocery shopping for your brain! And I hop you'll remember to come back to this site every day after increasing your memory and brain power, right!?:


Read more!

Masala Indian Fusion Restaurant - Danville, San Ramon

Anyone who has eaten Indian food knows that it is characterized by the rich spectrum of spices in which it is cooked, giving the food its inimitable flavor and aroma. These spices are known as "Masala", which is nothing but an intricate combination of different spices used to flavor the food. But Masala Indian Fusion restaurant takes the traditional indian food one step further by pairing the indian culinary techniques with western ingredients to make it more appealable to an international audience, and I must say they do a great job of it! Located in Danville, more like the San Ramon area of East Bay in california, Masala Fusion is an upscale restaurant sure to serve you a memorable dinner.

Masala Fusion is located in the danville downtown area on San Ramon Valley blvd, and has the look of a typical downtown eatery. Quaint and artistically decorated in warm colors with white tablecloths, it is not very overly-done, and has its warmth and appeal. The highlight is definitely the open kitchen area where you can see the chef Rajesh Khanna in action, who by the way, is also the owner. His wife Anu is a gracious hostess, ever-smiling and exuding warmth, which makes you feel quite at ease and relaxed. The low-lighting, small wooden partitions and plants create nice individual spaces, both comfortable and inviting. During day-time, the open glass windows give a nice view of the downtown while you enjoy your food.

The food is definitely the best I have eaten in a long time, and I'd put it in league with my other favourites Shiva's restaurant in mountain view and Amber restaurant in santana row. There is an extensive Wine List to choose from, and a nice menu with loads of vegetarian and non-veg options. All the dishes we ordered were just perfect, and the entrees are served with saffron rice. From tender lamb to grilled mahi-mahi, pepper chicken to mussels, calamari or scallops, the non-veg options are plenty. But the vegetarians have loads to enjoy too! The pan-fried baby eggplant and grilled portobello mushrooms were great as appetizers, and their tomato-coconut bisque(soup) is the closest to indian tomato soup I've had anywhere in the bay area! We were really impressed by their gravies, which had some unique blends like pine-nuts and saffron, carmelized onion and grape, or the cashew and chilly sauce! And their Vegetable Biryani was simply superb; perfectly cooked and spiced. They also have several tandoori classics and breads to choose from. But please notify them about your spice level as some of their dishes can get really hot! But don't worry, a mango creme brulee or a pista-ssaffron kulfi will soothe your tongue and your senses.

Desserts at Masala Fusion deserve a praise of their own. Even with just 4 choices, their Creme Brulee and Indian kulfi is a classic end to a perfect dinner! Their very-well-priced lunch buffets are a delectable option for under $10. They are closed on Mondays, but if spices and indian cooking interests you, they offer Cooking Class & Food Tasting every Monday evenings from 5:00 PM to 8:00 PM at the restaurant for $6. We've already been there two times and I have nothing but good reviews to share about Masala Indian Fusion. You really have to try this restaurant for a unique take on indian food. A warm ambience, commendable food, friendly staff and a unique blend of flavors will lure you to visit them again. If you don't believe me, try it for yourself and see!

Address:
499 San Ramon Vly Blvd
Danville, CA 94526
(925) 362-4900
Masala Indian Fusion

More Bay Area Restaurants


Read more!

Spring Finds For Eco-Friendly and Stylish Entertaining

Playing a host is supposed to be as fun and fulfilling for the hosts as the guests, and entertaining does not have to be burdensome at any time! As we move into warmer weather, spring and summer collections are everywhere, be it clothes or home decor, so why not change your entertaining styles too! As they say, variety is the spice of life! So whether you are looking for ideas to entertain a large crowd, or host a simple dinner or cocktail party with friends and family, check out these cool, stylish and eco-friendly hostess collections that are ideal for the sunny weather and also the upcoming Earth Day!

As Earth Day is around the corner (April 22nd), I thought it would be great to look at some "green entertaining" deals. There are several alternatives to paper plates and cups, and one of the hot favorites is the elegant-looking Veneerware party supplies from Bambu, which is made from 100% organically-grown bamboo and will biodegrade within 4-6 months of disposal. Co-ordinate these with the stylish bamboo vases from jamaligarden that work great as centerpieces, or even to hold veggies or breadsticks!


And if you are looking for that splash of color that catches the eye, these hand-colored woven fruit baskets available in shades of green, red, orange, chocolate and olive are a fun addition to your kitchen or living room, and it's multi-faceted to be used to hold anything from food to papers to plants! Crate & Barrel offers some fusion dining options in earth tones of green, brown, olive and mocha in glossy and semi-matte glazes for that rich ethnic feel!


This wonderful spring dishware with matching placemats are all about going green and welcoming spring right into your house. With the vibrant christhaneum motifs on classic white porcelain, these dishes(not totally eco-friendly though) are ideal to serve appetizers and salads! The stylish spring placemats ($3.95) only add to the beauty of your table setting. If you are going for the more modern look for spring, try these amulet-placemats that can do with any dishes and come for only 99c!! Rosanna's carries a range of eclectic collection for mugs, plates and bowls.


Most of us try to use disposable serving-ware for larger parties. But disposable does not mean it can't reflect your acute sense of design or your values! Great hip colors, wonderfully designed shapes great for party and picnic use, these biodegradable and disposable tableware is sure to suit your style and budget. Available in bright green, aqua blue, rich red, and salmon pink, this set is great for summer parties and picnics! To really bring the spring into your house, add these miniature bio-degradable egglings ($7.99 from amazon)as part of your decor; they are not only pretty, but you can actually grow tiny herbs in them without much effort.

You don't need to spend a fortune to entertain in style; with these spring findings that are stylish and affordable, you can surely host a party that's both chic and green. And this Earth Day, make an effort to go eco-friendly if you can!


Read more!

Gluten-Free Spinach-Onion Dosa (Pancake)

Spinach Dosas also famous as "Chana na Pudla" in Gujarat, is a healthy meal option. So this weekend, when I had an urge to make something gluten-free, more as a challenge and a change than anything else, I decided to make some savoury gluten-free pancakes with gram flour; we actually call them "dosa" or "puda" in local dialect. Its a great way to toss up your favourite veggies into the flour mixture and cook up something special without much effort or planning. I opted for spinach and sauteed onions as my main ingredients, while a blend of spices add to the flavor and fluff! These spinach dosas are a great way to eat something healthy yet tasty, and you can enjoy these with any dipping sauce of your choice!

I really wanted to send something to Srivalli for her Dosa Mela, but instead of using regular dosa-flour or all-purpose flour, I decided to go gluten-free by opting for the gram flour (besan). It not only adds a unique flavor, but also a nice color and texture to the pancakes. You can choose to add your favorite veggies like grated carrots, bell-peppers, peas or even shredded cheese!

Ingredients
Yields 3-4 pancake-sized dosas

2-1/2 cups gram flour (chickpea-flour or besan)
1 cup spinach leaves - washed and chopped
1 small onion - finely chopped
4 tbsp fresh coriander - chopped
1 tsp turmeric powder
2 tsp salt
1 pinch of asafoetida(optional)
2 tsp ginger-garlic paste
1 tsp fruit salt(baking soda)
1 tsp red chilli powder
2-3 cups water (or less, to make the batter)
oil - for saute

Note: It is believed that hing(asafoetida) is generaly ground with wheat-flour, so in that case it would be better for people to omit it from this recipe to make it a strictly gluten-free recipe.

Method
Saute the onions in 1 tbsp of oil till they are lightly brown in color. Don't burn them too much, just make them soft and glazed.

Wash and chop the spinach and cilantro leaves. Add these to the gram flour. Add the ginger-garlic paste and all the spices except fruit salt, then slowly add water, half cup at a time and stir to form a loose batter. Make sure you do not have any lumps in the batter. Form a thick pancake-like batter; but it will be a little thick as gram flour has more consistency than all-purpose flour.

Now add the sauteed onions and fruit salt(soda) to the batter.

Take a non-stick pancake-pan, drop one ladleful of batter into the pan and swirl to form a circular dosa or pancake. This batter is a little thick, so it may not spread as readily as pancake; so just tilt the pan to let the batter spread around. You can even spread and shape it using your wooden spoon or spatula.

Now drizzle a teeny bit of oil on the sides, then cover the pan with a lid and let it cook on medium flame, for about 3-4 mins. Then flip it on the other side and cook again. it will not rise as much as a pancake, but you should see goledn brown spots on both sides. Flip it again till both sides are evenly cooked.

Repeat for the remaining batter and make dosas out of them.

Serve these gluten-free spinach and onion dosas with your favorite dipping sauce. We enjoyed it with corn-cilantro pesto along with a second round of Indian Chai! Serve them hot as they are best enjoyed crisp and fresh right off the stove! For more inspiration, check out these delicious Spinach Recipes

More Savoury Recipes:
Achari Paneer Tikka Wraps
Savoury Muffins with Sun-dried Tomato and Cheese
Fluffy Spanish Tortilla Omelettes


Read more!

Rasgulla - Traditional Bengali Sweet

soft-bengali-rasgullasSince childhood, I've had a weakness for Bengali sweets like Soft Rasgullas, Rasmalai and Sandesh, just because they have a juicy and rich texture made of ricotta cheese and khoya, and combined with "ras", made with either sugar syrup or milk, these delicious indian sweets never fail to impress! "Rasogullas", as they are called in West bengal, are favorites with not just the locals, people around the country love them. They have a fake reputation of being hard to make at home. But I'd seen my mom make these when I was young, so it gave me enough strength to try making them myself. After some hesitation, a bit of aprehension, and a mindset to not feel bad if they didn't turn out well, I was surprised to find that my rasgullas were actually pretty good!

I had a big batch of homemade paneer and as RCI-Bengal was around the corner, I decided to try a hand at my favourite indian sweet. The recipe is simple, its just the pressure-cooking part that makes you apprehensive. I have added some tips to keep your rasgullas soft, and hope they help you in your sweet venture too! Remember, its definitely worth the effort!

Ingredients
2 cups homemade paneer
2 tsp all purpose flour
2 cups sugar
6-7 strands of saffron (kesar)
2 tsp cardamom powder (optional)
3 cups water

Method
Make paneer at home following my recipe for homemade paneer. (sorry, I didn't want to type it all again!:))

Take the paneer at room temperature, add 2 tsp of flour and crumble this mixture in a food processor. Pulse coarsely for 30 to 40 seconds.

To make the sugar syrup, pour 3 cups of water in a pressure cooker. Add 1 cup sugar(keep the other 1 cup for later) and bring this to a boil on medium heat.

Meanwhile knead the ricotta cheese mixture again for about 1 minute using your hands. Rub it against the palms to make it smooth; remember, the more you knead the softer the rasgullas will be, and the easier it would be to shape them.

Now divide the mixture into 15 equal sized portions and roll them into balls or any other desired shapes. I have made rasmalai before, hence find it easier to shape these into flatter discs as it gets cooked faster.

When the sugar syrup comes to a boil, gently drop the rasgulla balls into the syrup. Close the cooker and pressure cook for about 7-8 mins. After one whistle, wait for 5 minutes and turn off the stove.

Do not overcook, else the rasgullas will become too hard. It's generally good to wait for one whistle to go off, then turn off heat and check if the balls are cooked. They should approximately double in size and become fluffy. If you think they are not done yet, cover the lid, without the whistle, and cook for another 5 mins or so at medium heat.

Open the cooker after 10 minutes and add the cardamom powder to the syrup and stir gently. Add another 1 cup of sugar and let it boil. Take the saffron strands and place in 2 tbsp warm water. Microwave for 1 minute, when it starts bleeding, add the saffron water to the sugar syrup to evenly flavor and color the entire sugar syrup.

Allow the rasgullas to cool before transferring them to a container and refrigerate till ready to use. If you do not have a pressure cooker, you can do this is a large crockpot too. Just keep it covered to allow steam to build and cook the rasgullas.

How To Make Rasgullas Soft?
I came across this while looking for tips to make rasgullas soft. To achieve this, divide your sugar in half; add only 1 cup sugar in the syrup initially and let it boil. Put the balls in boiling syrup; as soon as they puff up in about 5 to 10 minutes, remove the cheese balls. Add the remaining one cup of sugar. Heat till all the sugar is absorbed. Do NOT stir; turn off heat when syrup gets thick. Keep these tips in mind:

1. The more you knead the cheese (chenna), the softer your rasgullas will be
2. Do not add too much flour as that will make them hard
3. Do not let the cheese balls sit long; immediately cook them in the sugar syrup to keep them soft and allow them to puff up.

When serving, layer the rasgullas, add a generous helping of the syrup and garnish with chopped pistachios or saffron strands. Serve chilled and enjoy a traditional Bengali sweet! To make Kesar Rasmalai instead, follow the exact same recipe but use milk instead of sugar syrup.

Related Recipes:
Gulkand and Khoya Burfi
Coconut Laddoos
Gajar ka Halwa

Related Tags
, , ,


Read more!

How To Make Paneer (Ricotta Cheese) at Home

Paneer, also known as Ricotta or Cottage Cheese is a favorite ingredient in Indian cooking, and there's nothing like fresh homemade paneer! I have posted several paneer recipes on this blog, and over the course of time, a lot of my readers have reported that they live in regions where readymade paneer is not that accessible, and it'd be great to make it at home. Actually, making paneer at home is not such a big deal; its simple and does not require a lot of care or expertise! Plus, homemade paneer guarantees that you are eating something fresh, and its definitely a great resource for those who cannot find it in stores near them. So catering to popular demand, here's a simple recipe to make paneer at home.

I have adapted this recipe from ehow's article on How To Make Paneer and also Indira's post about homemade paneer. You need only two ingredients for this - whole milk and an acid like lemon juice or vinegar. The final quantity of paneer that you get would be about 15% of the weight of the milk you start with. So one liter of milk makes about 150 grams of cheese and a gallon of milk makes a little more than a pound. What you get after curdling the milk is cottage cheese or ricotta; when you press it and shape it like a bar, you would get the firmer version called "paneer", same as what you get in the indian grocery stores.

Ingredients (For 150 gms of paneer)
1 liter whole milk
1/2 lemon or lime - juiced, or 1-3 tsp vinegar
muslin cloth (or anything that's a bit thin)

If you are using 1 Gallon of milk, use juice from one whole lemon

Method
Bring the milk to a boil over medium heat, stirring frequently to prevent burning or sticking.

When it comes to a boil, stir in the acid and cook for another 2-3 minutes; in a few minutes, you see small curds floating on top. Wait till they get bigger to form small stone-like granules, about five minutes. The solids will clump together (known as channa or curd) and the remaining liquid will become a thin watery white (known as whey).

Now turn off heat and allow to sit for a few minutes to cool.

Strain through the muslin cloth. When the liquid is mostly drained out, lift the cloth by the corners and twist to squeeze out remaining liquid. You can put the cloth with the paneer in it to sit on a colander over the sink for an hour or so till all excess water drips away. What you get at this stage is cottage cheese. If you let it sit for an additional 12 to 24 hrs at room temperature to develop acidity, and then cook it further you will be able to make ricotta cheese.

To make paneer, press the cloth-covered cheese under a 5kg (or anything heavy enough) weight for up to two hours. I folded the cloth around the cheese, then pressed it to shape like a rectangular bar, and put it between two heavy wooden cutting boards. Put something heavier on top of the cutting board to increase the weight. Leave it like this for a couple of hours.

This makes the paneer firm and hard. Now you can store it in an airtight box and refrigerate till ready to use. You can even cut it into cubes and store them.

Cooking with paneer
When you want to use the paneer, remove from fridge and let it sit at room temperature for about 10 mins. Then you can slice it, shred it, grate it or cut it into desired shapes!

Now that you have homemade paneer, try some of these delicious paneer recipes:

Paneer Butter Masala
Savoury Paneer and Tomato Muffins
Spicy Chilli Paneer
Paneer Paratha(Stuffed Flatbread)
Rasgulla - Bengali Sweet


Read more!

Village California Bistro and Bar - Santana Row (San Jose)

When it comes to an upscale area full of shopping and good food, Santana Row in san jose steals the show. This small street is lined with beautiful shops on both sides and quaint yet inviting restaurants that can fulfill any culinary urge! Decked among these is the only independently-owned Village Bistro and Bar that offers the finest and freshest local ingredients in a culturally diverse menu that reflects the personality of our region. If you are looking for a fresh take on taste and presentation on californian cuisine, Village California Bistro is a place you should not miss. With a great location, admirable food and the most eclectic wine list in the South Bay, this place will make you feel right at home!

Located right in the middle of Santana Row, The Village California Bistro is walking distance to numerous hot spots on the street. We went there for an early dinner with a reservation, which was good, as it does get crowded at times. The place is small and quaint, and though the ambience was relaxing, I think the lighting was too dim; just a little more bright would only have made it more appealing. They are open for Lunch and Dinner and offer a special Brunch Menu on weekends, which looked pretty interesting. They have a bar seating on the right side, and a wonderful outside and shaded side-patio seating which is perfect for sunny days! The decor of the place was soothing, and each table has a neatly folded square piece of paper which is actually the Menu- pretty cool and different, I liked the style!

True to its California Bistro theme, the menu has several options with regional favorites combined with classic and some fusion elements. It has a wide choice for both vegetarians and the meat-lovers alike. The portions are small, especially if you are comparing them to generous servings in indian or italian restaurants, so be prepared to order an entree per person, unless you have a really small appetite. But the dishes are reasonably-priced, comparing with the other places in Santana Row. We had the Housemade Tortellini and Spring Garlic Soup which were just fabulous; we ordered the Spinach-Mushroom Lasagna and the Grilled Asparagus Spears, while our friends had the Linguine Clamps and the Oven-roasted Salmon- all food was cooked fresh and was aromatically spiced with herbs and sauces. They have variations in the menu for weekend brunches, so we are definitely trying those next time.

The wine selection is huge, and if its California wine (from the wine country itself), you know you can't go wrong! The desserts were good, we could barely share the Sunken Hazelnut Belgian Chocolate Brownie which was awesome! They do charge $2.00 extra for split/sharing orders (kind of strange, huh!), but that's printed on the menu in fine print, so don't be shocked! So far so good, and now a look at a few things that I'd like to be changed. The staff is coureous, but the service is slow, and the food takes a really long time to come! I'd like to think its because they make everything fresh, and it gives us time to enjoy and converse, but a little faster service would get it more followers. And I don't think its a place young kids would enjoy. Maybe the patio for brunches, yes, but the restaurant is more suited to private, romantic dinners rather than a group of boisterous people.

Overall, we did like the food at Villge Bistro, and though we may not visit it as often as Amber Indian Restaurant, its definitely a nice place to enjoy authentic and fresh californian food around the Santana Row area.

Village California Bistro & Wine Bar in San Jose

Address:
378 Santana Row
San Jose, CA 95128
(408) 248-9091
Village Bistro and Bar

More Bay Area Restaurant Reviews


Read more!

Raspberry Coulis(Sauce) with Creme - Layered Dessert

When you think about making desserts, fruits are one of the main ingredients most of the times. One of the easiest and most satisfying way of eating seasonal fruits is by making coulis, compote or preserves out of them, without giving up their nutritional value. Raspberry Coulis is one of the preferred toppings for many desserts. Coulis, traditionally a french recipe, is a form of thick sauce made from puréed and strained vegetables or fruits, and used as a base for other sauces or as toppings for other dishes. I have used it as a primary ingredient in my recipe for an easy Layered Dessert with Raspberry Coulis and Creme Fraiche; I also used some crushed orange biscuits to give it that cheesecake-like appeal.

The recipe below can be easily modified to suit availability of seasonal fruits like strawberries, pears, apricot or apple. The fruit coulis can also be made ahead and preserved in a jar in the refrigerator and used as topping for other cakes, ice creams and desserts.

Ingredients
3 ounces fresh or frozen raspberries (or strawberries)
1 cup sugar(or more if needed sweet)
1/2 cup water
8 orange-flavored biscuits(cookies)
1 cup ready-whip (cool whip)

Method

Raspberry Coulis (Sauce)
Take the fresh raspberries, deseed them and add to a blender. If using frozen ones, thaw then first then blend. Add the sugar and blend to form a smooth puree. Strain the puree theough a colander or sieve mesh to remove seeds and keep aside.

Now heat a pot on medium flame, add the raspberry puree to it and 1/4th cup water. Stir to mix and thicken the syrup. Add a little more water if required, but not too much. Cook the puree to form a thick jam-like fruit preserve, more like a compote recipe. When the water has evaporated and the mixture is thick enough, remove from flame and allow to cool.

Take the cool whip (add sugar if its not sweetened) and blend in a mixer on the "whip" setting for 3 short pulses. Add the orange zest and pulse again, then set in the refrigerator until time to serve.

Take the orange biscuits and grind them in the blender to form a smooth-to-coarse powder.

To assemble the dessert, take a tall clear serving glass. Start with a layer of ground biscuits, then add the warm raspberry coulis, then layer with the creme fraiche. Repeat the process with all 3 layers again. Top with a sprinkling of fresh orange zest, or use the ground powder and mint leaves for garnish. This delicious dessert is on its way to Susan who's hosting this week's edition of WHB started by Kalyn's Kitchen!

This layered dessert tastes best with warm fruit topping and cool creme fraiche; the temperature difference nicely balances the taste. This is a great and simple recipe for a quick dessert when you are entertaining! Plus the basic Raspberry Sauce can be used as a topping for any other desserts.

Similar Recipes:
Plum Compote with Cardamom
Carmelized Almonds with Strawberries and Cream


Read more!

Methi Pakodas-Fenugreek Fritters

Its mystifying how much flavor herbs can add to cooking and recipes, without even being one of the main ingredients! But some herbs like Fenugreek(Methi), Cilantro, Mint, and Basil are known for their distinct flavor, and can carry a dish entirely by themselves. Methi Pakodas(Fenugreek Fritters), aslo known as "Methi na Gota" in Gujarat, are one such fried food that is sure to please your palate. These fritters are made by combining Methi with coriander, besan, curd and spices, and are really easy to make. They require no special preparation, so it can be an ideal meal for the days when elaborate dinners are off the table. Fenugreek is used both as a herb (the leaves) and as a spice (the seeds, and has lots of medicinal properties.

The yellowish-colored methi seeds are frequently used in the preparation of pickles, curry powders and pastes; the young leaves and sprouts of fenugreek are eaten as greens, and the fresh or dried leaves are used to flavor other dishes. The dried leaves(called kasuri methi) have a bitter taste and a strong characteristic smell. All these varieties can be found in any indian grocery store or whole foods market. I am going to send these to Jugalbandi who's hosting this week's edition of Weekend Herb Blogging, originally started by Kalyn.

Ingredients
2 cups packed Methi leaves (Fresh Fenugreek)
1/2 cup coriander leaves - chopped
2 green chillies - chopped finely
1/2 tsp red chilli powder
1/2 tsp turmeric(haldi) powder
3 cups besan(chickpea flour)
4 tbsp rawa(fine semolina)
1 tsp fruit salt (soda)
2 tbsp fresh curd
1/2 tsp sugar (optional)
1-2 tbsp lemon juice
Oil for frying + 1 and 1/2 tbsp extra
Salt to taste
Water (roughly about 2 cups or less) - to make batter

Method
Mix all the ingredients except soda and oil.

Make a batter with water. Start with just 1/2 cup water, keep stirring or mixing well, then keep adding water a little at a time till you get semi-solid batter. When you hold it in your hand, it should not drop, nor should it be hard enough to be shaped. Its better to use less water than more, and make sure the batter is not thin.

Now add the fruit salt(soda) and 1-1/2 tbsp oil and mix well.

Keep a wok filled with oil on medium flame. Drop one small drop of the batter to the oil. If it comes up(floats) immediately, your oil is at the right temperature. Now lower the flame a little, then drop spoonfulls of batter in the oil and fry till golden brown on both sides. It is advisable to wear oven mittens to avoid oil burns and don't fry more than 4-5 fritters at a time.

Serve the hot Methi Pakodas with Tamarind-Raisin-Date Chutney, ketchup, Roasted Tomato-Peanut Chutney or any other dip of your choice!


Read more!

Molten Chocolate Lava Cake

Chocolate Lava Cakes are so called because the center of the cake is a thick liquid chocolate that oozes out when cut, just like molten lava. These make a great individual dessert and, although pretty simple to make, will definitely impress your guests. Molten Cakes are more chocolate than flour, and that is what makes it rich and gooey. And no, it has nothing to do with Betty Crocker's recipe, just one bite and you’ll know why this intense, gooey chocolate sensation is one of the best crowd-pleasers!! It's really easy to make, so go ahead and try it yourself.


The major difference in molten cakes from regular ones is in the way its cooked, as you want the center to be liquid. So the general rule of thumb for individual cakes is to check with a toothpick after 10 minutes of baking. If you don't like liquid-center chocolate desserts, just cook for a little longer, and you will have an incredibly moist chocolate cake.


Ingredients

6 oz semi-sweet baking chocolate (I use ghiradelli's 70% dark chocolate bar)

6 oz butter (diced, at room temperature)

3 eggs

2 tbsp cocoa powder

1/2 cup granulated sugar

1/3 cup all-purpose flour

butter for greasing ramekins


Method

Preheat oven to 350° F. Butter 6 small ramekins or muffin tins (use butter for best results, and not cooking spray) and set aside.


Melt the chocolate on low flame in a double boiler or microwave for 1 minute. Stir after 30 seconds, then add the butter and melt it again till smooth and creamy. Remember to stir after every 30 seconds so that it does not scorch or burn and remains smooth.


Sift together the flour and cocoa powder. In another bowl, beat eggs and sugar, until it starts to whiten. Stir in the melted chocolate and then the flour mixture.


Take the buttered individual ramekins, and pour in the chocolate batter. Do not fill upto the brim, keep some room to allow it to rise a little. Bake for about 8-10 mins at 350 degrees.


You can even microwave each ramekin for upto 2 mins instead of baking them. If using microwave, make sure you do only one ramekin at a time, and do not cook for more than 3 mins else it will turn hard. Check after 1 min, if the cake is still not sone, microwave in 1-second intervals until you get the desired hard crust and molten center. Molten cakes are ideal microwave cakes due to the liquid chocolate inside. It keeps them moist and soft.


Baking a Molten Cake

The outside of a molten cake will form a crust like any other cake, but the center should remain a thick liquid. Watch the tops of the cake to see how done they are. Touch the top of the cake with your finger. When done, you should be able to press down slightly on the cake and have it spring back but when you insert a toothpick into the cake, the toothpick should come out with wet batter on it. The trick is to cook the cakes as little as possible for a liquid center yet long enough that a firm cake-like exterior forms that won't fall apart when you take it out of the pan.


Serving Suggestions: Remove cakes from oven and let cool in pan for 10 minutes. Loosen the edges of the cakes with a paring knife and invert onto dessert plates. Serve warm topped with whipped cream! But I chose to serve these in the cups or ramekins itself; just dust with some confectioner's sugar and they are delicious just like that! I'm sending these to Srivalli who's hosting MEC-Cakes event this month.


Chocolate lava cakes can also be made ahead of time. Place them in an air tight container and refrigerate until needed. When ready to serve, microwave the cakes for approximately 30 seconds to melt the center again. This is a classic dessert, one of my favorites, and the microwave-recipe makes them really easy to prepare and a treat to the palette and the soul!


Similar Recipes:

Chocolate Cupcakes with Raspberry Filling

Chocolate Heart Cakes with Strawberry Topping

Warm Chocolate Muffins with Hot Sauce


Read more!

WBB-Balanced Breakfasts - The Mega Roundup!

Breakfasts are the most important meal of the day, and we often tend to neglect them completely, or just gulp something down with a cup of caffeine or juice! But I guess we all know that we need to pay more attention to our breakfasts as this is the meal that lays the foundation of your day, giving you energy and invigorating your brain cells so you can meet the challenging tasks ahead! At least during the weekends, we should have enough time to make something delicious yet wholesome for our families, right??!! So to give justice to this first meal of the day, I chose "Balanced Breakfast Meals" as this month's theme for WBB#20. I was a bit skeptical about this as the theme sounded challenging, and required some planning. So I thought I wouldn't be getting so many entries. But all you fabulous cooks out there proved me wrong, and we gathered 106 winning entries!! that's enough ideas for balanced meals for several weekends, right??!!

This indeed was a mega roundup. Thanks once again to everyone for playing along and sharing your ideas and recipes with us. The batton for the next round of hosting lands at EC's WBB-Microwave, so hope to see you all there! And now without any more rambling, let's get to the roundup!

Bread/Eggs/Biscuits
1. Asha's Classic Omelette, Pear Salsa and Toast
2. Lisa's delicious Winter Frittata
Anuzi's Curried Egg Salad on Toast
Veena's American Omelette
Deeba's Grilled Toast
Hima's Pizza Sandwich and a Fruit pizza
Radha's Healthy Sandwich
Pooja's Bread-Moong and OJ Breakfast
Kalai's Spring Vegetable Frittata
Ricki's Onion-Potato Bread with Carrot Pate
Srivalli's Jam and Cheese Sandwiches
Vandana's French Toast
Chow Vegan's Leek and Mushoom Quiche
Vaishali's Whole-wheat Challah Bread
Vani's Spicy Bean Sandwich
Margot's Guava Jelly Toast with Peanut Butter
MS's Baked Egg with Pico-de-gallo
Foodblogga's Asparagus-Mushroom-Parmesan Frittata


Pancakes/Muffins/Baked Goodies
Carol's Ricotta Crepes with Blueberry Sauce
Manju's Mango-stuffed Whole-Wheat French Toast
Rina's French Toast with Hashbrowns and Grapefruit
Revathi's Wholegrain Pancakes with Oats
Kaykat's yummy Oat and Corn Pancakes
Dhivya's Oatmeal-Raisin and Cinnamon Pancakes
Nick's Peanut-butter and Peach Bran Muffins
Saswati's Pear and Rum Souffle Omelette
Nick's Healthiest Pancakes
Ashley's Pumpkin-Pecan-Raisin Muffins
Eskay's Oatmeal and Flaxseed Muffin
Dhivya's Ricotta Pancakes with Berry Sauce
Ivy's Cypriota Olive Pies
Christina's Skim Milk Bicuits
Arundathi's Savoury Crepes
Jugalbandi's Peanut-butter Cupcakes
Michael's Blueberry Muffins with Hazelnut Streusel
Jill's Oatmeal-Raisin Muffins
Ben's Whole-wheat Breakfast Crepes
Archana's Wholewheat Pancakes with Bananas and Honey
Mansi's Low-Fat Pear and Almond Cake


Dosas/Parathas/Idlis
Mansi's Vegetable-Cheese Parathas
Shaheen's Raagi Idiappam and Potato Ishtu
Sowmya's Instant Healthy Dosa
Lavi's Oats Oothappam
Veena's Wheat Bhakhri
Miri's Appam and Vegetable Stew
A-kay's gorgeous Paneer Parathas
Red Chilli's innovative Pumpkin Idlis
Divya's Radish-Carrot Parathas
Uma's Spinach Parathas with Mango Juice
Sia's wonderful Mooli Parathas
Remya's Appam and Egg curry
Priya's Moong-Sprout Dosas
Hima's Vegetable Dosa with Pear-Pecan Chutney
Bharathy's Tender Coconut Dosas
Cham's Vegetable Pancakes
EC's Cheese Dosas
Sagari's Paper Dosas
Jan's Nutritious Adai
Jayashree's Vegetable Dosa
Raaga's Cauliflower-Cheese Tortilla Wraps
Indosungod's Sunny-side-Up Dosai
Arundati's Onion Uttapam
Sushma's Raagi Idlis
Raji's Udad Dal Kozukattai
Alamelu's Raagi Dosay and Badaami Haalu
Trupti's Palak Paneer Dosa
Renuka's Dosa Cassata
Meera's Brown Idli with Sambhar and Fruits


Fruits/Sprouts/Drinks
Bhawna's Moongdal and Lentil Chaat
Sandeepa's Whole Green Microwaved Mung
Kamala's Kambu (Bajra) Koozh
Madhuram's fiber-rich Cereals and Banana Smoothie
Jayashree's nicely Balanced Breakfast
Gaurav's Strawberry Smoothie
Sreelu's Sprouted Mung Chaat
Nandita's Hummus-Cucumber and Sprouts Wrap
Lisa's Tropical Breakfast Risotto
Meeta's Baked Beetroot with Apple-Horseradish Dip
Adria's Bean Salad
Nag's Cereal and Fruits
Arfi's Lazy Sunday Breakfast
Johanna's Blueberry-Banana-Oat Smoothie
Cenk's Homemade Granola
Suganya's Yogurt Vermicelli
Jayasree's Cornflour Roti with Sprouts Kurma


Oats/Granola/Grains/Bars
Christine's Oats with Apples and Yogurt
Alexandra's Granola with Yogurt and Raspberries
Shibani's Oat and Raspberry Bars
Jan's Coconut Oats
Laavanya's Peanut-Butter Oatmeal
Suganya's Granola Bars
Shankari's Pistachio Oatmeal
Jules's Vegan Flapjacks
Frances' Oats and Strawberry Cereals

Tidbits and Snacks
Trupti's Veg Lollipop
Madhavi's Soybean and Tofu Cutlets
Vineela's Burrito with Potato-Horsegram Gravy
Sriranjini's Macaroni with Soy Nuggets
Swati's Missi Roti, Kuku Omelette and Fig Shake
Kalva's Kaju-Vegetable and Tomato Upma
Roma's Vegetable Nutri-Pie
Cynthia's Sauteed Squash
Vaishali's Nut Bagel with Tofu Scramble
Coffee's Nutritious Poha
Caroline's Superfood Strata with Red-pepper Coulis
Kathleen's Super-Balanced Breakfasts
Garam Masala's Scrambled Tofu
Medhaa's Beet-Carrot-Potato Pancakes
Trupti's Veg Lollipops
Nanditha's Rice Balls in Lentil Soup
Mansi's Steamed Rava-Spinach-Corn Dhokla

That was an amazing roundup indeed. If I've forgotten any entry, I apologise; please send me an email and I'll add it:) Thanks again for your love and support!


Read more!

AeroGarden - Grow Herbs and Flowering Plants in Your Kitchen or Office!

Aerogarden, the name must not be unfamiliar to many of you who may have seen these cute-looking miniature garden units that boast of growing plenty of varieties or herbs and plants without much maintenance! For those of you who may not have heard of these, Aerogardens literally bring your garden into your office, kitchen or any other space you want to make green. Last year, they had introduced their first edition mainly for herbs and greens, but at a price label of $150, it was still out of reach for the general mass. But due to growing popularity and demand, they have launched a revamped version which grows not only herbs, but other decorative flowering plants as well, and has the added benefit of a price cut!!

So what is an AeroGarden? Well, its basically a NASA-tested aeroponic technology that grows plants in water, nutrients and air – so simply and easily that anyone can succeed. With the starter kit, you can choose from over 50 different seed kits, from fresh herb varieties to cherry tomatoes, salad greens, chili peppers, lettuce, mint and now even flowering varieties like petunias! Fully automated garden with built-in grow lights, no dirt, no weeds, no mess and requiring no special care except following instructions, this is like a dream-come-true for garden-lovers! AeroGarden is truly a boon for cooks like me who love to use fresh herbs and vegetables in their cooking but do not have the luxury of having a huge garden space to grow them. Some of its interesting features are:

- Available in black, white or silver-colored models
- The AeroGarden unit, 2 daylight-spectrum bulbs, preseeded bio-dome grow pod, time-release nutrients, and tending and harvesting guide with recipes
- Self-monitoring system that adjusts for best growing conditions
- Automatic alert system that notifies when more water or nutrients are needed
- Organic-based, 100% natural tool requires no dirt or natural light; grows 5 times faster than soil

The best part is this - they have recently launched "The $99 AeroGarden-3" which targets an entirely new category with an increased focus on flowers and home decor; For the first time, anyone can grow a beautiful, blooming flower garden right inside their home, office or kitchen, any time of year. This also includes more than 40 new herb, vegetable and flower seed kits, including exotic plants like Purple Basil and Mini Roses and Japanese Herbs! To know more about this, check Aerogarden-How it Works section and find out for yourself. .

Here are some more interesting Aerogarden Reviews, and from what I read, it looks like a really cool and efficient way to grow germ-free and healthy plants right insode your home! And with the new price cut, its more affordable too. I am seriously considering of buying one, and if anyone has used it before, please share your opinions with our readers. Hope it intrigues some of you too - after all, who doesn't love home-grown organic plants and herbs, right?!!


Read more!

Tips to host the Perfect Super Bowl Party

Super Bowl is around the corner, and with just about a week to go, I'm sure everyone is on a planning spree! Whether you are throwing a party at your place, or have been invited to one at a friend's place, deciding on the menu and organizing everything so you are enjoying the game rather than stressing yourself out at the last minute is always a good idea. Super Bowl is not a formal party event; it's just a bunch of sports-lovers getting together, cheering their favorites, jeering at the losers, and having fun together. So don't stress yourself out and try to be more relaxed about. I scoured the net and magazines for some fun ideas and thought it would be great to share these with you. Basically, a big-screen TV, lots of finger food, chips and salsa, and chilled frozen beers would do the trick! But if you want to play the perfect host, here are some additional tips!:)

Invite Friends and Family
Duh!! That's so obvious:) but still, no game night party can be fun when there's just the 2 or 3 of you sitting in front of the TV. To get the real excitement going, invite as many friends as you like, the more the merrier!! You need friends for cheering, passing comments, jumping up and down, shouting with glee or cussing the player for a stupid move, and finally, to share the joy of victory or lend a shoulder to cry on when your favorite team loses!! This is what makes the game more fun, right!

Food and Drinks
Once you are done with the invitations, the next thing obviously is the Food, because that's what we all love!!! To make things simpler, you can always arrange a pot-luck, and ask each or some of your friends to bring in one entree. Division of work is easier and can often work out well. But if you are like me, you'd like to take the cooking-forefront yourself, so it's necessary to plan ahead. Food needs to be simple, so sandwiches, finger-food, chips, dips, and cookies work out the best. You don't want to spend time cooking or heating up food while the others are enjoying the game!! Ordering pizzas or long foot-long subways works great too. You can also find tonnes of super-bowl recipes on Rachel Ray's emag site! You'll also find some nice recipes right on this site, in the Entrees/Snacks section:) Keep you snack table simple for this night, and leave your gourmet stuff for some other time!

Setting the Mood
It always helps if you have sme props and table settings to compliment the game. Use stuff like megaphones, miniature footballs, and whistles for calling penalties. It can be fun for the kids too. Clear your seating area of ornate furniture. Some comfortable chairs, bean-bags or a rug spread on the ground with pillows and cusions would work best! Planning simple fotball trivia games with small themed prizes add a lot more fun to the event. You can organize this before the game or during half-time to keep the momentum going. And lastly, if there are kids, it's always a good idea to keep some toys out for them so they don't feel neglected:)

Setting the Buffet Table
Game Nights always have to be buffet nights, so set two tables, one for all the appetizers, drinks and beer cans, and the other for the food. It's advisable to use aluminium containers that you can pop into the oven when required; for meat and chicken, you might even go for the warming trays. Paper plates and plastic cutlery with packs of napkins should be stacked at one end of the table. Make sure you have enough ice to survive the game, and ask people to re-use their glaases and pitchers by marking them with their initials. This can be fun too:)

Wrapping It Up
Once the game is over, and all the hugging and crying has subsided, it's time to clean up! There's nothing wrong in asking your friends to help clean up. Dump stuff into large trash bags and take their help in loading the dishwasher, as well as moving back the furniture! Trust me, you'll feel way more relaxed when all this is cleared immediately, rather than getting to it later.

Always remember that parties are a time for fun, and that includes the hosts too. Pre-planning will help a lot in keeping things organised, and you will not be stressed at the end of it all. Follow these simple tips and hope you have a blasting Super Bowl Party!!


Read more!