Fun & Healthy Halloween Recipes

halloween recipes

Halloween is a time that's often associated with sugary snacks like chocolate and candy, which can leave your kids wired on sugar and without the nutrition they need. However years of studying at an online university has taught me that just because a snack is healthy doesn't mean it has to be boring, remotely expensive or take a bunch of time to make.

Halloween provides the perfect time to sneak in healthy food items in creative ways. Your kids will have so much fun creating and eating these snacks, they won't even care they are eating fruits, veggies and whole-grains. These few examples are just a start to the many different snack options you can come up with by simply using your imagination and getting in the Halloween spirit!
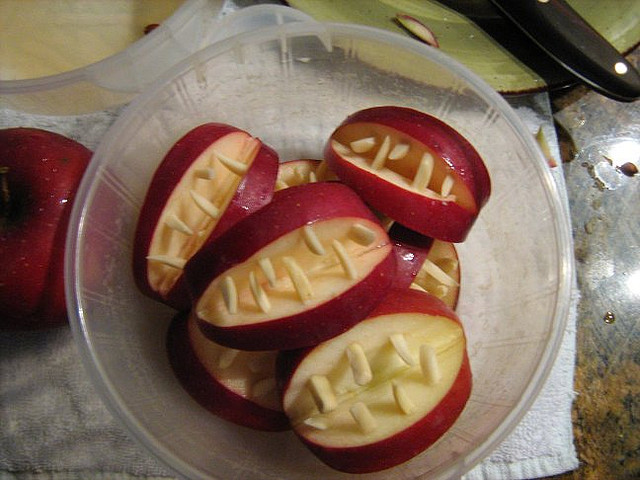
Apple Bites
These apple bites look like they can bite back, but provide the healthy vitamins and fiber from the apples, as well as the important protein from the almonds.

* First, take an apple of any kind and slice it into quarters. Be sure to remove the core and seeds from each quarter.
* Dunk the apple in a quick bath of lemon juice to prevent the apple from browning.
* Lay the apple quarter on a plate with the peel facing you.
* Cut a wedge from the skin side to create the look of an open mouth.
* Take slivered almonds and stick them into the top and bottom of the wedge all the way across to create the look of “jagged” teeth.

Ghost Toasts
A simple slice of bread and cream cheese spread can quickly become a ghostly snack by using a ghost cookie cutter. Use whole-grain bread and trade out full-fat cream cheese for low-fat or fat-free versions.

* Press a ghost-shaped cookie cutter against the bread firmly until it cuts through to the plate, and lift away.
* Take a knife and spread a light coating of cream cheese over the bread.
* Add two raisins for eyes and a third for a moaning mouth. To make this recipe even healthier, use a whole grain bread for additional fiber and nutrients, and trade out regular cream cheese for a low-fat or fat free version. You can take this idea even further by using any Halloween cutter to shape any piece of bread. Cut out two of the same shapes for making a sandwich, or keep it open faced and decorate with sliced almonds, dried fruits, cut up cheese, or any other favorite topping.


Eerie Eyeballs
Turn dried fruit into eerie eyeballs by simply layering apple rings, dried apricots and raisins on top of each other.

* Take your dried apple ring and place on a clean cutting board. Take the palm of your hand and place pressure on the ring to help make it flat.
* Next, take a dried apricot and slice it in half.
* Take the sticky side of the half and place it over the hole in the apple ring.
* Take a pair of clean kitchen sheers and cut a raisin in half.
* Place the sticky side of the raisin down on the apricot half. This will create the effect of a spooky eyeball.

Boonannas
For a potassium rich snack, try making these! If you want, you can also throw these in the freezer for a frozen snack when your kids get home from school!

* Peel a ripe banana. Cut the banana in half and dip it in a glass of orange juice.
* Move the banana directly from the glass to a zip lock bag full of coconut shakes. Shake the bag gently until the banana is completely covered in coconut.
* Press two currants into the banana towards the top and stick a few chocolate chips for the eyes. and stick on a Popsicle stick for easier eating.

As you can see, including healthy snacks this October into your kids' meals can be quick and easy-- while still providing a fun holiday snack time experience. Even if your children still go out and trick or treat, or take part in other holiday goodies, you can rest assured in knowing that your children are still getting healthy snacks along the way!

This is a guest post written by Tracy, who has always had a deep passion in ensuring quality education is available for all who want to attend college. Tracy understands all online colleges aren't created equal and for the past few years has helped spread the message of the level of education, convenience and opportunity Online University can provide students.


Read more!

Blueberry Orange Sour Cream Bread

blueberry-bread-recipe

Sweet breads are a great way to enjoy the goodness of a cake-like dessert which can be relished by itself, or even be paired with tea or coffee. Fruit breads are not only easy to make, they can be really versatile to incorporate seasonal ingredients. This week we enjoyed baking this Blueberry Bread, made even more delicious by addition of citrusy Orange flavor, and made soft by using Sour Cream. The bread not only smells great, it can fill your kitchen with a refreshing aroma that lingers long after you've finished your delicious loaf of Blueberry Orange Bread.

Ingredients
1 cup whole grain flour
2 cups all-purpose flour
1/2 cup sour cream
1 stick butter - at room temp
1 1/2 cup cane sugar
4 large eggs
Zest of 2 large oranges
3/4 cup fresh orange juice
2 tsp vanilla
4 tsp baking powder
1 tsp salt
1 cup blueberries

Method
Spray 2 bread pans generously and keep aside. Preheat oven to 350 deg F.

Cream butter and sugar in large bowl. Beat in eggs one at a time, then orange zest, orange juice and vanilla.

Thoroughly combine flour, baking powder and salt in medium bowl and add to creamed butter mixture. Slowly add the sour cream and mix everything well to form an even blend.

Fold in the blueberries, taking care not to mix too hard so s to break them.

Bake in the middle rack for 45-50 minutes at 350 F, until the loaves swell up and pass the toothpick test. When done, let them rest on the wire rack till they cool to room temp. Only then attempt to cut the loaf into slices.

Store in a cool, dry container and you can relish this bread for up to a week. It tastes great 2-3 hours after baking, as the orange and blueberry juices slowly sink in to make a moist flavorful bread!

This has now become one of our cherished breakfast recipes. Enjoy it yourself either with your morning tea, or serve them as a sweet treat at your next Tea party!


Read more!

Cherry & Peach Upside Down Cake

peach-cherry-cake

Though fall and baking go hand in hand, sometimes, its more comforting to bake whenever you want to, using whatever ingredients you have at hand. Just like this Upside down Peach and Cherry cake which was a great way to use the bag of stone fruits lying on my kitchen counter. Foodblogga's story behind his cake is much more interesting though, as its an adapted version of her grandma's 70-year old recipe! It's a fresh and colorful cake that will fill your house with a scintillating aroma, as the beautiful cake bakes in the oven. The peach and cherry compote that covers the cake will linger on your tastebuds long after the piece of cake is gone!


Fresh Cherry and Peach Upside-Down Cake
Makes 8 servings

Ingredients
1/2 cup butter (8 tablespoons)
1 cup brown sugar
3/4 cup fresh cherries, pitted and halved
3-4 small, ripe peaches, pitted and halved
1 cup flour, sifted
1 teaspoon baking powder
1/8 teaspoon salt
3 eggs, separated
1 cup granulated sugar
5 tablespoons orange juice
2 teaspoons orange zest
1 teaspoon pure vanilla extract

Method
Place a rack in the center of the oven, and preheat to 350 degrees F.

Place butter in a 9-inch-round baking pan, and place inside of a warm oven until melted, about 5 minutes. Remove from oven, and sprinkle brown sugar evenly over the butter. Add the peach halves, cut side down, then add the cherry halves, filling in all of the nooks and crannies.

In a medium bowl, combine sifted flour, baking powder and salt, and stir.

Using a hand mixer, in a metal or glass bowl, beat egg whites at high speed until fluffy. Set aside.

In a separate bowl beat egg yolks with sugar at medium speed until creamy. Add orange juice, orange zest, and vanilla extract, and beat well. Add the flour mixture to the creamed mixture, and beat until well combined. Fold in the egg whites with a rubber spatula. Pour cake mixture evenly over the fruit, and smooth with the spatula.

Bake for 40-45 minutes, or until cake is golden and a toothpick inserted into the center comes out clean. Place on a wire rack to cool for 10 minutes. Run a blunt knife around the edges of the pan to loosen the cake. Invert carefully onto a plate. Serve warm or at room temperature.


Read more!

Classic Scottish Shortbread

scottish shortbread

Scotland is as well known for its Food, as it is for its history, folklore and festivals. Some people think Scottish food is not for the faint-hearted - they use varieties of meat and spices that might not gel with everyone. However, when it comes to Desserts, they are a safe bet, and Scottish pastries are famous for being not overly-sweet, with a flaky crust and nice fresh fruit filling. But even if someone is not familiar with Scottish food, I am sure they will know about the Scottish Shortbread. [photo courtesy of Rita Maas via Fine Cooking]

Shortbread is the simplest of preparations, flour, butter and sugar, and also one of the fastest cookies that I have baked! The end result relies heavily upon the flavor of the butter, so don't compromise here, and DO NOT think about calories when you bake a Shortbread. This recipe is adapted from The Edinburgh Book of Plain Cookery Recipes. It has loads of authentic recipes that you will love.

Scottish Shortbread Recipe

Ingredients
1-1/2 cup flour
1/2 cup rice flour
8 ounces salted butter, softened at room temperature
1/2 cup superfine sugar
1 tsp vanilla extract

Method
Combine all ingredients in the bowl of a standing mixer, paddle until the dough clumps together. You can even do this by using a ladle or your hands. Break the butter into chunks and slowly mix it in with the flour to form the dough.

Press the dough in a 8-9 inch cake pan, pressing it gently to attain 1-2 inch thickness, depending on how you like your shortbread. Line the pan with heavy aluminum foil, letting the foil extend over two sides of the pan, then press the dough. This will help to lift out the shortbread after it is baked, and cut it into pieces.

Prick with a fork to decorate if you wish. Bake in a 350 degree oven for 25 to 35 minutes, or until cooked through and lightly browned. Cut into appropriate sized pieces while it’s still warm, and allow to cool completely before removing it from the pans.

Related Recipes
Pistachio Shortbread Cookies
Chocolate Nutella Cookies
Coconut Cookies with Vanilla Icing


Read more!