BBQ & Grilling Tips - Perfect for Memorial Day

bbq-grilling-tips-memorial-day
As we approach summer, its time to get out your barbecue grills and start having some fun with them, especially around Memorial day weekend! Whether its camping or just a backyard bbq, there is always a thrill attached to grilling; in fact we absolutely love it! But as easy as it sounds, grilling is not everyone's forte. I am sure all of you must have had some good and bad experiences with barbecues; it serves to be one of the best events for a pot luck, meeting with friends, chilling out and having fun. A few simple pointers go a long way in making a bbq successful. I'd like to share with you some common tips and techniques about grilling, what bbq grills work best, what food to grill and how to make sure you are doing it right, followed by a beautiful Memorial Day BBQ Menu to get you going!

I'm no expert at bbq, but we've had our fair share of grilling, and it has taught me a few tricks that will make an outdoor barbecue less stressful and more fun. If you are interested in knowing how bbq attained such a craze in US, here's a brief history about how bbq's originated. The first step, of course, is to buy a bbq-grill, and though there is a wide variety of products available to suit your style, I love the charcoal grill, especially for small-scale grilling.

Buying a Grill: Though charcoal grills are still most widely used, I'd recommend a Gas or an Electric Grill (especially for first-timers) as they are the easiest to use and produce nice results. They burn hot enough to make distinct "char" marks and add the smokey flavor to your food. If you have to use charcoal, for picnics or camping, try to avoid the self-igniting briquettes. Though easy to burn, they can give the food a petroleum flavor.

Basic Tips & Techniques: Grilling is a lot of fun, but not everyone can manage a great job the first time. Here are some general techniques to help you in your outdoor grilling venture.

1. Prepare the fire a half hour or more before grilling. For quick lighting, use a chimney starter with crumpled newspaper in the bottom and briquets or charcoal above. Or stack the charcoal in a pyramid shape and light with a liquid or electric starter.

2. First make sure that the grill is medium-hot. For most of the grilling recipes, the fire should be medium-hot with a single, even layer of coals lightly covered with grey ash. Less heat, and there'll be no "smoky " falvor to your food, too much high heat, and you'll practically burn and blacken your food! Also, adding a handful of aromatic wood chips such as mesquite, hickory, alder, or fruitwood chips over the coals can add whole new dimension of flavor to your food.

3. Make sure to clean the grill with a wire brush, and remove any previous residue food bits from the grill, before putting anything new onto it. Any burnt food chunks sticking to your main entree can so kill the taste!

4. Place the food item to be grilled on the clean grill. Be sure to put the presentation side down first on the grill in order to utilize the intense initial heat which guarantees the beautiful "grill marks" on the side that is visible on serving. Refer to some chicken breast recipes, if you like, for more pointers.

5. As the item cooks, move it around slowly so that it does not burn, and turn it over when it is cooked half-way. This is where the art of grilling comes in. The goal to perfect grilling is to give the item delicious dark brown (not black) grill marks on both sides and remove it from the heat without overcooking it.

6. To reduce the chance of overbrowning, apply tomato- based sauces or those containing sugar or other sweeteners only during last 20 to 30 minutes of grilling. For grilling paneer, do not marinade for more than 20 mins before grilling or it will turn out soggy.

7. Try to space food so that it does not stick to each other and also shift items from the center of the hot grill over to the sides as you keep placing new food in the center. Closing the lid speeds up the cooking time and increases the smoky flavor, but also increases the likelihood of a small fire, so be careful. And remember to open the small air vent on the top of the grill if you decide to close the lid.

8. Use a pair of gloves and tongs to remove hot food from the grill to prevent yourself and your guests from getting burnt.

9. Position your grill according to the direction of the wind so that coal burns quickly and at the same time, your guests don't have to put up with the heat! A corner of the backyard is not always the best spot; wind governs where you place your grill!

10. Last but not the least, be prepared! Keep a suppy of charcoal and igniter fluid handy so you don't have to run in the middle of the bbq to get more coal. Once it loses heat, its very hard to bring it back to the right temperature again. Also, keep a first-aid kit handy for accidents and burns, especially with children around. Try to maintain a safe distance between the grill and the serving area to prevent random accidents.

Direct & Indirect Cooking
There are two methods to grill food over a gas, wood, charcoal, or infrared - direct or indirect cooking. based on what you are cooking, you should choose the method that the recipe demands.

With the direct heat method, the food item is placed directly over the flame or coals. This method exposes the food item to very hot temperatures, often in excess of 500F or 900F for infrared grills. This is the fastest way to cook food items on a grill. The food items are cooked by the flames and radiant heat coming from the heat source of the grill.This method is ideal for grilling steaks, hamburgers, hot dogs, sausage, pork chops and skewers. All veggie and fruit skewers use this method. The food items must be carefully monitored so as to not burn them.

With the indirect heat method, you place the food item so that it is not directly over flames or coals. This is done by having the fire or coals on only one section of the grill and placing the food items on the other side. In a charcoal grill, it is best to place a foil pan of water under the food to keep it from drying out. This method is best for large cuts of meat or bone-in poultry. It allows the food to cook all the way through without burning or charring on the outside of the meat.

Best Items to Grill

Vegetables: Capsicum, Potatoes, Onions, Corn, Eggplant, Zucchini
Fruits: Pears, Pineapples, Apples, Grapes, Apricots, Plums,Peaches
Meat: Steak, Chicken, Fish, Sausage

I hope this article can help some amateurs like me to host a successful barbecue event, or at least enjoy the experience of grilling. Once you master it, grilling can be wonderful and addictive! Use these basic tips and techniques to make your outdoor grilling & bbq a fun and relaxing event this summer!

Memorial Day Vegetarian BBQ Recipes:
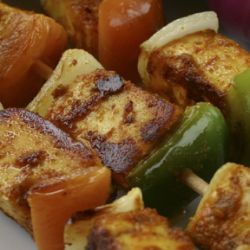
Paneer Tikka with Mango Dressing
Grilled Pesto Burgers
Grilled Asparagus Salad
Grilled Peaches with Chipotle Raspberry Sauce


Read more!

Healthy Wild Rice Salad

wild-rice-salad
Eating healthy does not always mean feeding on the same old-fashioned salad and boiled vegetables. In fact, I recently discovered a new card on the diet table - Wild Rice! For those who have never seen it, purple rice is one of the several varieties of colored rice. Anthocyanins are the color pigments that give many foods their deep rich red, blue, and purple colors. The risk of several chronic health conditions, including atherosclerosis, is also lowered by regular consumption of such foods. They have a slightly nutty flavor that might need some getting used-to, but their distinct color and nutritive content far outweigh this fact, making them a great addition to salad recipes. I added some cooked garbanzo beans, and some onions, walnuts and tomatoes to make this delicious Wild Rice Salad which could very well be served as a side dish.


Wild Rice Salad with Chickpeas

Ingredients
2 cups wild rice - cooked
1 cup garbanzo beans
2 tbsp red or white onions - chopped
3 green onions - sliced
1/2 cup walnuts
1/4 cup firm tomatoes - chopped
2 green chillies - chopped
Salt and pepper - to taste
1/4 cup olive oil
1 Tbsp red wine vinegar (or lemon juice)
fresh cilantro - to garnish

Method
Heat half of the olive oil in a small skillet on medium high heat. Add the chopped onions and saute till mildly soft and brown in color. Next add the garbanzo beans and add about 2 tbsp water. Then add the cooked wild rice, salt, pepper and green chillies and let it cook for about 5-7 mins. Once done, let the rice cool to room temperature.

Whisk together the remaining olive oil and red wine vinegar to make the dressing.

In a large bowl, gently mix together the cooled cooked rice, green onions, chopped tomatoes, walnuts and the dressing. Garnish with some chopped cilantro, and serve the Wild Rice salad as a healthy and delicious side dish!

Related Recipes
Summer Salad with Poppyseed Dressing
Sprouted Beans & Lentil Salad
Vegetarian Mexican Salad


Read more!

Remake Libby's Jingle & Win $10,000!

If you have a young kid in the house, I am sure you are used to singing rhymes and jingles.And if you love doing that, then here is your chance to get your creative juices flowing, remake an existing jingle, and win $10,000!! Yes, Libby's and Jewel have teamed up to discover a new Libby's jingle by declaring a one-of-its kind contest with a huge grand prize. It’s easy to enter and it can be a fun family activity!

Libby’s knows the importance of family meal time and encourages families to make it a point to get back to the table to spend quality time together. This spring, Libby’s Fruits and Vegetables, along with singer-songwriter Jewel, is also encouraging families to come together and show off their creativity by re-making the iconic Libby’s jingle.

To enter the contest go to the Libby’s Table Facebook page, click on the Jingle Contest tab and upload your video version of the jingle. You will have until May 13 to submit your entries, at which point Libby’s special guest judge, Jewel, will select five finalists to compete for America’s vote to win the $10,000 grand prize, $2,500 second place prize, and $1,000 third place prize.

Jewel, who is working on a new children’s album, starring in Bravo's new music competition series Platinum Hit, and preparing for a baby boy's also thrilled to be a part of this exciting contest, and will be recording her own version of the Libby’s jingle, which will debut in September. So if you love the concept of having dinner together with your family, and have a fun idea to sing and share the sentiment, you know what to do.

Visit Libby's on Twitter @LibbysTable, Hashtag #LibbysJingle and online at www.getbacktothetable.com for more details. Good Luck, and may the best jingle win!


Read more!

Carrot Cookies- Healthy & Tasty Treats

carrot cookies
With a toddler growing up in your house, you do end up baking cookies and treats a bit more often than you'd like, because no matter how healthy you'd try to feed them, sometimes, there is just no alternative to a cry for cookie:) luckily for moms like us, it is possible to introduce a healthier twist to your desserts too, just like these wholesome Carrot Cookies courtesy of Whole Foods. With amazingly nutritive ingredients like whole grain flour, oats, nuts, apples, carrot and banana, you will fell good about feeding them to your kids, and it would do no harm to sneak a couple bites for yourself too!

Carrot and Walnut Cookies
Makes about 24 cookies

Ingredients
1 cup raw unsalted walnuts
1 cup old-fashioned rolled oats
1 cup raisins
1/2 cup whole wheat pastry flour
1 1/4 teaspoons baking powder
1 1/4 teaspoons ground cinnamon
1/2 teaspoon ground ginger
2 carrots, grated
1 apple, grated
1 very ripe banana, peeled and mashed
1/4 cup apple juice

Method
Preheat oven to 350°F. Line 2 baking sheets with parchment paper.

Combine walnuts, oats and raisins in a food processor and pulse until finely ground. Transfer to a bowl and stir in flour, baking powder, cinnamon and ginger.

Add carrots, apples, banana and apple juice and stir until combined. Drop by rounded tablespoons an inch apart on the prepared baking sheets, making about 24 cookies.

Press down on each cookie with the back of a fork to flatten them slightly. Bake until tops and bottoms are lightly browned, about 20 to 25 minutes. Rotate the baking tray by 180 degrees, midway, to ensure even heating.

You can store these cookies in an airtight jar for almost a week, and they'll stay nice and fresh. Its a great way to get some good vitamins and fiber into your toddler's body by means of fruits and flour. A guilt-free treat that is perfect for mommy and baby!

Related Recipes
Soft & Chewy Oatmeal Raisin Cookies
Heart-Healthy Buckwheat Cookies
No-Bake Thumbprint Cookies


Read more!